A Practical Guide to Room Tone and Ambience
Learn how to choose between recorded, harvested, generated room tone and ambience beds, with scored criteria, a worked example and advice for each situation.
 Tomas Lindqvist

Every dialogue edit is a splice between two moments that were never meant to sit next to each other. The words may join cleanly, but the air behind them rarely does: an air conditioner cycles, a distant truck passes, a microphone drifts a few centimeters closer to a window. Room tone and ambience are the two materials sound editors use to hide those joins and to give a scene a believable sense of place. Room tone is a recording of a location's background sound with nobody speaking; ambience is the atmosphere of a place, such as traffic, birds or a crowd, often added in post to build the sound of a scene.
This guide is for producers, marketers and in-house video teams who commission interviews, brand films, podcasts, training content and short documentaries, and for the editors who have to make that material sound continuous. It is organized as a decision framework. Most projects end up choosing between a small number of ways to get clean, consistent background sound, and the right choice depends on what was recorded, how noisy the location was, how much time the edit has and where the finished piece will be heard.
We will define the options, set out the criteria that separate them, score them side by side, and then give a recommendation for the situations that come up most often. Along the way you will find a worked example with realistic numbers, the recording habits that make every later decision easier, and the mistakes that turn a smooth edit into a choppy one.
Room Tone and Ambience: Two Materials With Different Jobs
People often use the two terms interchangeably, and that confusion causes real problems in the edit. They are related but they solve different problems, and a well-built soundtrack usually needs both.
Room tone is the glue under dialogue
Room tone is the background sound of a location with everyone silent and still, recorded through the same microphone, in the same position and with the same settings that were used for the dialogue. It captures the specific signature of that space at that moment: the hum of the lighting ballasts, the rumble of a ventilation duct, the faint reflections of the walls, the self-noise of the preamp. Its main use is filling gaps and smoothing background jumps between edited lines. When an editor removes a cough, tightens a pause or cuts from take three to take seven mid-sentence, room tone is the material that makes those edits inaudible.
Because it is so specific, room tone is not interchangeable between locations or even between setups in the same location. Moving the boom from a wide shot to a close-up changes the ratio of direct voice to room, and it changes the character of the background as well. That is why the common convention is to record 30 to 60 seconds of tone at each location and each setup, not once per day.
Ambience is the atmosphere around the scene
Ambience, sometimes called atmos or backgrounds, is an atmosphere track such as traffic, birds, wind in trees, an office murmur or a busy restaurant. It is distinct from room tone. Where room tone is meant to be unnoticed, ambience is a deliberate creative layer: it tells the audience where they are, sets a mood and can carry the viewer across a picture cut. Ambience may be recorded on location as wild sound, pulled from a library, or built from several layers in the mix. Our guide on building a sound effects library that editors actually use covers how studios organize this kind of material so it can be found quickly.
The practical rule is simple. Room tone repairs the dialogue track so that it is continuous; ambience shapes the world around it. You cannot fix a dialogue edit with a birdsong bed, and you cannot create a sense of place with room tone alone.
- Room tone
- The background sound of a location recorded with everyone silent and still, through the dialogue microphone at its dialogue settings.
- Ambience (atmos)
- An atmosphere track such as traffic, birds or crowd, used to establish place and mood; distinct from room tone.
- Fill
- Room tone laid into gaps and edit points on the dialogue tracks so the background never drops out.
- Noise floor
- The combined level and character of all steady background sound in a recording, including equipment self-noise.
- Crossfade
- An overlap where one clip fades out while another fades in, used to hide the join between two pieces of tone or dialogue.
- Wild track
- Sound recorded on location without picture, such as room tone, ambience or an effect.
Why Background Continuity Decides Whether an Edit Sounds Professional
Viewers rarely notice good dialogue editing. They notice bad editing immediately, even if they cannot say why. The tell is almost always the background rather than the words.
Consider what happens at an edit point. The outgoing clip ends with a particular hiss and hum at a particular level. The incoming clip starts with a slightly different hiss, perhaps a little louder because the speaker leaned back and the operator raised the gain. Without treatment, the listener hears a small step in the background at every cut. Over a ten-minute interview with dozens of edits, those steps become a rhythm of bumps that makes the piece sound assembled rather than recorded.
Worse still is digital silence. If an editor removes an unwanted sound and leaves the gap empty, the background drops to absolute zero for a fraction of a second. On headphones this sounds like the audio has briefly cut out, which it has. On a laptop speaker it is less obvious, but the pumping effect of background appearing and disappearing still registers as something wrong. Filling gaps with digital silence is one of the most common mistakes in amateur edits, and it is entirely avoidable.
Room tone solves both problems. Laid under the full dialogue edit, not only in the gaps, it gives every clip the same bed so that small differences in the production background are masked by a continuous, consistent layer. Ambience then sits on top to give the scene its character and, where needed, to hide residual unevenness in a way that sounds intentional.
The practical lesson is that listeners forgive a slightly noisy background far more readily than one that keeps changing. Consistency matters more than silence.
This matters for commercial work in particular. Brand films and executive interviews are often played on a large conference-room screen or through a venue system, where background steps that hide on phone speakers become obvious. Large rooms and powerful speakers expose problems that small speakers conceal.
The Options for Getting Clean, Continuous Background Sound
When an editor sits down with a dialogue edit, there are four realistic sources for the tone and background they need. Most real projects use more than one, but it helps to understand each on its own before combining them.
Option A: Dedicated room tone recorded on location
The crew stops, everyone freezes, and the sound recordist captures 30 to 60 seconds of the room with the dialogue microphone exactly where it was and every setting unchanged. The recording is slated and labeled with the scene and setup. This is the gold standard and the material the editor hopes to find in every folder.
Option B: Tone harvested from the production takes
When no dedicated tone exists, or when it runs short, the editor searches the dialogue takes for pauses: the moment before "action", the breath between questions, the second after the subject finishes speaking. These fragments, sometimes only a fraction of a second long, are strung together and crossfaded to build usable fill. Harvested tone matches the dialogue perfectly because it is the dialogue recording, but there is usually very little of it and it is often contaminated by breaths, clothing movement or crew noise.
Option C: Matched or generated tone using repair software
Modern audio repair tools can analyze the background in a short clean section and generate a longer bed that matches its spectral profile, or learn the background and apply it across gaps. iZotope's documentation, including its guidance on room tone and ambience matching, describes this approach in detail. Generated tone can rescue a project with almost no usable material, but it is a reconstruction of the background's average character rather than a recording of it, and it can sound slightly static or synthetic on long stretches.
Option D: Cleaning the dialogue and covering it with ambience
The fourth route treats the problem from the other direction. The editor reduces the production background with noise reduction until the differences between clips are too small to hear, then lays a designed ambience bed underneath so the scene still sounds like somewhere. This is common when the location was noisy and inconsistent, for example a street interview or a trade show floor, and it overlaps with the work described in our guide on getting sound effects and Foley right, since the ambience layer is often assembled like any other effects track.
A related case is dialogue that cannot be saved at all. When a line is unusable for reasons beyond background noise, the answer may be replacing the dialogue entirely. Replaced lines need room tone and ambience even more than production lines, because studio recordings are dry and must be made to sit in the location. Our article on ADR and dialogue replacement decisions covers that process.
The Criteria That Separate the Options
Choosing well means being explicit about what matters for this particular project. Six criteria do most of the work.
1. Match accuracy
How closely does the fill sound like the background behind the dialogue? Tone recorded through the same microphone at the same settings matches by definition. Harvested tone matches perfectly in character but may carry contamination. Generated tone matches the average spectrum but not the small movements of a real room. A designed ambience bed does not attempt to match the production background at all; it replaces it.
2. Quantity and flexibility
How much usable material is available? Thirty to sixty seconds of clean tone is enough to fill a long interview without audible repetition, because an editor can pull different sections for different gaps. A few seconds of harvested tone, by contrast, has to be reused repeatedly, and looping a few seconds of tone so the repetition is audible is one of the classic giveaways of a rushed edit.
3. Editing time
Dedicated tone is fast to use: the editor drops it on a fill track and gets on with the cut. Harvesting is slow and fiddly. Generation is quick once the clean reference is found, but it needs careful listening. A clean-and-cover approach can be the slowest of all because it involves both repair and sound design.
4. Risk of audible artifacts
Heavy noise reduction can leave dialogue sounding thin, watery or phasey, particularly on sibilants and breaths. Generated tone can sound too even. Harvested tone can carry clicks and breaths into the fill. Dedicated tone carries almost no artifact risk as long as it was recorded cleanly.
5. Dependency on the shoot
Some options are only available if the crew did its job on the day. Dedicated tone has to be captured before the crew moves; once the set is struck and the lights are off, the exact sound of that room at that time is gone. The other options can be applied after the fact, which is why they exist.
6. Creative control in the mix
Finally, how much freedom does the approach leave for shaping the final sound? Keeping room tone on its own fill tracks and ambience on separate ambience tracks gives the mixer independent control over both, which is exactly what you want when a scene needs to feel busier, calmer or more intimate. The same separation principle applies to automated level control; our guide to ducking and sidechain compression explains how background layers can be pulled down under speech without riding them by hand.
Scored Comparison of Room Tone and Ambience Approaches
The table below rates each option against the six criteria on a five-point scale, where 5 is best for the project. These are editorial judgments based on how each technique behaves in typical dialogue work, not measured results; a specific location or tool can move a score up or down by a point.
| Criterion | A: Recorded room tone | B: Harvested tone | C: Generated or matched tone | D: Clean and cover with ambience |
|---|---|---|---|---|
| Match accuracy | 5 | 5 | 3 | 2 |
| Quantity and flexibility | 5 | 1 | 4 | 4 |
| Editing time | 5 | 2 | 4 | 2 |
| Low artifact risk | 5 | 3 | 3 | 2 |
| Independence from the shoot | 1 | 3 | 4 | 5 |
| Creative control in the mix | 4 | 3 | 3 | 5 |
| Total (out of 30) | 25 | 17 | 21 | 20 |
Two things stand out. First, recorded room tone wins comfortably on every criterion except one, and that exception is decisive: it only exists if someone captured it on the day. Second, the three fallback options score within a few points of each other, which reflects reality. None of them is a clean substitute for the real thing, and the best choice among them depends heavily on the specific problem, which is why the recommendations later in this guide are organized by scenario rather than by total score.
Notice also that the options are not mutually exclusive. A typical rescue job might use a short piece of harvested tone as the reference for generated fill, then lay a light ambience bed across the scene to cover whatever small differences remain. Treat the scores as a guide to which technique should carry the most weight, not as a single winner.
Option A in Depth: Recording Room Tone on Location
If your team controls the shoot, this is where the decision is really made. A minute of discipline on set saves hours in the edit, and no amount of software fully replaces it.
How to capture tone that the editor can actually use
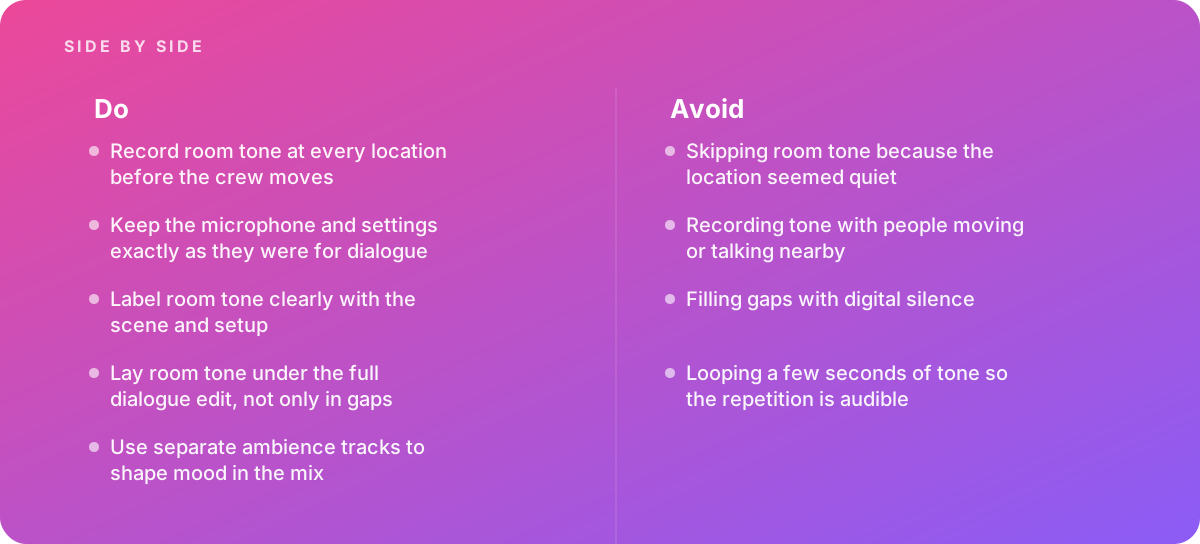
Record room tone at every location before the crew moves, and ideally at every significant setup change within a location. Keep the microphone and settings exactly as they were for dialogue: same mic, same position, same gain, same filters, same recorder track. If the scene used a boom and two lavaliers, record tone on all three, with the lavaliers still on the talent if possible, because a lavalier on a shirt sounds different from one sitting on a table.
Ask everyone to stay where they were during the take and hold still. Leave lights, fans and air handling in the same state they were in during the dialogue, even if they are noisy, because the goal is to match the dialogue background rather than to record the quietest possible room. If the air conditioning was switched off for takes, keep it off for tone; if it could not be switched off, leave it running.
Label room tone clearly with the scene and setup, both in the recorder metadata and with a verbal slate at the start, such as "Room tone, scene 4, interview close-up, boom and lav one." A folder of unlabeled thirty-second files is only slightly more useful than no tone at all.
What gets in the way
The most common reason tone goes missing is social rather than technical. Asking a room full of busy people to stand silently for a minute feels awkward, and on a tight schedule it is the first thing to be dropped. The second most common reason is the assumption that a location seemed quiet enough not to need it. Skipping room tone because the location seemed quiet is a mistake, because even a quiet room has a signature, and the gap between that signature and digital silence is exactly what the listener hears at an edit. Recording tone with people moving or talking nearby is almost as bad, since the editor then has to clean the tone before it can be used. Our guide to field recording decisions covers the wider habits that make location sound usable, and the microphone choices that shape the background are covered in microphone selection and placement.
Pros
- Matches the dialogue background exactly, because it is the same mic, position and settings.
- Thirty to sixty seconds gives enough variety to fill long edits without audible loops.
- Fastest option in the edit room and carries almost no artifact risk.
- Also useful as a clean noise profile if the dialogue needs light noise reduction later.
Cons
- Only available if captured on the day, before the crew moves or conditions change.
- Costs a minute or two of crew time per setup, which feels expensive on tight schedules.
- Useless if people moved, talked or changed equipment settings during the recording.
- Does not provide atmosphere; the scene may still need separate ambience.
Options B and C in Depth: Harvesting and Rebuilding Tone
When dedicated tone is missing, the editor's first move is usually to look for it inside the recordings that do exist, and the second is to reconstruct it.
Harvesting tone from takes
Every take has a head and a tail: the seconds before the subject speaks and after they stop. Interviews also contain natural pauses while the subject thinks. A patient editor listens through the takes from the same setup, marks every clean pause, copies those regions to a separate track and joins them with short crossfades until there is a usable stretch of fill. The most useful sources are the heads of takes after the slate and before the question, because the room tends to settle in that moment.
The limitations are practical. Pauses in speech are often occupied by breaths, lip noise, a chair creak or a producer's whisper. The clean pieces may be only half a second long, which means the same tiny fragment gets reused dozens of times. Short fragments repeated in quick succession create a pattern the ear picks up, especially if the background contains any distinctive element such as a ticking clock or a fluorescent buzz. Good harvesting varies the fragments, reverses some of them where the background is steady enough to allow it, and staggers the crossfades so that no two joins line up.
Pros
- A perfect tonal match, since it comes from the same recording as the dialogue.
- Needs no special software, only an editor with patience and good monitoring.
- Often available even on shoots where nobody thought about tone.
Cons
- Usually only a few seconds of clean material exists per setup.
- Reusing short fragments risks an audible loop.
- Slow to assemble and easy to contaminate with breaths and movement.
Generating or matching tone with repair software
Repair suites can analyze a short clean section of background and synthesize a longer bed with the same spectral profile, or fill silent gaps automatically with a matched background. Digital audio workstations used for dialogue work, such as Pro Tools, whose publisher Avid provides dialogue editing guides and workflow documentation, make it straightforward to place that generated material on a dedicated fill track under the edit.
The results depend on the quality of the reference. A second of clean background produces a much better model than a second with a breath in it. Generated tone also tends to reproduce the average of the background rather than its natural variation, so on long gaps it can sound slightly too smooth. Editors usually get the best result by generating tone in moderate lengths, varying the reference sections, and keeping the generated fill at or slightly below the level of the real background so it supports the dialogue rather than drawing attention.
Pros
- Produces as much fill as the edit needs from a very short reference.
- Fast once a clean reference is identified.
- Can rescue projects where no dedicated tone was recorded.
Cons
- Models the average background, so it can sound static on long stretches.
- Quality depends entirely on finding a clean reference section.
- Cannot reproduce intermittent sounds that were part of the real room.
Option D in Depth: Cleaning Dialogue and Building an Ambience Bed
Some locations are simply too inconsistent for tone matching to work. A café where the espresso machine runs in some takes and not others, a street corner with passing buses, an exhibition hall with a public address system: in these cases the background changes so much between takes that no single fill can match all of them. The answer is to reduce the variation and then give the scene a new, consistent atmosphere.
How the approach works
The editor first uses noise reduction and spectral repair to bring each clip's background down to a similar, lower level. The goal is not silence, which would sound unnatural and damage the voice, but a background low enough that the differences between clips fall below what the listener notices. Then a designed ambience bed is laid underneath: a café atmosphere, a street at the right time of day, an exhibition hall murmur. Because the ambience runs continuously across the edits, it masks the joins, and because it matches what the picture shows, it sounds intended.
This technique borrows directly from how spaces are treated in the physical world. Sound masking in offices works on the same principle, raising a steady, neutral background so that intermittent sounds become less distracting. In post-production, the ambience bed plays that masking role while also establishing place.
Where it goes wrong
The two failure modes are over-processing and a mismatched bed. Pushing noise reduction too hard strips the natural room sound from the voice and leaves it sounding thin or underwater. Choosing an ambience that is too busy, too loud or from the wrong kind of place makes the viewer aware of the soundtrack. A calm corporate interview filmed in a glass-walled office does not need a bustling open-plan murmur behind it. A light touch on reduction, combined with a restrained ambience bed and, where the voice sounds too dry after cleaning, a small amount of matched reverb, gives the most natural result. Our article on reverb and delay done properly covers how to put a cleaned voice back into a believable space.
Pros
- Works even when the location background changed dramatically between takes.
- Gives full creative control over the sense of place in the mix.
- Can make a noisy, uncontrolled location sound continuous and intentional.
Cons
- The slowest route, combining repair and sound design.
- Heavy noise reduction can leave dialogue thin or watery.
- A poorly chosen ambience draws attention to the soundtrack.
Worked Example: Filling an Interview Film Across Three Locations
The following project is illustrative, built to show how the options combine and how the time adds up. It is not a real client job, and the timings are reasonable planning figures rather than published benchmarks.
A company commissions an eight-minute brand film built from interviews with three employees, each filmed in a different location: a quiet meeting room, a workshop floor with machinery running, and an outdoor courtyard. Each location has two setups, a wide and a close-up, recorded on a boom and a lavalier. The edit ends up with around 120 dialogue edit points, many of them mid-sentence tightening where the subjects repeated themselves.
| Location | Tone recorded on the day | Background character | Approach chosen | Planning estimate for fill work |
|---|---|---|---|---|
| Meeting room | 45 seconds per setup, both mics, labeled | Steady air handling, low hum | A: recorded tone under the full edit | About 30 to 45 minutes |
| Workshop floor | None; the crew ran out of time | Machinery cycling on and off between takes | D: light cleaning plus workshop ambience bed, with B for short gaps | About 3 to 4 hours |
| Courtyard | 20 seconds on the wide only, with a passing conversation in the middle | Wind, distant traffic, birds | A for the clean part of the tone, C generated from it for the close-up, plus outdoor ambience | About 1.5 to 2 hours |
The meeting room is the easy case. The editor lays 45 seconds of recorded tone on a fill track under the whole interview, pulls different sections into each gap so nothing repeats, and crossfades each join over a few frames. The background becomes seamless in well under an hour.
The workshop is the hard case. With the machinery switching on and off, some takes have a loud, rhythmic background and some are nearly quiet. No tone was recorded, so the editor cannot fill from a matching source. The chosen approach is to reduce the machinery noise moderately in the noisier takes, lay a continuous workshop ambience underneath that includes machine sound at a consistent level, and use harvested fragments only for the handful of small gaps where the ambience alone does not cover the join. It works, but it takes several times longer than the meeting room and involves creative decisions the client needs to approve.
The courtyard falls in between. The first twelve seconds of the recorded tone are clean before a conversation passes; the editor uses that section directly for the wide shot, and uses it as the reference to generate matched fill for the close-up, which sounds slightly different because the boom was closer. A light outdoor ambience with birds and distant traffic then runs under both setups to hold the scene together.
The lesson from the numbers is straightforward. The minute or two it would have taken to record tone in the workshop would have saved roughly three hours of editing time and a round of client review. That ratio, a few minutes on set against hours in post, is typical, and it is the strongest argument for making room tone a non-negotiable line on every call sheet.
One caution from this example applies widely: watch for generated tone laid across a long gap with nothing else on top. Even a good match can sound too even over more than a few seconds. Break it up with sections of real tone where possible, or place a light ambience bed above it.
Laying Tone and Ambience Correctly in the Session
Whichever option provides the material, the way it is placed in the session decides whether it works. A few conventions are worth adopting on every project.
Fill under the whole edit, not just the gaps
Lay room tone under the full dialogue edit, not only in gaps. When fill runs continuously on its own track beneath the dialogue, the small variations in each production clip's background are masked by a steady layer, and the edit points become much harder to hear. Filling only the holes leaves the background changing at every splice, which is precisely what the tone was meant to hide.
Keep separate tracks for separate jobs
Use dedicated fill tracks for room tone, grouped with the dialogue from the same setup, and separate ambience tracks for atmosphere. Keeping them apart lets the mixer adjust mood without disturbing continuity. If the director wants the courtyard to feel quieter, the ambience comes down while the fill stays where it is. Use separate ambience tracks to shape mood in the mix, and resist the temptation to bake atmosphere into the dialogue tracks, where it can no longer be controlled.
Crossfade every join
Every join between two pieces of tone, and between tone and dialogue, needs a crossfade. Short fades of a few frames are usually enough for steady backgrounds; busier backgrounds may need longer ones so the change in texture is gradual. Hard cuts in fill tracks produce clicks and small steps that undo the work.
Avoid audible repetition
Never loop a few seconds of tone so the repetition is audible. Pull from different parts of the recording for each gap, and where the material is short, vary the order and the crossfade positions. Distinctive events in the background, such as a single bird call or a door closing, should be removed from the fill or used once only.
A useful habit before the mix, solo the fill and ambience tracks together and listen to them on their own from start to finish. Repetition, clicks and level jumps that the dialogue hides on a normal playback become obvious in isolation, and fixing them at this stage is quick.
The space itself matters too. If you are recording in a room you can treat, a well-controlled acoustic reduces the amount of room sound in the dialogue and makes every later step easier; our guide to room acoustics for recording covers what makes the biggest difference.
Recommendations for the Situations You Will Actually Face
With the options and criteria in place, the choice for most projects comes down to what was recorded and how consistent the location was. Here are the recommendations for the scenarios that come up most often.
You control the shoot and the location is reasonably quiet
Record dedicated tone at every setup, with every microphone, at dialogue settings, and label it. Plan on 30 to 60 seconds each. In the edit, lay it under the full dialogue as a continuous fill and add ambience only where the scene needs character. This covers most interviews, podcasts filmed on location and training content.
Verdict For controlled shoots, recorded room tone is the only option worth planning around. Treat the other three as insurance, not strategy, and put tone capture on the call sheet for every setup.
The footage is shot and nobody recorded tone
Start by harvesting clean fragments from the heads and tails of takes. Use the best of them directly for short gaps and as the reference for generated fill for longer stretches. Lay a light, appropriate ambience bed over the scene to cover residual differences. Budget more editing time than you would for a project with recorded tone, and expect the result to be good rather than perfect if the location was variable.
If the dialogue edits already sound choppy, no room tone was recorded, or a noisy location has to sound continuous, this is the point to bring in specialist help. An experienced dialogue editor will find usable tone in places a general video editor would miss, and will know when a scene is better served by cleaning and covering than by forcing a match. Our audio editing and production service handles exactly this kind of repair and continuity work.
The location was noisy and changed between takes
Accept that a perfect match is not achievable, and move to the clean-and-cover approach: moderate noise reduction to bring the takes closer together, a continuous ambience that fits the picture, and harvested or generated fill for any small gaps the ambience does not cover. Keep the reduction light and let the ambience do the work of continuity.
Verdict For inconsistent, noisy locations, stop chasing a tone match and design the background instead. A restrained ambience bed over lightly cleaned dialogue sounds more natural than heavily processed audio forced into silence.
The piece is heading for a large room or a demanding audience
Content that will play through a venue system, a cinema or a high-quality conference room, and anything that will be judged by an audio-literate audience, deserves recorded tone plus careful fill work and a properly mixed ambience layer. Choosing a studio with dialogue editing experience matters here; our guide to choosing an audio studio explains what to ask before you commit.
In short, when the playback environment will expose every flaw, combine recorded tone, continuous fill and a dedicated ambience layer, and have the fill tracks reviewed in isolation before the final mix.
Mistakes That Undo Good Room Tone and Ambience Work
Most background problems in finished work trace back to a short list of habits. Knowing them is the fastest way to raise the standard of an in-house team.
- Skipping tone because the room seemed quiet. Quiet rooms still have a signature, and the difference between that signature and digital silence is exactly what the listener hears at an edit.
- Recording tone with people moving or talking nearby. Contaminated tone has to be cleaned before it can be used, which defeats the purpose. Ask for a full minute of stillness and be willing to repeat it.
- Changing the microphone or settings for the tone recording. Tone captured on a different mic, at a different gain or from a different position does not match the dialogue it is meant to support.
- Filling gaps with digital silence. The background dropping to nothing is one of the most obvious signs of an amateur edit.
- Looping a few seconds of tone. The ear finds patterns quickly; repetition turns fill into a noticeable rhythm.
- Using ambience to fix dialogue continuity. Ambience can help mask joins, but it cannot replace fill on the dialogue tracks.
- Over-processing noisy dialogue. Aggressive noise reduction damages the voice more than a steady, moderate background ever would.
A persistent belief is that modern repair software makes recording room tone unnecessary. It does not. Repair tools can generate convincing fill, but they need a clean reference to work from and they reproduce the average background rather than the real one. Recorded tone remains faster, more accurate and lower risk, and it also gives the software a better reference when repair is needed.
The same principles apply beyond film and video. Recorded meetings and webinars suffer from background jumps when they are edited for publication, and the capture setup in those rooms largely decides what an editor can do later. Game and interactive audio treat ambience as a system rather than a track, looping and layering beds in response to the player, and the same concern with avoiding audible repetition is handled in engines and middleware.
Whatever the medium, the goal is the same: a background that never draws attention to itself unless you want it to. Record room tone every time you can, keep it separate from ambience, lay it under the whole edit and reserve the rescue techniques for the projects that genuinely need them.
Where this comes from
The figures and practices above come from the sources listed.
Working on something like this?
We take on Audio Editing & Production work for teams who want it done once, properly. Tell us what you are building and we will tell you honestly whether we are the right studio for it. Start a project.
Where to go next
Spotted something wrong? Report an error on this page. We correct on the page and say what changed.