Speeding Up After Effects Previews: The Decisions That Matter
Learn which After Effects settings, proxies, pre-renders and cache choices speed up previews, how to diagnose the bottleneck and which fix fits each job.
 Tomas Lindqvist

Speeding up After Effects previews is mostly a question of decisions, not purchases. A preview is After Effects rendering every frame of a composition on the fly so you can watch it play, and how quickly that happens depends on the resolution you ask for, the footage the program has to decode, the effects it has to calculate, what it already has cached and how it is allowed to use your processor, graphics card and memory. Many projects that feel like they need a new workstation are sluggish because of settings, habits and project structure that nobody has looked at.
This matters to anyone whose schedule depends on motion work. For an animator, a preview that takes ninety seconds to build instead of ten means fewer iterations on timing, fewer experiments with easing and more guesswork. For a producer or marketing lead, it means review rounds that drag, overtime near delivery and a temptation to blame the hardware budget. Slow previews slow every creative decision in the project, because nearly every decision in motion design is made by watching something move.
This guide is written as a decision framework. It lays out the six main levers you can pull, the criteria that decide between them, a scored comparison, and a recommendation for the situations studios actually run into. The aim is that you can open a slow project, diagnose where the time is going and choose the cheapest fix that solves it, rather than toggling every setting you have read about and hoping.
Where Preview Time Actually Goes in an After Effects Project
Before choosing a fix, it helps to know what After Effects is doing when you press the spacebar. For every frame in the preview range, it has to read and decode any footage on visible layers, apply each layer's effects in stack order, transform and composite the layers from the bottom up, handle nested compositions recursively, apply motion blur, depth of field and 3D rendering where they are switched on, and then hold the finished frame in RAM so it can play back in real time. Only once enough frames are cached does playback run at full speed.
That chain gives you five places where time is spent, and each responds to a different lever:
- Pixels. Every operation scales with the number of pixels processed. A 3840 x 2160 frame has four times the pixels of a 1920 x 1080 frame, so almost every effect has roughly four times the work to do. Preview resolution and Region of Interest attack this directly.
- Decoding. Long-GOP camera codecs such as H.264 and HEVC store most frames as differences from other frames, so the software has to reconstruct them before it can use them. That decoding load is heavy when you scrub or play from arbitrary points. Proxies and transcoding attack this.
- Effect math. Blurs with large radii, glows, noise-based distortions, particle systems, third-party plug-ins and 3D renderers can dominate render time on their own. Pre-rendering and restructuring attack this.
- Recomputation. If frames that have not changed are rendered again, time is wasted. The RAM and disk caches attack this, as long as they have room and a fast drive.
- Resource use. How After Effects uses CPU cores, GPU acceleration and memory is set in preferences and project settings. Multi-Frame Rendering and memory allocation attack this.
The practical lesson is that different slowdowns have different causes. A comp that stutters because it contains a 10-bit HEVC drone clip will not get much faster from a bigger disk cache, and a comp that is slow because of a stacked glow on forty text layers will not be fixed by proxies. Diagnose first, then choose.
Finding the expensive layer
Recent versions of After Effects include a Composition Profiler and a render time readout in the Timeline panel that show how long each layer and effect takes to render for the current frame. If your version has it, turn it on before changing anything. If it does not, use the older method: solo or hide layers one at a time, or switch individual effects off with the fx toggle, and watch how the frame render time changes in the Info panel. Ten minutes of this usually reveals that one or two layers account for most of the render cost, which tells you exactly which lever to reach for.
The Options on the Table and the Criteria That Decide Between Them
Almost every performance technique in After Effects falls into one of six families. They are not mutually exclusive, and a well-run project uses several, but each has a different cost and a different payoff.
- Preview resolution and fast previews. Previewing at Half, Third or Quarter resolution, using Adaptive Resolution or Draft 3D modes, limiting the preview to a Region of Interest, and skipping frames in the Preview panel.
- Proxies and transcoded footage. Lower-resolution or easier-to-decode stand-ins that replace heavy footage while you work, swapped back to the originals for the final render.
- Precomposing and pre-rendering. Isolating expensive work into its own composition, rendering it once to an intermediate file and using that file in place of the live comp.
- Cache management. Sizing the RAM available to After Effects, putting the disk cache on a fast drive with enough space, and purging it deliberately rather than letting it fill.
- Multi-Frame Rendering and GPU acceleration. Letting After Effects render several frames at once on multicore processors and use the graphics card for supported effects.
- Project hygiene. Removing redundant effects, collapsing duplicate work into adjustment layers, closing unused projects and panels, turning off motion blur and depth of field while blocking, and keeping the project structure lean.
The six criteria
To choose among these, score each against the criteria that matter in a working studio:
- Speed gain
- How much faster previews get when the lever addresses the actual bottleneck. Some levers produce dramatic gains in the right situation and nothing in the wrong one.
- Setup time
- How long it takes to put in place, from a single click to an hour of transcoding.
- Reversibility
- How easily you can undo it or switch back to full quality. A toggle is fully reversible; a baked pre-render is not until you re-render.
- Quality risk
- The chance the lever causes a mistake that reaches the client, such as a proxy left on in the final render or a pre-render made before the last design change.
- Storage cost
- How much disk space it consumes. Proxies, pre-renders and disk cache all trade storage for speed.
- Fit for the task
- Whether it helps the job you are doing right now. Timing and blocking need responsive playback; look development needs accurate pixels.
No lever wins on every criterion, which is why the choice depends on situation. A useful rule of thumb: start with the levers that are fast to set up and fully reversible, and move to the ones that cost storage or create a quality risk only when the cheap levers do not fix the bottleneck.
Scoring the Options for Speeding Up After Effects Previews
The scorecard below rates each lever from 1 (weak) to 5 (strong) on the six criteria. For quality risk and storage cost, a higher score means less risk or less storage used, so higher is always better. The scores are editorial judgments based on typical studio work, not benchmark measurements; your mileage depends on footage, effects and hardware.
| Option | Speed gain | Setup time | Reversibility | Quality risk | Storage cost | Best fit |
|---|---|---|---|---|---|---|
| Preview resolution and fast previews | 4 | 5 | 5 | 4 | 5 | Timing, blocking, any heavy comp |
| Proxies and transcoded footage | 4 | 2 | 4 | 3 | 2 | Camera footage, 4K and above, long-GOP codecs |
| Precompose and pre-render | 5 | 3 | 2 | 2 | 3 | Finished heavy effects, particles, 3D |
| Cache management | 3 | 4 | 5 | 5 | 2 | Repeated previews of stable sections |
| Multi-Frame Rendering and GPU | 3 | 5 | 5 | 5 | 5 | Multicore machines, supported effects |
| Project hygiene | 4 | 3 | 4 | 4 | 5 | Every project, especially inherited ones |
Three patterns stand out. First, preview resolution is the closest thing to a free lunch: it is instant, fully reversible and helps nearly every comp, which is why it should be your default while animating. Second, pre-rendering offers the biggest speed gain but carries the most risk, because a baked file does not update when the underlying comp changes. Third, Multi-Frame Rendering and cache settings score well on safety but modestly on gain, because they are about using what you have efficiently rather than removing work. They are worth setting correctly once and then leaving alone.
Preview Resolution, Fast Previews, and Region of Interest
The resolution menu at the bottom of the Composition panel controls how many pixels After Effects renders for the viewer. At Half, it renders every second pixel in each direction, so a 1920 x 1080 comp is processed at 960 x 540, which is a quarter of the pixels. At Quarter, it is a sixteenth. Most effects scale close to proportionally with pixel count, so the gain is large. Auto adjusts resolution to the viewer zoom level, which is sensible if you routinely work at 50 percent zoom but confusing if you forget it is on.
The Preview panel adds more control. You can set a separate resolution for preview playback, choose whether to skip frames (a skip of 1 renders every other frame, which halves the render work for a quick sense of timing), and decide whether to cache before playback or play while caching. Fast Previews, available from the button at the bottom of the Composition panel, offers Adaptive Resolution, which drops resolution automatically while you drag a value or scrub, and Draft 3D for 3D scenes. Region of Interest lets you draw a rectangle so only that part of the frame is rendered, which is very effective when you are refining one element in a busy composition.
Matching resolution to the task
The key habit is to change resolution based on what you are judging. When you are setting keyframes, checking rhythm against music or blocking a sequence, you are judging time, not pixels, and Half or Quarter resolution is entirely adequate. When you are judging typography, fine lines, grain, color and edges, you need Full resolution, but usually only for a few frames at a time, which you can check with a single-frame render or a short work area. Keep the work area tight: previewing a four-second move inside a sixty-second comp should never render sixty seconds.
Typography deserves special care. Small type and hairline strokes look soft at Half resolution, which can mislead you into over-sharpening or adjusting weight. If you are building type-heavy sequences, the guidance in getting text animators in After Effects right pairs well with a routine of checking type at Full resolution on a handful of hold frames, rather than previewing whole animations at Full.
Watch out: the most common self-inflicted slowdown is running full-resolution previews to check timing.
- Timing does not need every pixel; it needs frames to play in real time.
- A full-resolution preview of a 4K comp processes sixteen times the pixels of a Quarter preview for the same judgment.
- Set the Preview panel resolution to Auto or Half as your default and switch to Full only when you are judging image detail.
One subtlety: some effects do not scale perfectly with resolution, and a few look different at reduced resolution because their parameters are measured in pixels. After Effects compensates for most built-in effects, but third-party plug-ins vary. If a blur or glow looks noticeably different between Half and Full, treat Half as a timing tool only and confirm the look at Full before sign-off.
Proxies for Heavy Footage
A proxy is a lower-resolution or easier-to-decode stand-in that After Effects uses in place of the original footage while you work. The original stays linked, and you choose whether each item uses its proxy or its source with a toggle in the Project panel. At render time, the Render Settings dialog lets you choose whether to use proxies, so the final output can be made from the full-quality originals.
Proxies solve two different problems. The first is size: working with 6K or 8K camera files in a 1080p deliverable wastes time processing pixels that will be discarded. The second is decoding: long-GOP codecs such as H.264 and HEVC, especially 10-bit variants from mirrorless cameras and drones, are expensive to decode frame by frame, and scrubbing through them can stall even when the resolution is modest. An intraframe codec such as Apple ProRes or Avid DNxHR stores every frame independently and decodes far more easily, which is why transcoding to ProRes 422 Proxy or ProRes 422 LT at reduced resolution is a common proxy recipe.
Setting up proxies in practice
You can create proxies inside After Effects by selecting footage and choosing Create Proxy, which queues a render, or make them in Adobe Media Encoder or another transcoder and attach them with Set Proxy. For large batches, a transcoder is usually more convenient because it can run overnight or in the background. Keep the proxy frame rate and duration identical to the source, and keep the aspect ratio the same; a proxy that differs in length or frame rate will cause timing mismatches that are painful to track down. Store proxies in a clearly named folder next to the source media so they travel with the project.
Proxies work best when footage is locked early. On a project where the edit changes daily and new clips keep arriving, the transcoding step becomes a recurring chore. In that case, transcode only the heaviest clips, or transcode to a full-resolution intraframe codec instead, which removes the decoding bottleneck without the swap-back step.
Pros
- Large gains on high-resolution and long-GOP footage, both in playback and scrubbing
- The original footage stays linked and can be restored with one toggle
- Render Settings can ignore proxies for final output, so quality is preserved
- Transcoding can run in the background or overnight
Cons
- Setup time and disk space for every clip that needs one
- Little benefit when the bottleneck is effects rather than footage
- Risk of a final render made with proxies if Render Settings are wrong
- Mismatched frame rate or duration causes subtle timing errors
The quality risk is manageable with one rule: build an output module template and render settings template for finals that set proxy use explicitly to ignore proxies, and use that template every time. A final that ships at proxy resolution is the classic embarrassing mistake, and it is entirely preventable.
Precomposing and Pre-Rendering Heavy Effects
Precomposing moves layers into their own composition, which then behaves as a single layer in the parent. On its own, precomposing does not make anything faster; the nested comp still renders every frame. What it does is isolate expensive work so you can treat it separately: preview it on its own, cache it, or pre-render it. Good project structure also makes it easier to see where the cost sits, which is the subject of precomposing and project structure decisions in more depth.
Pre-rendering goes a step further. You render the precomp to an intermediate file, typically a high-quality intraframe codec with alpha if needed (ProRes 4444 or a PNG or OpenEXR sequence are common choices), and then use that file in place of the live comp. After Effects has a Pre-render command in the Composition menu that sets a post-render action to import the result and substitute it, so the swap happens automatically when the render finishes. From then on, the parent comp reads a finished file instead of recomputing a particle system, a 3D render or a stack of heavy blurs on every frame.
What to pre-render and when
The best candidates are elements that are expensive and finished: a background loop with fractal noise and several blurs, a particle burst that has been approved, a 3D logo reveal that will not change, or a lens effect applied over a locked section. The worst candidates are elements still in development, because every change means a new render, and forgetting to re-render means the old version ships. Particle work is a common reason to pre-render; see particle effects in motion design for how simulation choices affect render cost in the first place.
Name pre-rendered files with a version number and the date, and keep the live precomp in the project, disabled or parked in a clearly labeled folder, so you can return to it. A simple convention such as bg_loop_v03_prerender tells anyone opening the project that the file is baked and which version it came from.
Pros
- The largest speed gain available when one element dominates render time
- Frees the parent comp for fast iteration on everything else
- The intermediate file can be reused across edits, versions and aspect ratios
- Makes final renders faster as well as previews
Cons
- Baked results do not update when the source comp changes
- High-quality intermediates can be large, especially with alpha
- Adds a versioning burden: someone has to track which pre-render is current
- Pre-rendering too early wastes render time on work that will change
A middle path between live and baked is to keep the heavy element in a precomp and use the disk cache to hold its frames. That works well for a single session, but cache is purged when you change anything upstream, and it does not travel with the project to another machine, so for elements that are truly locked, a pre-render is more dependable.
Disk Cache, RAM, and Multi-Frame Rendering
After Effects keeps rendered frames in two places. The RAM cache holds frames for immediate playback; the green bar above the timeline shows which frames are cached in RAM. The disk cache, set in Preferences under Media and Disk Cache, stores rendered frames on a drive so they can be reused later in the session or even after reopening the project, shown as a blue bar. When you preview a section you have already rendered and nothing has changed, After Effects can pull frames from cache instead of rendering them again.
The disk cache is only useful if it has room and lives on a fast drive. A cache on a nearly full system drive, or on a spinning hard disk, can make things worse rather than better. Frame sizes add up quickly, as the table below shows. These are raw, uncompressed frame sizes calculated from width, height, four channels and bit depth; they show the scale involved, not the exact footprint on disk.
| Frame size | Bit depth | Approx. size per frame | 900 frames (30 s at 30 fps) |
|---|---|---|---|
| 1920 x 1080 | 8 bpc | 8.3 MB | 7.5 GB |
| 1920 x 1080 | 16 bpc | 16.6 MB | 14.9 GB |
| 3840 x 2160 | 8 bpc | 33.2 MB | 29.9 GB |
| 3840 x 2160 | 16 bpc | 66.4 MB | 59.7 GB |
| 3840 x 2160 | 32 bpc | 132.7 MB | 119.4 GB |
Two lessons follow. First, bit depth is a performance decision as well as a color decision: working in 32 bpc doubles the memory load of 16 bpc for every cached frame, so use it when a linear workflow or HDR output requires it, not by default. The trade-offs are covered in color management in After Effects. Second, a disk cache of a few gigabytes fills almost immediately on 4K work. Put it on a dedicated fast SSD, ideally an internal NVMe drive, give it a generous allocation, and leave headroom so the drive never runs full.
Memory allocation
Under Preferences, Memory and Performance, you choose how much RAM to reserve for other applications; the rest is shared by After Effects and other Adobe applications. If you work with a browser, a chat client and Media Encoder open, reserve enough for them so the system does not start swapping to disk, which is far slower than any cache. Adobe publishes minimum and recommended memory, processor, GPU and disk configurations for each release in the Adobe Help Center's After Effects system requirements; check your machine against the recommended column, not the minimum, before concluding your settings are at fault or that your hardware is.
Multi-Frame Rendering and GPU acceleration
Multi-Frame Rendering lets After Effects render several frames at the same time on multicore CPUs, rather than one frame after another. It applies to previews as well as final renders, and it is on by default in versions that support it. Its benefit depends on the number of cores, available memory and whether the effects in the comp support it; effects and plug-ins that are not compatible can force frames to render sequentially. If a comp previews no faster on a machine with many cores, an older third-party plug-in or a heavy expression chain is a likely culprit.
Expressions matter here more than many animators realize. An expression that samples other layers or loops through many keyframes runs on every frame, and complex expression networks can slow both previews and multi-frame rendering. Converting finished expressions to keyframes, or simplifying them, is often a better fix than any hardware change. After Effects expressions done properly covers how to write expressions that stay light.
GPU acceleration is set in Project Settings under Video Rendering and Effects, where you choose Mercury GPU Acceleration (Metal, CUDA or OpenCL, depending on the platform) instead of software only. Many built-in effects are GPU-accelerated; many third-party effects rely on their own GPU code or run on the CPU. Check that GPU acceleration is actually enabled on each machine, because projects opened from another system can carry a software-only setting.
Project Hygiene Before Hardware
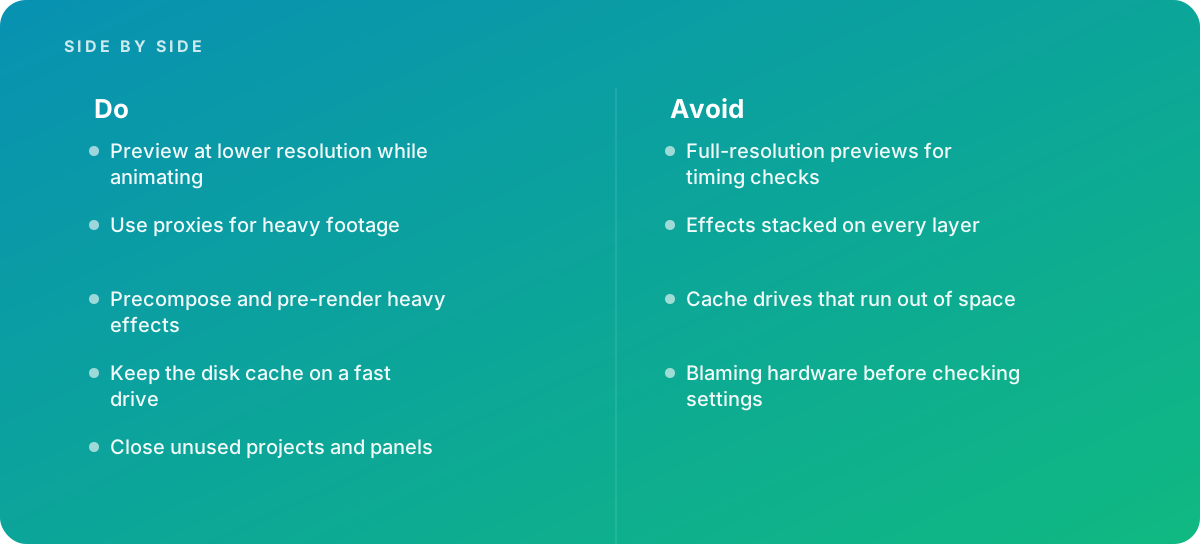
Many slow projects are slow because of accumulated habits rather than any single setting. Effects stacked on every layer, duplicated heavy effects that could be applied once on an adjustment layer, motion blur switched on during blocking, unused footage still decoding, dozens of hidden layers carrying effects, and several projects open in the background all add load. None of these are visible in the final frame, which is why they build up unnoticed.
The habits that pay back most
- Apply once, not forty times. If forty text layers share the same glow, apply the glow once to an adjustment layer or to the precomp that holds them. That turns forty effect instances into one.
- Keep motion blur and depth of field off while blocking. The composition-level Motion Blur and 3D Depth of Field switches let you turn them off globally without losing per-layer settings; turn them back on for review renders.
- Use Draft quality on heavy layers. The quality switch on each layer can be set to Draft while you work, which reduces sampling quality for that layer only.
- Delete what you do not use. Reduce Project and Remove Unused Footage clear out clutter. Hidden layers with effects still carry a cost in some situations and add confusion always.
- Close unused projects, compositions and panels. Each open Composition or Layer viewer can request renders. Closing viewers you are not using keeps After Effects focused on the one you are.
- Keep the structure legible. A clear folder and naming system makes it obvious where expensive work lives. After Effects project organization lays out a system that scales to team work.
Hygiene also includes the discipline of blaming hardware last. When a project is slow, the reflex is to ask for a faster computer. Sometimes that is the right answer, but it is rarely the first one. Settings, codecs and structure are free to fix, and fixing them also improves performance on the new machine if one does arrive later.
- Check preview resolution and work area. Set Half or Auto, tighten the work area to the section you are judging, and confirm Fast Previews is on.
- Profile the frame. Use the Composition Profiler or solo layers to find the one or two layers that dominate render time.
- Check the footage. Look at the codec and resolution of heavy clips in the Project panel. Long-GOP or oversized footage points to proxies or transcoding.
- Check the effects. Look for stacked or duplicated heavy effects, incompatible plug-ins and complex expressions on the expensive layers.
- Check settings. Confirm GPU acceleration in Project Settings, Multi-Frame Rendering in preferences, bit depth, and the disk cache location and free space.
- Choose the lever. Match the fix to the bottleneck: proxies for footage, pre-render for finished heavy effects, restructuring for duplication, cache and settings for the rest.
This triage takes fifteen minutes or less on most projects, and it makes the next decision obvious. It is worth doing at the start of any inherited project, and again whenever a project that used to preview smoothly slows down.
A Worked Example: Rescuing a Sluggish 4K Product Spot
The following is an illustrative example, a composite built to show the reasoning, not a client project, and its numbers are plausible rather than measured. Picture a 30-second product spot at 3840 x 2160, 30 frames per second, so 900 frames. It combines 10-bit HEVC drone footage for the background, a product shot filmed in 6K, a fractal-noise light-leak overlay with two blurs, twelve animated type layers each carrying its own glow and drop shadow, and a particle burst at the logo reveal. The project is set to 16 bpc. The animator reports that a full-resolution preview of the whole spot takes several minutes to build and scrubbing stalls on the drone clip.
Diagnosis
Profiling a representative frame shows three costs dominating: the light-leak overlay, the twelve separate glows, and decoding the drone footage. The particle burst is heavy but only runs for about three seconds. The disk cache is 20 GB on the system drive, which has 35 GB free, so it fills and starts evicting frames partway through the spot; the table above shows that 900 frames at 4K and 16 bpc are close to 60 GB uncompressed.
Decisions and their effect
- Preview resolution to Half for animation work. Pixel count drops from 8,294,400 to 2,073,600 per frame, a quarter of the work for most effects. Instant, zero risk.
- Transcode the drone clip to ProRes 422 Proxy at 1920 x 1080 as a proxy. A few minutes of background transcoding removes the decoding stall when scrubbing.
- Consolidate the twelve glows. Move the type layers into a precomp and apply one glow and one drop shadow to it, turning twenty-four effect instances into two.
- Pre-render the light-leak overlay. It is approved and does not change, so render it once to ProRes 4444 and substitute it. It is used across the full 900 frames, so the saving compounds.
- Leave the particle burst live for now. The client may still ask for changes to the reveal, and it only covers about 90 frames. Use a tight work area when refining it.
- Move the disk cache to a dedicated NVMe drive with room to spare. Allocate enough that a full pass of the spot at Half resolution fits, and purge it deliberately between major changes.
The outcome to expect from changes like these is not a single number, because it depends on hardware and effects, but the direction is clear: the animator can now preview timing at Half resolution in near real time for most of the spot, scrubbing no longer stalls, and full-resolution checks are reserved for short ranges. The pre-render and the glow consolidation also shorten the final render, which matters on a spot that will go through several revision rounds. The only new risk introduced is the pre-render, which is managed by naming it with a version number and keeping the live comp in the project.
Which Lever to Pull: Recommendations by Situation
The scorecard shows the general picture; the right choice depends on the job in front of you. Here are the situations studios run into most, with the lever that should come first.
Blocking and timing a new animation
You are judging rhythm, spacing and easing, not pixels. Drop preview resolution, turn off motion blur and depth of field at the composition level, keep the work area tight and skip frames if you just need the broad shape of a move. Everything here is instant and reversible. The detail of how timing choices land is covered in easing and timing curves, and none of it requires Full resolution to judge.
Verdict For timing work, lower preview resolution and composition-level switches are the whole answer. Proxies or pre-renders at this stage are usually premature; restore full quality only for short look checks.
Footage-heavy edits and composites
If the project is built on camera footage, especially 4K and above or long-GOP codecs, proxies or transcoding come first. Match the proxy frame rate and duration to the source, and lock render templates so finals ignore proxies. If the edit is still changing daily, transcode only the heaviest clips.
Effects-heavy design pieces
If the time goes into glows, blurs, noise, particles or 3D, restructure first: consolidate duplicate effects onto adjustment layers or precomps, simplify expensive expressions and check plug-in compatibility with Multi-Frame Rendering. Pre-render only what is approved and stable. For recurring pieces such as templated campaigns, a reusable rig built with performance in mind saves time on every version; build the rig so heavy effects sit in one precomp that every variant shares.
Verdict For effects-heavy work, restructure before you bake. Consolidate and simplify first, then pre-render the elements that are both expensive and approved, and keep the live comps parked in the project with versioned names.
Long projects with many revision rounds
Invest in cache and settings once: a dedicated fast cache drive with generous space, correct memory reservation, GPU acceleration confirmed, Multi-Frame Rendering on. Then adopt a pre-render and versioning convention so baked elements are tracked. Repetitive steps such as creating proxies, swapping pre-renders or purging caches can also be scripted; automating After Effects with scripts explains when that effort pays off.
Inherited or third-party projects
Run the fifteen-minute triage before touching anything creative. Inherited projects are where stacked effects, orphaned footage, 32 bpc settings nobody needed and disabled GPU acceleration tend to hide. Fixing structure here often makes more difference than any single setting.
When Settings Stop Being Enough
There is a point at which settings and structure have done their work and the project is still too slow to be productive. Signs that you have reached it: previews at Half resolution with a tight work area still fall well short of real time for most of the timeline; the profiler shows no single dominant layer but a broadly heavy comp; the machine is below the recommended configuration for your After Effects version; or memory is exhausted and the system is swapping even with other applications closed.
At that point, the options are hardware, workflow or help. Hardware upgrades should target the bottleneck you found: more RAM when caching and memory pressure are the problem, a faster or larger NVMe drive when the disk cache and footage reads are, more CPU cores when Multi-Frame Rendering is working but saturated, and a stronger GPU when GPU-accelerated effects dominate. Buying the wrong upgrade is common when the diagnosis was skipped.
Workflow changes include splitting a long piece into sections rendered separately, moving 3D work to a dedicated 3D application and bringing in rendered passes, or restructuring the project so different team members work on different comps. Scoping matters too: an ambitious look with dense particles, 3D and 4K delivery on a short schedule needs render time planned in from the start. Scoping animation projects covers how to budget for that.
Bring in help when projects become too slow to work on and the internal fixes have not solved it. An experienced motion team can audit the project, restructure it, set up proxies and pre-render pipelines, and carry the render load on machines built for it. If your team is spending more time waiting for previews than making decisions, a partner such as our animation and motion graphics service can take on the heavy lifting while your team focuses on the creative calls.
Whatever route you take, the principle stays the same: find where the time goes, match the lever to the bottleneck, prefer fixes that are instant and reversible, and treat baked or hardware solutions as deliberate decisions rather than reflexes. Projects that follow this discipline stay responsive from the first blocking pass to the last revision, and every creative decision along the way gets made faster.
Where this comes from
- Adobe Help Center — After Effects User Guide
- Adobe Help Center — After Effects system requirements
The figures and practices above come from the sources listed.
Working on something like this?
We take on Motion Graphics & Animation work for teams who want it done once, properly. Tell us what you are building and we will tell you honestly whether we are the right studio for it. Start a project.
Where to go next
Spotted something wrong? Report an error on this page. We correct on the page and say what changed.