Non-Destructive Editing, Done Properly
A phase-by-phase playbook for non-destructive editing: layered masters, adjustment layers, masks and smart objects that turn client revisions into quick fixes.
 Imogen Clarke
Non-destructive editing is the practice of building an image edit out of layers, masks, adjustment layers and smart objects so that every decision stays reversible. The original pixels stay intact underneath, and each change sits on top as something you can switch off, reshape or dial back. The finished image looks the same as a destructively edited one. The difference is what happens on the day a client asks for a change.
That day always comes. Clients revise: warmer skin, a less aggressive background cleanup, the logo moved two centimeters left, the sweater back to its real color because the buyer noticed. If the file was flattened as it went, every one of those requests means redoing work that was already done. If it was built non-destructively, most of them take a few minutes of adjustment. This matters to marketing teams and business owners who pay for revisions, to in-house designers who inherit files from freelancers, and to retouchers whose margins depend on not doing the same job twice.
This playbook walks through non-destructive editing as a sequence of phases, from setting up the working file to generating flattened deliverables, with the goal, actions, outputs and checks for each. It is written around Photoshop because that is where most layered retouching happens, but the same principles apply in Affinity Photo, Capture One and any editor that supports layers and masks.
The Non-Destructive Editing Playbook at a Glance
Before the detail, here is the whole procedure in order. Each phase produces something the next one depends on, and skipping one usually shows up later as a file that cannot be revised cleanly. The phases are deliberately separated so that retouching, color and composition never get tangled on the same layer.
- Set up the working file Choose a layered working format, preserve the original capture, and establish the naming and folder structure before any editing starts.
- Make the base conversion recoverable Do raw development as parametric settings or as an editable raw smart object, never as a one-way bake.
- Build a readable layer stack Create named groups for cleanup, retouching, color and finishing so every later change has a place to go.
- Retouch on separate layers Heal, clone and shape on empty or duplicated layers above the original, never on the background.
- Apply color and tone through adjustment layers Use Curves, Hue/Saturation, Selective Color and similar layers, limited by masks rather than selections that get discarded.
- Transform and filter through smart objects Scale, warp, liquify and sharpen inside smart objects so the source data survives repeated changes.
- Review and revise from the master Send proofs, record feedback against named layers, and make changes in the layered file.
- Generate flattened deliverables Export every final size and format from the approved master, and archive the master alongside them.
A practical way to think about it: the working file is the source code, and JPEGs, PNGs and flattened TIFFs are compiled builds. Nobody edits the compiled build. When something needs to change, you change the source and rebuild.
Phase 1: Set Up the Working File Before Touching a Pixel
Goal: a file that can hold every future decision without losing anything, and a place to keep it.
Actions
Start by deciding the working format. PSD and layered TIFF both preserve layers, masks, adjustment layers and smart objects in Photoshop, and native formats such as Affinity's own document format do the same inside their applications. PSD has hard limits worth knowing: 30,000 pixels on either side and a 2 GB file size. Large composites, high-resolution art reproduction and multi-image panoramas can hit those limits, and PSB, Photoshop's large document format, removes them. If your files regularly approach 2 GB, standardize on PSB rather than discovering the limit at save time on a deadline.
Next, protect the original capture. The raw file or the supplied original goes into a read-only folder and is never overwritten. In the working file, the first layer is the original, either as the locked background or, better, as a smart object that embeds or links the original data. Everything else stacks above it.
Set the document's color settings deliberately. Choose the working color space (commonly Adobe RGB or ProPhoto RGB for print-bound work, sRGB for web-only work) and a bit depth. Sixteen bits per channel gives much more room before heavy curves produce banding in skies and gradients, at roughly double the file size. Editing in 16-bit and delivering in 8-bit is a common, sensible pattern. Calibrating the display matters here too, because a non-destructive file only protects your decisions if the decisions were made on an accurate screen; our practical guide to monitor calibration for image editing covers the targets and the routine.
Finally, agree a folder structure before the job starts. A simple, durable pattern is one folder per job with subfolders for originals, working masters, proofs, deliverables and client references. Name files with the job, the image identifier and a version: for example, a working master and its exports share the same stem so anyone can match a JPEG back to the file that produced it.
Outputs and checks
The output of this phase is an empty but correctly configured working file per image and a folder structure that everyone on the job understands. Check it before moving on.
- Original capture stored read-only, outside the working folder, and never overwritten.
- Working format chosen (PSD, layered TIFF, PSB for large files, or the editor's native format) and used consistently across the job.
- Color space and bit depth set intentionally and recorded in the job notes.
- Original placed as a locked background or as a smart object at the bottom of the stack.
- File naming pattern agreed, including version numbers, so exports trace back to masters.
- Display calibrated within the studio's normal schedule.
Phase 2: Keep Raw Development Recoverable
Goal: a base conversion that can be reopened and changed at any point, rather than a baked-in starting point.
Actions
Raw developers are non-destructive by design. Lightroom, Camera Raw and Capture One store your edits as instructions, in a catalog, a session database or sidecar files, and render a preview from them. The raw data is never altered. The risk is the handoff to the pixel editor: if you export a flattened TIFF and start retouching on that, the white balance, exposure and lens corrections are now locked in. When the client asks for a warmer overall look three rounds later, you either live with the old conversion or rebuild the retouching on a new one.
There are two ways to keep the conversion open. In Photoshop, you can open the raw file as a smart object from Camera Raw or Lightroom, which embeds the raw data and its settings; double-clicking the smart object reopens the raw converter with every slider where you left it. Alternatively, you can apply the Camera Raw Filter to a smart object layer, where it becomes a smart filter that can be edited or disabled later. Capture One's own session and layer documentation explains how its adjustments and layers are stored with the image rather than applied to it, which is the same principle inside a single application.
Local adjustments in the raw developer, such as graduated filters, brushed exposure or AI subject masks, are also stored as instructions and remain editable. If you do your first pass of masking there, our guide to getting Lightroom masking right covers how to keep those masks precise enough that they do not need redoing in Photoshop.
Shortcut: decide early whether the raw smart object should be embedded or linked.
- Embedded raw smart objects travel with the file, which is safer for handoffs but makes the file larger.
- Linked smart objects keep files small but break if the linked raw is moved or renamed, so only use them when the folder structure from Phase 1 is stable.
- Either way, retouching that sits on layers above the smart object stays aligned when you change the raw settings, as long as you do not change crop or lens geometry.
That last point is the main trap in this phase. Changing crop, lens distortion correction or perspective inside the raw smart object moves pixels, and any healing layer above it was painted for the old geometry. Settle geometry first, before retouching, and treat later changes to tone and color in the raw settings as safe and later changes to geometry as a rework trigger.
Outputs and checks
The output is a working file whose base layer can be reopened in the raw converter. Check it by double-clicking the smart object and confirming that the raw converter opens with the settings intact. Confirm that geometry corrections are final before any retouching layer is created.
Phase 3: Build a Layer Stack Someone Else Can Read
Goal: a predictable structure where every type of change has a known home, so the file can be understood by a colleague or by you six months later.
Actions
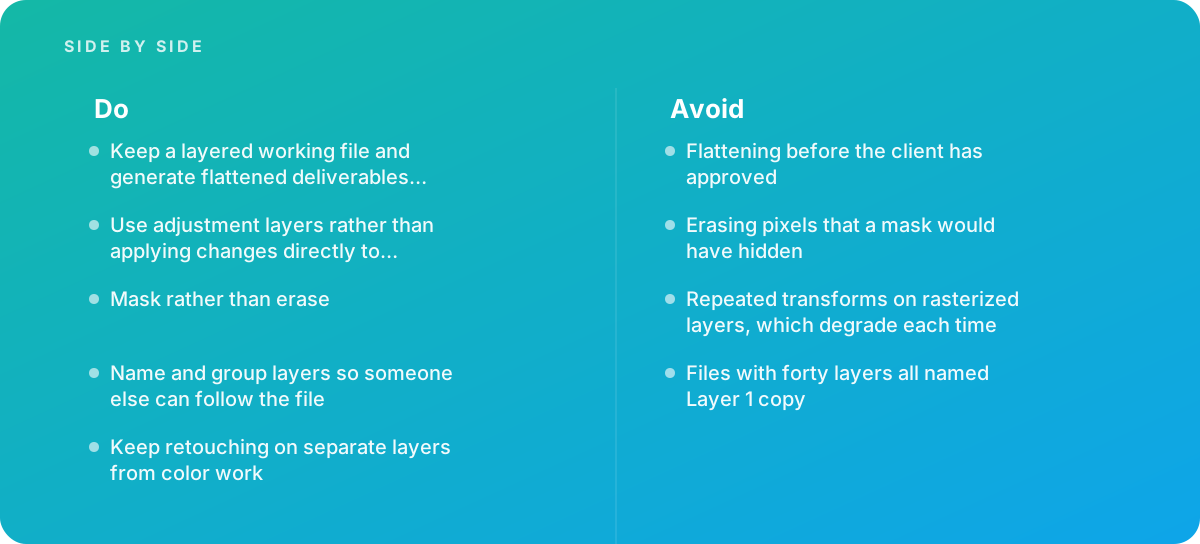
The most common failure in supposedly non-destructive files is not destroyed pixels. It is chaos: forty layers all named Layer 1 copy, adjustment layers stacked in no particular order, and masks that nobody can explain. Technically everything is reversible, but in practice no one can find what to reverse. A readable file is part of non-destructive editing, not an extra.
Create a standard set of groups at the start of every file, in stack order from bottom to top. A structure that works for most commercial retouching looks like this:
| Group (bottom to top) | What goes in it | Typical layer types |
|---|---|---|
| BASE | The original capture and the raw conversion | Raw smart object or locked background |
| CLEANUP | Dust, sensor spots, stray threads, background marks | Empty healing and clone layers |
| RETOUCH | Skin, fabric, product surfaces, shape work | Frequency separation pairs, dodge and burn layers, liquify smart objects |
| COMP | Background replacement, added elements, extensions | Smart objects with layer masks |
| COLOR | Global and local color and tone | Curves, Hue/Saturation, Selective Color, Color Balance adjustment layers |
| FINISH | Output-independent finishing such as grain or vignette | Adjustment layers, filled layers with blend modes |
Sharpening for output is deliberately missing from this stack. It depends on the final size and medium, so it belongs in the delivery phase, applied to a flattened copy or a smart object of the approved master, not baked into the master itself.
Name layers by what they do, not by the tool that made them. "Heal: background seam" and "Curves: warm skin midtones" tell the next person exactly what to switch off when the client says the skin looks too orange. "Curves 3" does not. Color-coding groups helps too; many studios assign one color to retouching and another to color work so a glance at the Layers panel shows which area a change belongs to.
Keep retouching on separate layers from color work. This is the single most useful structural rule. If a healing layer also carries a color shift, you cannot change the color without redoing the healing, and you cannot remove the healing without losing the color. Separating them means each revision touches one group.
- Standard groups created in the agreed order before editing starts.
- Every layer named for its purpose; no default names such as "Layer 1 copy" survive past the end of a session.
- Retouching and color work live in different groups.
- Output sharpening kept out of the master.
- Group colors follow the studio convention if one exists.
Phase 4: Retouch on Layers Above the Original
Goal: all cleanup and retouching exists as removable, adjustable layers that never touch the original pixels.
Healing and cloning on empty layers
Create a new empty layer, set the healing or clone tool to sample from the layers below, and paint the fix onto the empty layer. In Photoshop, the Spot Healing Brush has a "Sample All Layers" option, and the Healing Brush and Clone Stamp can sample "Current & Below" or "All Layers." The fix lands on its own layer. If a client later decides a mole or a scuff should stay, you erase part of the healing layer or mask it out, and the original is still there underneath.
One caution: healing samples texture and color from what it sees below. If you later make a large tonal change underneath, for example in the raw settings, a healing layer painted over the old tones can show as patches. Keep big tonal decisions in adjustment layers above the retouching group rather than in the base, and this rarely happens.
Content-aware fills and generative fills
Content-Aware Fill in Photoshop can output to a new layer rather than the current one; always choose that option. Generative fill results arrive as their own layers with masks. In both cases, the fill can be hidden, replaced or refined later without touching the base.
Skin, fabric and surface work
Frequency separation, where texture and tone are split into high- and low-frequency layers, should be built from duplicated or stamped copies inside the RETOUCH group, with the original left untouched below. Dodge and burn is best done on a layer filled with 50 percent gray set to Soft Light or Overlay, or with a pair of Curves adjustment layers (one brightening, one darkening) whose masks you paint. The Curves approach has one advantage: you can change the strength of all your dodging at once by editing the curve, rather than repainting.
Shape work, such as smoothing a garment's silhouette or correcting a product's bottle wall, belongs in a smart object with Liquify applied as a smart filter. The Liquify mesh is stored with the filter, so reopening it lets you adjust or undo individual pushes. Fashion work in particular leans on this, because shape corrections are the edits clients most often ask to soften; fashion lookbook editing is a good example of work where keeping liquify reversible saves whole rounds.
Detailed skin and surface retouching with a pen tablet benefits most from this structure, since the strokes are numerous and fine and redoing them is expensive. When a project calls for that level of work at volume, a dedicated non-destructive Wacom retouching service keeps each stroke on its own layer for exactly that reason.
Mask rather than erase
The eraser is the one tool that has almost no place in a non-destructive workflow. Anything the eraser removes is gone from that layer. A layer mask hides the same pixels, and painting the mask white brings them back. The same applies to backgrounds: a product cut out with a mask can be refined along the edge later; one cut out with the eraser or by deleting a selection cannot. Masks also carry feather and density settings in the Properties panel, which let you soften an edge or reduce a mask's strength without repainting it.
Outputs and checks
The output is a RETOUCH and CLEANUP group that can be toggled off to reveal an untouched original. Toggle each group off and on as a check. If turning off every retouching layer does not return the image to the raw conversion, something has been painted into the base and needs fixing now, not after approval.
Phase 5: Color and Tone Through Adjustment Layers and Masks
Goal: every color and tone decision exists as a separate, adjustable, maskable layer.
Actions
Adjustment layers apply color and tone changes without altering pixels. A Curves adjustment layer is a set of instructions applied to everything below it; change the curve and the image updates. The same change made through Image > Adjustments > Curves writes directly into the pixels of one layer and cannot be reopened. Adobe's help documentation on layers and smart objects lays out which adjustments are available as layers, and in practice the set covers almost everything a color workflow needs: Curves, Levels, Hue/Saturation, Color Balance, Selective Color, Black & White, Channel Mixer, Photo Filter, Gradient Map, Exposure and Vibrance.
Work from global to local. Start with one or two layers that set the overall tone and white balance, then add local layers limited by masks. A Hue/Saturation layer that corrects a product's color should carry a mask covering only the product. A Curves layer that lifts shadows in the lower third should have a gradient mask. Each layer should do one job, named for that job.
Use masks and blend-if instead of destructive selections
Selections disappear when you deselect; masks persist. If you make a precise selection of a garment, save it as a mask on the adjustment layer rather than using it once. For tonal targeting, the Blend If sliders in Layer Style let an adjustment affect only highlights or shadows, and splitting the slider handles (Option-drag on Mac, Alt-drag on Windows) gives a smooth transition. Blend If is fully adjustable later, unlike a luminosity selection that was used and discarded.
Clipping masks are the other essential. Clipping an adjustment layer to the layer directly below it limits the adjustment to that layer's visible pixels. This is how you color-correct a composited element to match the background without affecting the background itself.
Shortcut: build the product color correction as a reusable group.
- For catalogs with the same product shot in many angles, create the color-matching adjustment layers once, group them, and save the group as a template file or library item.
- Drag the group into each new master and adjust only the masks. The curves themselves are usually close or identical across a consistent set.
- Because the correction is a set of layers, a buyer's note that "the navy is reading too purple" becomes one edit applied across every file, not a repaint.
Consistency across a set is where this pays off most clearly. In print catalog editing, where dozens of products need to match swatches and each other, color held in adjustment layers can be revised across the whole set when the printer's proof comes back. Retouching held separately means those revisions never disturb the cleanup work.
Outputs and checks
The output is a COLOR group in which every layer is an adjustment layer or a fill layer, named, and limited by a mask, clipping mask or blend-if where appropriate. Check that no color change has been applied directly to a pixel layer by scanning the stack for any layer that is not an adjustment layer yet changes color. Check the image in both the working space and a soft proof of the output space if the job is going to print.
Phase 6: Transforms, Composites and Filters Through Smart Objects
Goal: scaling, warping, compositing and filtering that can be changed repeatedly without losing quality.
Why rasterized transforms degrade
Every time you scale or rotate a normal pixel layer, the software resamples it: it computes new pixel values from the old ones. Scale a layer down to 50 percent and the discarded detail is gone. Scale it back up and you get a soft, interpolated version. Repeat a few rotate-and-nudge cycles on a rasterized logo or product cutout and the edges visibly soften each time. This is the mistake behind many composites that look slightly blurry for no obvious reason.
Smart objects preserve the original data through transforms and filters. When you scale a smart object, Photoshop keeps the source at full resolution and renders the transformed result from it each time. Scaling down to 50 percent and back to 100 percent returns the original quality, because it was never discarded. The one limit is enlargement past the source's native size, which still interpolates.
Smart filters
Filters applied to a smart object become smart filters: listed under the layer, individually switchable, reorderable, and editable by double-clicking. Each smart filter also has a filter mask and a blending options dialog for opacity and blend mode. Gaussian Blur for a background, Camera Raw Filter for local color, Liquify for shape, noise reduction and lens effects all work this way. Affinity Photo's equivalent, described in Serif's documentation on its non-destructive workflow, is live filter layers, which sit in the stack like adjustment layers and can be edited at any time.
Compositing
Place every added element, whether a replacement sky, a product in a mockup, a label or a logo, as a smart object with a layer mask. Keep the matching adjustments clipped to it. The result is a composite in which every element can be moved, resized, recolored or swapped without rebuilding the others. For placing designs onto products or packaging, the same logic drives getting product mockups right: the artwork lives inside a smart object so a new version can be dropped in and the warp, shadows and highlights update around it.
Smart objects have a cost. They increase file size, and complex stacks of smart filters can slow down redraws. That is an argument for organization, not for giving them up: convert to smart objects the layers that will be transformed or filtered, and leave simple empty healing layers as normal layers.
Outputs and checks
The output is a COMP group where every placed element is a smart object and every filter is a smart filter. Check by looking for any layer that has been scaled or filtered but is not a smart object. If one exists and the job is still early, replace it from the source rather than continuing to transform the degraded copy.
Phase 7: Client Review and Revisions Without Rework
Goal: gather feedback and make changes in the layered master, so each revision round is an adjustment rather than a redo.
Proofing
Proofs are exported from the master, never saved over it. Export a watermarked or reduced-size JPEG per image, with a filename that includes the version. Keep a short revision log per image: the date, the feedback, and the layer or group changed in response. This is the practical payoff of naming layers well. When the client writes "go back to how the collar looked in round one," the log tells you which layer to toggle.
Making the change
Each common revision type maps to a specific place in the stack:
- Overall warmer, cooler, brighter or darker: edit the global adjustment layers at the bottom of the COLOR group, or the raw smart object's settings if the change is fundamental.
- A product or garment color is off: edit its masked Hue/Saturation or Selective Color layer.
- Retouching went too far: reduce the opacity of the relevant retouching layer or group, or mask part of it back.
- Shape correction is too strong: reopen the Liquify smart filter and ease the mesh.
- An element needs moving or resizing: transform the smart object; its clipped adjustments follow.
- A cleanup should be undone: hide or mask the specific healing layer.
Save each revision round as a new version of the master rather than overwriting. Storage is inexpensive compared with the time it takes to reconstruct round two after round four is rejected.
Do not flatten before approval
Flattening before the client has approved is the most costly mistake in this whole process, because it is invisible until the revision request arrives. It is also tempting: flattened files are smaller and faster, and some older delivery pipelines expect them. Resist it. The flattened version belongs in the deliverables folder, generated from the master; the master itself stays layered until the job is archived, and ideally afterward.
A revision on a layered file is an adjustment. A revision on a flattened file is a reconstruction, and the client pays for it either in time or in quality.
Outputs and checks
The output is an approved master with a revision log and a version history. Check that the approved version is clearly marked and that every proof in circulation can be traced to a specific master version.
Phase 8: Generate Flattened Deliverables From the Master
Goal: every final file produced from the approved layered master, in the right format, size and color space, repeatably.
Working formats versus delivery formats
Working formats preserve layers; delivery formats are flattened. The two serve different purposes and should not be confused.
| Format | Role | Keeps layers? | Typical use |
|---|---|---|---|
| PSD | Working master | Yes | Standard layered master up to 2 GB and 30,000 pixels per side |
| PSB | Working master | Yes | Large composites and high-resolution reproduction beyond PSD limits |
| Layered TIFF | Working master or archive | Yes | Studios and archives that prefer TIFF; confirm the receiving software reads the layers |
| Flattened TIFF | Delivery | No | Print, prepress and archival deliverables |
| JPEG | Delivery | No | Web, email, marketplaces and social |
| PNG | Delivery | No | Web graphics and cutouts that need transparency |
Actions
Generate each deliverable from the master in one pass: duplicate or export, flatten the copy, convert to the output color space, resize to the output dimensions, apply output sharpening appropriate to the size and medium, and save in the delivery format. Photoshop's Export As, Image Processor and Actions can automate this; Lightroom and Capture One export recipes do the same from their own catalogs and sessions. The key rule is that the sequence runs on a copy, and the master is closed without saving the flattened state.
Different channels need different builds from the same master. A marketplace listing may require a pure white background at a specific pixel size, a social ad may need several crops, and a print catalog needs CMYK or a print-ready RGB file at full resolution. Our guides to image editing for marketplaces and image editing for social ads go into the channel-specific requirements; the point here is that all of them are generated from one approved master rather than edited separately.
Metadata is part of the build too. Copyright, credit and usage fields should be written into every exported file consistently, ideally by a preset applied at export rather than by hand. For large batches, bulk metadata editing explains which fields matter and how to apply them without mistakes.
- Every deliverable exported from the approved master version, not from a proof or an earlier export.
- Master closed without saving any flattened state; its layers and version history intact.
- Color space converted for each output (for example sRGB for web) and embedded in the file.
- Output sharpening applied per size and medium, only to the exported copy.
- Filenames trace back to the master's image identifier and version.
- Metadata fields written consistently across the set.
- Master archived with its deliverables so future revisions start from the layered file.
A Worked Example: Revising a 40-Image Product Set
The following is an illustrative scenario, not a client project. It shows how the phases above play out, and where the time goes, on a typical small catalog job. The time figures are planning assumptions for a single experienced retoucher and will vary with image complexity and the tools in use.
A home goods brand sends 40 raw product photos: ceramics and textiles shot on a light gray sweep. The brief asks for background cleanup to pure white, dust and blemish removal, color matched to physical swatches, and three deliverables per image: a 2,000-pixel square JPEG for marketplaces, a 1,080 by 1,350 crop for social, and a full-resolution TIFF for the print catalog. That is 120 deliverables from 40 masters.
Assume the first pass takes 12 to 20 minutes per image when it is built non-destructively, because setting up the standard groups and naming layers adds a few minutes per file. That puts the first round at roughly 8 to 13 hours of editing.
After round one, the client returns three notes. The whole set is reading slightly cool. The terracotta glaze on 11 items looks too orange next to the swatch. The textile folds were smoothed too much on 6 items and look artificial.
In the layered masters, the fixes map to specific layers. The cool cast is one global Curves or Color Balance layer; because the same correction group was dragged into every master, the adjustment can be made once and copied across, or applied with a short action, at perhaps a minute per file. The terracotta is a masked Hue/Saturation layer on 11 files. The textile smoothing is an opacity reduction on the retouching group, plus some mask painting where the folds need their texture back, on 6 files. A reasonable estimate is 2 to 3 hours for the whole round, followed by an automated export of all 120 deliverables.
Now run the same scenario with masters that were flattened after round one to save disk space. The cool cast can be corrected on the flattened file, but only by stacking another correction on already-corrected pixels. The terracotta fix needs a new selection on each of 11 files. The textile folds cannot be un-smoothed, because the original texture was replaced; the retoucher has to go back to the raw files and redo cleanup and retouching on those 6 images. Realistically the round takes most of a working day, and the reworked images may not match the rest of the set exactly.
| Revision note | Layered master | Flattened file |
|---|---|---|
| Whole set too cool (40 images) | Edit one shared correction layer, copy across | New correction on top of baked-in color, per file |
| Glaze too orange (11 images) | Adjust existing masked Hue/Saturation layer | Reselect the glaze and correct, per file |
| Textiles over-smoothed (6 images) | Lower retouch opacity, paint back texture in the mask | Redo cleanup and retouching from the raw file |
| Re-export 120 deliverables | Automated from masters | Manual resize and crop from edited flats |
The schedule below shows how the job might be laid out over a working week when built this way.
- Day 1, morning Folder structure, working file template with standard groups, raw conversion settings synced across the set, geometry and crops fixed.
- Day 1, afternoon to Day 2 Cleanup and retouching on separate layers; background masks built; color correction group created once and applied to every master.
- Day 2, end Proofs exported from masters with version numbers and sent for review, with a revision log started per image.
- Day 3 to 4 Client review period; retoucher available for questions but no edits to masters.
- Day 4, afternoon Round-one revisions made in the layered masters; new proof versions sent.
- Day 5 Approval received; 120 deliverables generated by export actions; masters and deliverables archived together.
Similar arithmetic applies to high-volume work in other categories. Event photo batch editing relies more on raw-level presets than on layered masters, but the principle is identical: keep decisions as settings that can be changed across the set, and render final files from them.
Handoffs, File Standards and When to Bring In Help
Goal: files that survive the move to another retoucher, another studio or another year.
Handing a file to someone else
A layered file is only as useful as its legibility. Before handing off, run a cleanup pass: delete hidden experimental layers that were rejected, name everything that is still default-named, collapse groups, and add a short note, either as a text file in the job folder or a hidden text layer at the top of the stack, describing the structure and anything unusual. If the file uses linked smart objects, package them (Photoshop's File > Package does this for linked files) or convert them to embedded so nothing breaks in transit.
Confirm the recipient's software and version. Layered TIFFs and PSDs open in many applications, but not every application reads every Photoshop-specific feature. Smart filters, some adjustment layer types and advanced blend settings may be rasterized or dropped when a file is opened elsewhere. If the next person uses Affinity Photo or another editor, test one file in their software before sending the whole set.
Writing a studio file standard
A studio standard is a short document, often only a page or two, that fixes the decisions from Phases 1 and 3: working format and size limits, color space and bit depth, group names and order, layer naming rules, color-coding, where output sharpening goes, versioning and filename patterns, and what gets archived. The value comes from everyone applying it the same way. A standard that one retoucher follows and another ignores is worse than none, because it creates files that look standardized but are not.
Standards also make quality checks possible. A reviewer can open any master and check it against a list: groups present and in order, no default layer names, no pixel-level color changes, all transforms on smart objects, master still layered. Categories with strict accuracy requirements, such as art reproduction, benefit most because their revisions are about small, precise corrections that only a clean file makes easy.
When to bring in help
Some situations are hard to solve alone:
- Files have to be handed to another retoucher and your current files are not organized well enough to hand over without a long explanation.
- A large revision is needed on flattened work, and the original masters were not kept. This usually means going back to raw files and rebuilding, which is a capacity problem as much as a skills one.
- A studio or brand needs a consistent file standard across several in-house and freelance retouchers, and someone needs to define it, template it and check files against it.
In each case, an experienced retouching team can either rebuild the files or set up the structure so that the next job starts clean. Our image editing and graphic design services cover that full range, from single-image retouching to studio-wide file templates.
Common mistakes, restated as checks
Most of the problems covered in this playbook reduce to four mistakes. Each has a simple check that can be run on any file:
- Flattening before approval. Check: is there a layered master for every image in circulation, and is the approved version marked?
- Erasing what a mask would have hidden. Check: are there layers with missing pixels and no mask? If so, find out why.
- Repeated transforms on rasterized layers. Check: does every scaled, rotated or warped element sit in a smart object?
- Forty layers all named Layer 1 copy. Check: could someone who has never seen the file find the layer that controls skin warmth in under a minute?
If a file passes those four checks, it is non-destructive in practice and not just in principle. That is the standard worth holding every master to, because the revision request is coming, and the only open question is whether it costs minutes or hours.
Where this comes from
- Adobe Help Center — Layers and smart objects
- Affinity by Serif — Non-destructive workflow
- Capture One — Session and layer documentation
The figures and practices above come from the sources listed.
Working on something like this?
We take on Image Editing & Retouching work for teams who want it done once, properly. Tell us what you are building and we will tell you honestly whether we are the right studio for it. Start a project.
Where to go next
Spotted something wrong? Report an error on this page. We correct on the page and say what changed.