HEVC Video: What Actually Works
A phase-by-phase playbook for HEVC video: map targets, edit camera H.265 smoothly, encode 4K and HDR correctly, and ship web files with H.264 fallbacks.
 Tomas Lindqvist

HEVC video, short for High Efficiency Video Coding and also known as H.265, is the codec that followed H.264. It was designed to deliver similar picture quality at substantially lower bitrates, and it handles 4K resolution, 10-bit color and high dynamic range far more comfortably than its predecessor. That makes it the default choice for many modern cameras and phones, for HDR10 and Dolby Vision deliveries, and for anyone trying to cut storage bills or streaming bandwidth without visibly degrading the picture.
The catch is that HEVC is not as universal as H.264. Browser support depends on the browser, the operating system and the graphics hardware underneath them. Licensing is more fragmented. Editing software handles it unevenly, and camera-original HEVC files can bring a capable workstation to a crawl. Teams that treat HEVC as a simple drop-in replacement for H.264 tend to discover these problems at the worst moment: a client reports a black rectangle where the hero video should be, or an editor loses a day to a timeline that stutters on every frame.
This playbook is for marketers, in-house video teams, producers and editors who need HEVC to work reliably from camera card to final delivery. It is organized as a sequence of phases. Each phase states its goal, the actions to take, the outputs it should produce and the checks that tell you it is done. Follow them in order and you will know where HEVC helps, where it hurts, and how to deliver it without leaving any viewer behind.
The HEVC Delivery Playbook at a Glance
Before the detail, here is the whole route. The phases build on each other: decisions made in the first phase determine which encoder settings matter in the fifth, and the testing in the seventh phase only makes sense if the delivery matrix from the first phase exists. Skipping ahead is the most common reason HEVC projects go wrong.
- Map the delivery targets List every platform, device class and use for the finished video, and decide per target whether HEVC, H.264 or both are required.
- Qualify the source footage Inspect camera files for profile, bit depth, chroma subsampling, GOP structure and HDR metadata before anyone starts cutting.
- Build an edit-friendly pipeline Confirm hardware decoding on each workstation, and transcode to an intraframe intermediate or proxies where the camera HEVC is too heavy to edit natively.
- Decide the color and HDR path Choose SDR, HDR10, HLG or Dolby Vision per deliverable, and grade and monitor accordingly.
- Encode HEVC masters and derivatives Set profile, level, bit depth, rate control, GOP and container tagging deliberately for each output.
- Package web delivery with fallbacks Pair every HEVC web file with an H.264 version and let the player choose.
- Test on real platforms and devices Upload, play back and inspect on the actual targets, not just on the editing machine.
- Quality-check and archive Verify metadata and picture, then archive the master and the encoding recipe so the work can be repeated.
The rest of this article walks through each phase. Where there is a genuine shortcut, it is flagged. Where there is a trap, it is explained along with the reason it catches people.
Phase 1: Map Where Your HEVC Video Has to Play
Goal: know, before a frame is shot or cut, which files you owe and where each one will be played. HEVC is a delivery decision first and a technical setting second.
Actions
Write a delivery matrix. Down the side, list every destination: your own website, a landing page, social platforms, a video host such as YouTube or Vimeo, an OTT or broadcast partner, internal screens, an email campaign that links to video, a sales team's tablets. Across the top, record for each destination the resolution, frame rate, dynamic range (SDR or HDR), the codec the platform prefers or requires, maximum file size or duration, and who will play it and on what. The last column matters most. A trade-show loop on a known media player is a completely different problem from a hero video that must play for every anonymous visitor to your homepage.
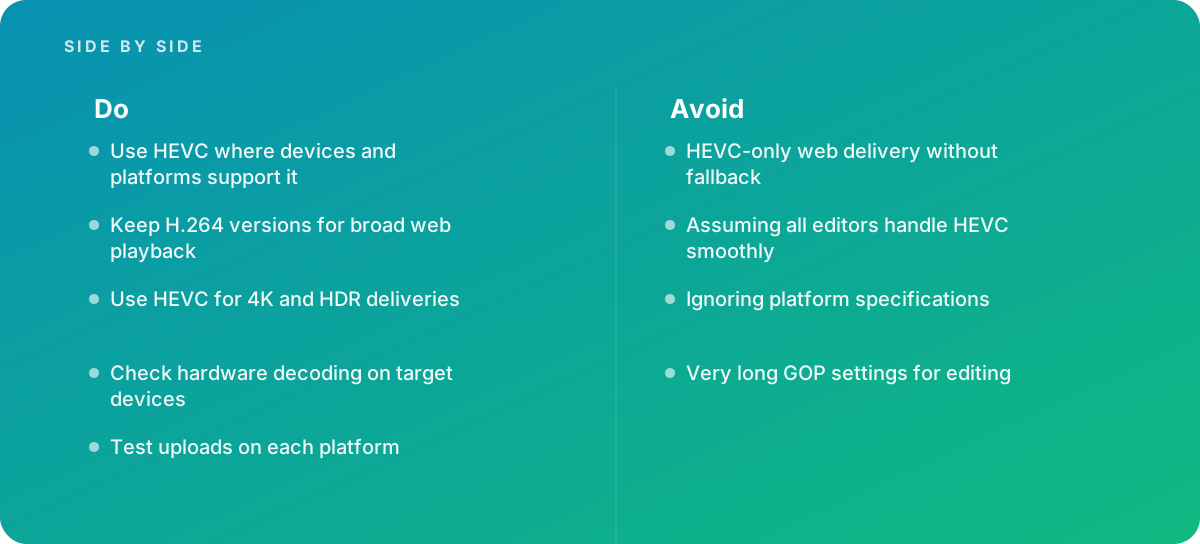
Then assign a codec to each row. The reference practice is straightforward: use HEVC where devices and platforms support it, keep H.264 versions for broad web playback, and use HEVC for 4K and HDR deliveries. In practice that usually produces three categories:
- HEVC required or strongly preferred. 4K and HDR masters, deliveries to platforms whose specs call for HEVC, Apple-device ecosystems, and archives where storage efficiency matters.
- H.264 required. Anything that must play on unknown browsers and older hardware without a fallback mechanism, many ad servers, and legacy corporate systems. Our guide to producing H.264 video properly covers that side of the matrix.
- Both. Most public web delivery, where HEVC serves capable devices a smaller or better-looking file and H.264 catches everyone else.
If you are also weighing the newer royalty-free option, read our breakdown of what works with AV1 video. AV1 competes with HEVC on efficiency for web streaming, but it is rarely a camera or mastering codec, so for most studios the question is which web tier gets AV1 alongside HEVC and H.264, not whether it replaces HEVC entirely.
Outputs
A one-page delivery matrix with a codec, resolution, frame rate, dynamic range and container for each destination, and a named owner for each platform's current specification.
Checks
Every row has a source for its specification (a platform help page or partner document, dated), and no row says "HEVC" for a context where you cannot guarantee decoding support unless a fallback is also listed. Ignoring platform specifications is one of the four classic HEVC mistakes, and this is the phase where you prevent it.
Phase 2: Qualify the Source Footage Before Anyone Edits
Goal: understand exactly what kind of HEVC (or other codec) you have been handed, because "it is H.265" tells you very little about how it will behave.
Actions
Run every camera format through a media inspection tool such as MediaInfo or ffprobe and record the following for each camera and each recording mode:
- Profile. Main (8-bit 4:2:0), Main 10 (10-bit 4:2:0), or a range-extension profile such as 4:2:2 10-bit. Many mirrorless cameras record 4:2:2 10-bit HEVC, and this is the variant that most often lacks hardware decode support.
- Bit depth and chroma subsampling. 10-bit is what you want for log footage and HDR; 8-bit log footage bands easily when graded.
- GOP structure. Camera HEVC is almost always long-GOP, meaning most frames are predicted from others. That is efficient for recording and a burden for editing, because to show one frame the decoder may have to reconstruct several.
- Transfer function and color primaries. Rec. 709, a camera log curve, HLG or PQ. Phones in particular may record HLG or Dolby Vision HDR by default, which surprises editors who expected SDR.
- Frame rate and variable frame rate. Phone footage is often variable frame rate, which can cause audio drift and stutter in editing software. Flag it now so it can be conformed to a constant rate.
Also note which clips came from which device. Mixed-source projects, such as a corporate shoot combining a cinema camera, a mirrorless B-camera and staff phone footage, often contain three different HEVC flavors that behave differently on the same workstation. Plan those shoots with a single recording spec where you can.
Shortcut: Shoot a ten-second test clip in every recording mode you plan to use, in advance, and drop those clips into your editing software on the actual edit machine. Ten minutes of testing before the shoot reveals decoding problems that would otherwise surface on day one of the edit, with a deadline attached.
Outputs
A footage sheet listing each source format with its profile, bit depth, chroma, GOP type, color space, transfer function and frame-rate behavior.
Checks
No source format in the project is "unknown". Any 4:2:2 HEVC, variable-frame-rate or HDR-tagged footage is flagged for handling in the next phases.
Phase 3: Build an Edit Pipeline That Survives Long-GOP HEVC
Goal: a timeline that plays in real time and scrubs cleanly, without compromising the quality of the final render. Assuming every editor handles HEVC smoothly is the second classic mistake, and it wastes more hours than any other.
Why HEVC is heavy to edit
HEVC achieves its efficiency with more complex prediction tools than H.264: larger and more flexible coding blocks, more intra-prediction directions and more sophisticated motion compensation. Decoding therefore costs more computation per frame. Combine that with long-GOP structure, where scrubbing backward or jumping to a random frame forces the decoder to rebuild a chain of reference frames, and software decoding on a CPU becomes the bottleneck. Hardware decoders built into modern GPUs and system-on-chip designs remove most of that cost, but only for the specific profiles they support.
Actions
- Check hardware decoding on each workstation. Look up the decode support matrix for your GPU or processor and compare it with the footage sheet from Phase 2. Pay particular attention to 4:2:2 10-bit HEVC, which many consumer GPU decoders have historically not supported, while some integrated and system-on-chip decoders do. Confirm in your editing software's preferences that hardware decoding is actually enabled.
- Choose native, proxy or intermediate per format. If a format decodes in hardware and plays smoothly at full resolution, edit natively. If it plays but stutters under effects, generate proxies. If it does not decode in hardware at all, or if the project involves heavy grading, compositing or multicam, transcode to an intraframe intermediate such as Apple ProRes or Avid DNxHR at matching bit depth.
- Conform variable frame rate footage. Transcode phone footage to a constant frame rate intermediate before editing.
- Keep the link to the originals. Whatever the approach, make sure the conform or relink back to camera originals (or to full-quality intermediates) is tested before the edit begins.
Intraframe intermediates are large. As a rough planning figure, they can be several times the size of the camera files, so budget the storage in advance. The trade is almost always worth it for anything beyond a simple cut: every frame is independently decodable, scrubbing is instant, and render times drop. Proxies are the lighter option, with small files at reduced resolution that you swap out for the originals at the render stage. For multi-camera sequences, video montage work and effects-heavy projects, intermediates remain the safer default.
- Hardware decode support confirmed for every HEVC profile on the footage sheet
- Hardware decoding enabled in the editing software's preferences
- Native, proxy or intermediate route chosen and written down for each format
- Variable frame rate clips conformed to a constant frame rate
- Storage budgeted for intermediates or proxies, plus backups
- Relink to full-quality media tested on a sample sequence
- A test timeline plays in real time at the project's frame rate
Outputs and checks
The output is a documented media pipeline: which formats are edited natively, which through proxies and which through intermediates. The check is simple and non-negotiable. A representative sequence plays in real time and the relink to full quality works before the creative edit starts. If you are commissioning creative video editing from an outside team, ask how they handle camera HEVC. The answer tells you a lot about how well they will manage your schedule.
Phase 4: Choose the Color and HDR Path for Each Deliverable
Goal: decide the dynamic range and color pipeline for every output before grading, because HEVC is the codec most HDR deliveries travel in, and HDR decisions cannot be bolted on at export.
The HDR formats HEVC typically carries
HEVC is commonly used for HDR10 and Dolby Vision. It is also a common carrier for HLG, the broadcast-friendly hybrid log-gamma format. Each uses 10-bit (or higher) encoding and wide-gamut Rec. 2020 color primaries, but they differ in transfer function and metadata:
| Format | Transfer function | Metadata | Typical use | Practical notes |
|---|---|---|---|---|
| SDR (Rec. 709) | Gamma (BT.1886 display) | None required | Most web, social, corporate and training video | Safest choice; HEVC Main or Main 10 both work |
| HDR10 | PQ (SMPTE ST 2084) | Static: mastering display color volume, MaxCLL, MaxFALL | Streaming platforms, 4K deliveries, TVs | Requires Main 10 and correct signaling; missing metadata leads to inconsistent tone mapping |
| HLG | Hybrid log-gamma | None required | Broadcast, live, phone-originated HDR | Degrades more gracefully on SDR displays than PQ |
| Dolby Vision | PQ, with dynamic metadata | Dynamic, scene-by-scene, from a Dolby Vision analysis and trim pass | Premium streaming, Apple devices, some platforms | Needs a licensed toolchain and a specific profile per platform; plan it, do not improvise it |
Actions
For each row in the delivery matrix, choose SDR or an HDR format. If any deliverable is HDR, grade in an HDR-capable project with a reference-grade monitor that can actually display HDR, and derive the SDR version with a deliberate trim rather than an automatic conversion. If every deliverable is SDR, do not let HDR creep in: phone footage recorded in HLG or Dolby Vision must be converted to Rec. 709 with care at the start of the grade, not at export.
Record the mastering display characteristics (primaries, white point, peak and minimum luminance) because HDR10 encoding needs them. Measure or calculate MaxCLL (the brightest pixel in the program) and MaxFALL (the highest frame-average light level) from the graded master. Most grading tools can generate these values.
Outputs and checks
Outputs: a graded master at the highest dynamic range required, an SDR trim where needed, and a written list of HDR metadata values. Checks: the SDR version is reviewed on an SDR display; the HDR version is reviewed on an HDR display; and nobody has approved HDR content by looking at it on a laptop that silently tone-maps everything.
Shortcut: If a project has only one HDR destination and it is a platform that accepts HLG, delivering HLG can avoid the metadata bookkeeping of HDR10 and still look reasonable on SDR screens. Confirm the platform's current HDR specification first, because requirements differ and change.
Phase 5: Encode HEVC Masters and Derivatives Deliberately
Goal: produce HEVC files whose every setting was chosen, not inherited from an export preset someone clicked years ago.
Profile, level and tier
The HEVC standard, published as ITU-T Recommendation H.265 by the International Telecommunication Union, defines profiles (which coding tools are allowed), levels (limits on resolution, frame rate and bitrate a decoder must handle) and tiers (Main and High, which set different maximum bitrates within a level). For delivery, the practical rules are:
- Use Main 10 for anything HDR, and prefer it for SDR 4K too, because 10-bit encoding reduces banding in gradients such as skies and studio backdrops even when the display is 8-bit.
- Use Main (8-bit) only when a target device or platform specification demands it.
- Choose the lowest level that fits your resolution and frame rate, so the widest range of decoders will accept the file. 4K at 30 frames per second generally fits Level 5, and 4K at 60 generally needs Level 5.1. Let the encoder set the level automatically only if you verify what it chose.
- Use the Main tier for distribution unless a specification explicitly calls for High tier; many consumer decoders are built around Main tier limits.
Rate control
For masters and archives, use a quality-targeted mode. In the widely used open-source x265 encoder, that means constant rate factor (CRF), where lower numbers mean higher quality and larger files. Values in the high teens to low twenties are a common starting range for high-quality delivery, but the right value depends on the content: grain, water, foliage and fast motion need more bits than talking heads on clean backgrounds. Test a demanding section at two or three values and compare on a good monitor.
For platform uploads and streaming, follow the platform's specification. When a maximum bitrate is specified, use constrained variable bitrate (a target average with a maximum rate and buffer size) so the file never exceeds the decoder's buffer. Two-pass encoding at a target bitrate gives the most predictable file sizes when a size limit exists.
Presets and hardware encoders
Software encoders like x265 offer speed presets. Slower presets search harder for efficient ways to code each frame, producing better quality at the same bitrate, at the cost of much longer encodes. Hardware encoders in GPUs and Apple silicon are dramatically faster and are fine for reviews, drafts and many social deliverables, but at the same bitrate they typically produce somewhat lower quality than a slow software encode. A sensible division of labor: hardware encoding for review copies and quick turnarounds, software encoding at a medium or slower preset for final masters and anything bandwidth-sensitive.
GOP and keyframes
For distribution files, a keyframe every two seconds or so is a common convention for streaming, because it lets players seek quickly and lets adaptive streaming systems switch between renditions at predictable points. Many platform specifications state a keyframe requirement; follow it. For anything that will be edited again, including mezzanine files sent to another editor or agency, avoid very long GOP settings. Very long GOPs save a little space and make the file miserable to edit, which is the fourth classic mistake on the list. If a file will be edited, either send an intraframe intermediate or use a short, closed GOP.
HDR signaling
For HDR10, the encoder must write the color primaries (BT.2020), transfer characteristics (PQ), matrix coefficients (BT.2020 non-constant luminance), the mastering display metadata and the MaxCLL and MaxFALL values from Phase 4. In x265 these correspond to parameters for color primaries, transfer, color matrix, master display and max content light level, with HDR10 signaling switched on. Omitting them does not usually cause an error; it causes a file that plays with washed-out or clipped highlights on some displays and looks fine on others, which is much harder to diagnose.
Container and codec tag
For MP4 and MOV files, HEVC can be tagged as hvc1 or hev1. The difference is where the parameter sets live: hvc1 stores them in the file's sample description, while hev1 allows them in the stream itself. Apple's players and Safari expect hvc1 for HEVC in MP4 and MOV, and a file tagged hev1 may refuse to play there even though the video data is perfectly valid. Some encoders default to hev1, so set the tag explicitly (in FFmpeg, with the video tag option set to hvc1) and verify it with an inspection tool. For web files, also move the MP4 index (the moov atom) to the start of the file, often called fast start, so playback can begin before the whole file downloads.
- Profile set to Main 10 for HDR and 4K, Main only where a spec requires it
- Level and tier verified in the output file, not just in the export dialog
- Rate control matched to purpose: quality-targeted for masters, constrained for platforms
- Keyframe interval set to the platform's requirement or about two seconds
- No very long GOP on any file that will be edited again
- HDR color primaries, transfer, matrix and mastering metadata written and inspected
- Codec tag set to hvc1 for MP4 and MOV targets that include Apple devices
- Fast start enabled on web MP4 files
Phase 6: Package HEVC for the Web With an H.264 Fallback
Goal: every visitor sees video, and capable devices get the more efficient HEVC file. HEVC-only web delivery without a fallback is the first and most damaging mistake on the list, because when it fails, it fails silently for the visitor and invisibly for you.
Why fallbacks are not optional
As the MDN Web Docs web video codec guide explains, HEVC support in browsers varies by browser, operating system and hardware. A browser may support HEVC on one machine because its GPU has a hardware decoder and not on another machine running the same browser version. Some browsers rely entirely on the platform's decoders and licensing. You cannot test your way to certainty across every visitor's configuration, so the only robust design is to offer alternatives and let the browser choose.
Actions
- Encode the H.264 version from the same graded master, in SDR, at resolutions suited to web playback. For most page videos, 1080p is ample.
- List sources in order of preference. In the HTML video element, list the HEVC source first with a type attribute that includes a precise codecs string beginning with hvc1, then the H.264 source. A browser that cannot play the first source moves to the next. If you also produce AV1, it usually goes first.
- Use a poster frame so something meaningful shows before playback begins.
- Consider a streaming host or adaptive streaming for long or high-traffic videos. Hosted players and HLS or DASH packaging handle codec selection and bandwidth adaptation for you, and HLS in particular can carry HEVC renditions for Apple devices alongside H.264 renditions.
- Keep HDR off the general web unless you have tested it thoroughly. An HDR file played on an SDR screen without proper tone mapping looks dull and washed out, which is worse than a good SDR file.
How the video sits on the page matters as much as the codec. Our guides to embedding video on websites and video for landing pages cover autoplay rules, lazy loading and page-weight budgets. If the video is meant to rank, the codec choice has no effect on search visibility by itself, but page speed and a well-structured player do, as covered in our video SEO guide.
Outputs and checks
Outputs: HEVC and H.264 web files, a poster image and the embed markup or hosted-player configuration. Checks: the page plays video in a browser known to lack HEVC support on your test hardware (proving the fallback works), and in Safari on an Apple device (proving the HEVC file and its hvc1 tag work).
Worked Example: A 4K HDR Brand Film Delivered Five Ways
The following project is illustrative, built to show the arithmetic and decisions rather than to describe a real client. A company commissions a ten-minute brand film shot on two mirrorless cameras recording 4K 4:2:2 10-bit HEVC in a log profile. It needs a 4K HDR10 version for a video platform, a 4K SDR version for the same platform's SDR viewers, a 1080p website hero edit, a vertical social cut and an archive master.
The source problem
The footage sheet shows 4:2:2 10-bit long-GOP HEVC. One edit workstation has a GPU whose decoder does not support that profile; the other, a system-on-chip machine, does. Rather than run two pipelines, the team transcodes everything to a 10-bit 4:2:2 intraframe intermediate. The shoot produced about three hours of footage. At a camera bitrate of 150 Mbps, three hours is 150 × 10,800 seconds, or 1,620,000 megabits, which is about 202 gigabytes. If the chosen intermediate runs at roughly 700 Mbps at this resolution and frame rate, the same three hours becomes about 945 gigabytes. The team budgets 2 terabytes of fast storage for intermediates plus render cache, and keeps the camera originals on separate backed-up storage.
The delivery files
| Deliverable | Codec and profile | Rate control | Approx. bitrate | Approx. size |
|---|---|---|---|---|
| Archive master | Intraframe intermediate, 10-bit 4:2:2, HDR graded | Fixed by codec | ~700 Mbps | 10 minutes: ~52 GB |
| Platform 4K HDR10 upload | HEVC Main 10, Level 5.1, hvc1 | Quality-targeted, capped | ~50 Mbps average | 10 minutes: ~3.75 GB |
| Platform 4K SDR upload | HEVC Main 10, Rec. 709 | Quality-targeted, capped | ~40 Mbps average | 10 minutes: ~3 GB |
| Website hero, HEVC | HEVC Main, 1080p, hvc1, fast start | Two-pass target | ~4 Mbps | 60-second edit: ~30 MB |
| Website hero, fallback | H.264 High, 1080p, fast start | Two-pass target | ~6 Mbps | 60-second edit: ~45 MB |
The sizes follow directly from bitrate multiplied by duration. Fifty megabits per second for 600 seconds is 30,000 megabits, which is 3,750 megabytes. For the 60-second hero edit, 4 Mbps gives 240 megabits, or 30 megabytes, and 6 Mbps for the H.264 fallback gives 45 megabytes. The bitrates themselves are planning assumptions for this example, not published requirements; on a real project, the platform's specification and quality tests on the actual footage set them.
The social cut is exported in whatever codec the social platform's current upload specification recommends, which in many cases is H.264. Using HEVC there would bring no benefit if the platform re-encodes everything on ingest anyway, and it would add a compatibility risk.
What the example shows
HEVC earned its place in three of the five outputs: the two platform uploads, where it carries 4K and HDR efficiently, and the capable-browser tier of the website hero, where it saves about a third of the bandwidth for every visitor who can use it. It was deliberately kept out of the editing timeline (replaced by an intermediate), out of the archive (where edit-friendliness matters more than size) and out of the social cut (where the platform decides). That pattern, HEVC for delivery and not for everything, is the most reliable way to get its benefits without its costs.
Phase 7: Test Uploads and Playback on Every Target
Goal: evidence, from each real destination, that the file plays correctly. Testing uploads on each platform is on the good-practice list for a reason: platforms re-encode, reject, or quietly mis-handle files in ways no local preview can predict.
Actions
- Upload a short test file first. Before sending a 4 GB master, encode a 30-second section with identical settings and upload it. Check that the platform accepts it, recognizes HDR where intended and processes it in reasonable time.
- Wait for full processing. Many platforms publish a low-resolution version first and add higher resolutions and HDR versions later. Judge quality only after processing completes.
- Check on the device classes in the matrix. At minimum: a recent phone from each major mobile platform, a desktop browser with and without HEVC support, and, for HDR, an HDR-capable TV or display alongside an SDR screen.
- Check the website fallback. Use a browser's developer tools to confirm which source actually loaded on each test device. Seeing video play does not tell you which file is playing.
- Check private delivery links. If a client, investor-relations team or regulator receives files by download, test the downloaded file on a typical recipient machine, not just the editing workstation. Sensitive contexts such as investor communications often call for an H.264 copy precisely because the recipient's hardware is unknown.
Watch for these failure signs:
- Audio plays but the picture is black or frozen: the device cannot decode the HEVC profile, or the codec tag is wrong.
- HDR looks gray and flat: the file is missing HDR signaling, or it is playing on an SDR display without tone mapping.
- Highlights clip harshly: incorrect mastering metadata or MaxCLL values.
- Playback stutters on a laptop that handles 4K H.264 easily: software decoding is being used because the hardware lacks support for that profile.
Outputs and checks
A short test log for each destination listing the device, browser or app, the file version that played, and pass or fail. A deliverable is not done until its row in the delivery matrix has a pass recorded on real hardware.
Phase 8: Quality-Check, Hand Over and Archive the Recipe
Goal: ship files that match the specification exactly, and preserve enough information that anyone can reproduce or revise them months later.
Actions
Inspect every delivery file with a media inspection tool and compare it line by line with the delivery matrix: codec, profile, level, bit depth, chroma, resolution, frame rate, color primaries, transfer, matrix, HDR metadata, codec tag, audio format and loudness, and duration. Then watch every file end to end, at least once, at full resolution. Encoding problems such as blocking in dark scenes, banding in gradients or a frame-rate mismatch show up on viewing, not in a metadata report.
Visual defects in the source are not something an encoder can fix, and HEVC compression will emphasize some of them. Shaky handheld footage costs bits, because motion is expensive to encode, and noisy low-light footage costs even more because noise is essentially random detail. Where source problems are significant, treat them before encoding; services like video stabilization and noise reduction both improve the picture and make the encode more efficient.
Archive
Archive the graded master in an edit-friendly intermediate, not in the delivery HEVC. Alongside it, store the delivery matrix, the footage sheet, the HDR metadata values and the exact encoder settings (or the encoder command line) for each deliverable. When a platform changes its specification, or a client asks for a new cut-down in a year, that record turns a half-day of detective work into a straightforward re-encode.
Outputs and checks
Outputs: final files, an inspection report per file, the archived master and the encoding recipe. Check: a colleague who was not on the project can find the master and re-create any deliverable from the recipe alone.
A Realistic Schedule for an HEVC Delivery Project
Timing depends on footage volume, how many deliverables there are and whether HDR is involved, but the phases themselves are predictable. The schedule below assumes the illustrative ten-minute brand film from the worked example, with one editor and one colorist, and a clean first round of feedback. Treat it as a planning template rather than a promise.
- Before the shoot Delivery matrix written, platform specifications gathered, camera test clips checked on the edit machines (Phases 1 and 2).
- Day 1 Footage ingested, inspected and logged; transcoding to intermediates starts and often runs overnight (Phases 2 and 3).
- Days 2 to 5 Creative edit on intermediates or proxies, through rough cut and client review.
- Days 6 and 7 Picture lock, HDR grade and SDR trim, HDR metadata measured and recorded (Phase 4).
- Day 8 Test encodes at two or three quality settings, short-clip platform uploads, fallback page built (Phases 5 to 7).
- Day 9 Final encodes, which can take many hours for 4K software encodes at slow presets; full uploads and device testing (Phases 5 and 7).
- Day 10 Quality checks, handover and archive of master and recipe (Phase 8).
Two things most often stretch this schedule. The first is discovering unsupported HEVC footage on day one rather than before the shoot, which can add a day of transcoding. The second is an HDR deliverable that nobody planned for, requested after the grade is finished, which adds a new grading pass. Both are prevented in Phase 1.
When HEVC Is the Wrong Choice, and When to Bring in Help
HEVC is excellent at what it was designed for, but several common situations favor something else:
- Editing and intermediate files. Use ProRes, DNxHR or similar intraframe codecs; the storage cost is repaid in speed and reliability.
- Universal short clips and embeds where you cannot offer a fallback, such as some ad servers and third-party players. Use H.264. Ad delivery follows its own specifications, so check the ad server's accepted formats.
- Social uploads where the platform re-encodes everything. Follow its current upload guidance and prioritize a clean, high-bitrate source over codec efficiency.
- Short, simple SDR training clips for internal systems whose playback hardware you do not control. H.264 is usually the lower-risk choice.
Licensing is the other consideration. HEVC patents are licensed through more than one pool and some individual holders, which is one reason browser and software support is less uniform than for H.264. For most businesses, licensing is handled inside the devices, operating systems and commercial software they already use; if you are building your own player, app or encoding product, get specific legal advice rather than assuming.
Bring in specialist help when delivering 4K or HDR video to multiple platforms. That is where the phases in this playbook multiply: separate HDR and SDR grades, different metadata per format, per-platform specifications, and testing across devices that behave differently. A studio that runs this process routinely, like our video editing and production team, will already have tested pipelines, reference monitoring and a device lab, which is usually cheaper than building those for one project.
If you follow the eight phases in order, HEVC stops being a gamble. You will know which files need it, your editors will not fight it, your HDR will be signaled correctly, and every viewer will see a picture, whether their device speaks H.265 or not.
Where this comes from
- International Telecommunication Union — H.265 High efficiency video coding
- MDN Web Docs — Web video codec guide
The figures and practices above come from the sources listed.
Working on something like this?
We take on Video Editing & Production work for teams who want it done once, properly. Tell us what you are building and we will tell you honestly whether we are the right studio for it. Start a project.
Where to go next
Spotted something wrong? Report an error on this page. We correct on the page and say what changed.