Cloners and MoGraph Effectors: What Actually Works
A practical checklist for cloners and MoGraph effectors in Cinema 4D: choosing cloner modes, shaping fields, effector order, render tests and caching.
 Tomas Lindqvist

Cloners and MoGraph effectors are the core of Cinema 4D's procedural motion toolset. A Cloner duplicates an object into a linear, radial, grid or object-based arrangement, and effectors then change the position, scale, rotation or color of those copies in bulk. Fields decide where each effector acts and how strongly. The result is motion that would be impossible to keyframe by hand: a wall of four hundred tiles that ripples when a logo passes through it, a spiral of spheres that blooms outward on a beat, or text that assembles itself from scattered fragments.
The toolset matters to two groups of people. Motion designers and 3D generalists use it every day and need to know how to keep a rig fast, legible and controllable when a client asks for "the same thing, but calmer" on the third revision. Marketers, producers and in-house creative leads commission this kind of work and need to know what separates a setup that can take notes from one that falls apart the moment someone touches it. Because the system is procedural, a single change to a setting updates every clone at once. That is its great strength, and it is also why a poorly built setup can go wrong in ways that are hard to trace.
This guide is organized as a checklist. It starts with a master list of the practices that hold up in production, then gives each item its own section explaining why it matters and how to do it well. After that come the main trade-off between procedural freedom and direct control, an illustrative worked example with real clone counts, and a short verdict on when to build these rigs yourself and when to bring in a specialist team.
The Master Checklist for Cloners and MoGraph Effectors
Use this list at the start of a job to plan the rig, and again before handoff to confirm that someone else could open the file and understand it. Each item is expanded in the sections that follow.
- Choose the cloner mode (Object, Linear, Radial, Grid or Honeycomb) that matches the design's underlying structure.
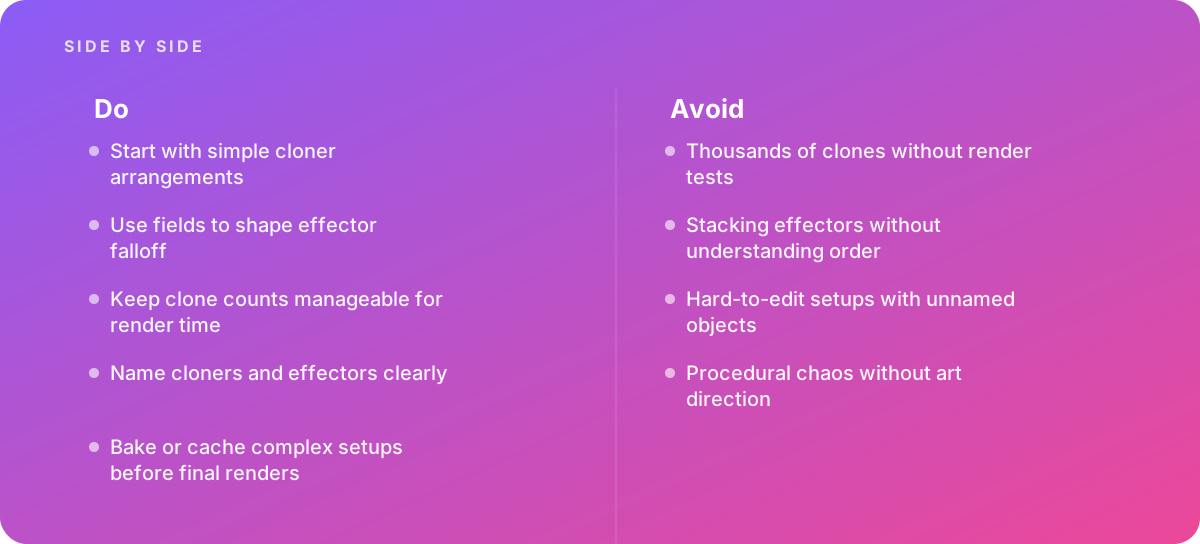
- Build the simplest arrangement first and confirm it reads before adding any effector.
- Shape every effector's influence with fields instead of keyframing its strength directly.
- Know the evaluation order of stacked effectors and add them one at a time.
- Set the clone count from a real render test, not from how the viewport feels.
- Name, color-code and group every cloner, effector and field so the hierarchy explains itself.
- Give the procedural motion an art direction: a hero moment, a rhythm and a resting state.
- Cache or bake complex setups before final renders and before sending files to a render farm.
- Decide early whether the shot needs procedural freedom, precise direct control, or a mix of both.
None of these items is exotic. What they have in common is that they are cheap to do at the start of a project and expensive to fix at the end. A cloner rig with forty unnamed effectors, no cache and fifteen thousand clones will render eventually, but it will not survive a round of client notes without costing someone a weekend.
Pick the Cloner Mode That Matches the Design, Not the One You Know Best
The Cloner object has several distribution modes, and the choice among them determines how the rest of the rig behaves. Many artists default to Grid Array because it is visually impressive in a viewport, then spend hours fighting it when the design actually wanted clones following a curve or sitting on a surface. Choose the mode from the structure of the design, not from habit.
What each mode is good for
- Linear places clones along a line with a per-step offset in position, scale and rotation. It is the right starting point for stacks, staircases, fanned cards and any row of elements that should read as a sequence. The per-step rotation and scale values let you build a spiral or a tapering column without a single effector.
- Radial arranges clones around a circle, with control over radius, plane, start and end angles, and an offset. It suits dials, flower-like blooms, clock faces and logo rings. A partial arc, such as 0 to 180 degrees, is often more elegant than a full circle.
- Grid Array fills a cube, sphere or cylinder shape with a three-dimensional grid. It is the workhorse for tile walls, pixel fields and volumetric arrays. The count per axis multiplies quickly, which is why it is also the mode most likely to produce an unmanageable clone count.
- Honeycomb Array offsets alternating rows or columns, which gives hexagonal or brick-like tiling. It looks more organic than a square grid for surfaces and backgrounds.
- Object mode distributes clones on another object: its vertices, edges, polygon centers, surface or volume, or along a spline. This is how you scatter elements over a product model, put beads on a curve or make type out of smaller shapes.
The clones setting is a separate decision
When a cloner has more than one child, the Clones setting decides which child appears where. Iterate cycles through the children in order, Random picks by seed, Blend interpolates between children's parameters, and Sort lets fields or effectors decide which child each clone uses. Iterate is predictable and easy to art direct; Random looks natural but needs a seed you have tested; Sort is powerful for transitions where one object type turns into another as a field passes through.
A good test before committing is to sketch the design as a flat diagram and ask one question: does this want to be a line, a ring, a lattice, or a coating on something else? The answer usually points to one mode. If the answer is "a lattice that bends along a path," consider a Grid or Linear cloner feeding a Spline Wrap deformer, or a Matrix object feeding a second cloner, rather than forcing one mode to do everything.
Build the Simplest Arrangement First, Then Add One Layer at a Time
Every good cloner rig starts as something almost boring: a single cloner, one child object, a clean arrangement that reads correctly with no effectors applied. The reason is diagnostic. Once three effectors and four fields are in play, a visual problem could come from the distribution, any of the effectors, the field falloff, a deformer on the child, or the child's own animation. If the base arrangement was confirmed first, you have removed one entire category of suspects.
A practical build order
- Model or choose the child object and check its axis. A clone scales and rotates around its own axis, so a tile whose axis sits at a corner will rotate around the corner. Fix the axis now, not after the effectors are in.
- Set the cloner mode, count and spacing. Keep the count low at this stage, perhaps a quarter of what you think you need, so the viewport stays responsive while you design.
- Decide the Instance Mode. Standard Instance is fine while designing; Render Instance and Multi-Instance matter once counts climb, and are discussed in the render-test section below.
- Add one effector and set its parameters with its strength at full, so you can see exactly what it does.
- Add a field to that effector and shape where it acts.
- Only then add the next effector, and repeat.
Working this way also makes the rig easier to explain. If a producer asks why the wave now looks jittery, you can switch effectors off one by one and show where the jitter comes from. That conversation is much shorter with a layered build than with a rig that was assembled all at once.
Tip: Keep a disabled "reference" duplicate of the bare cloner at the top of your Object Manager during the build. When the stacked result stops making sense, compare it with the reference to see whether the arrangement itself has drifted, for example because someone changed the grid count while testing.
Starting simple does not mean aiming low. Many of the most striking MoGraph pieces use a surprisingly plain cloner, such as a single Linear row of forty cards, with one or two well-shaped effectors. Complexity in the result usually comes from the fields and the timing, not from the number of objects in the hierarchy.
Shape Effector Falloff With Fields Instead of Keyframing Strength
An effector with no field applies its changes to every clone equally. That is rarely what a design wants. Fields control where and how strongly an effector applies, and they are the difference between a wall of tiles that all jump at once and a wave that travels across the wall with a soft leading edge.
How fields think
Each field produces a value from zero to one at every point in space. A Spherical Field is strongest at its center and falls off toward its radius; a Linear Field ramps across a direction; a Box, Cylinder, Cone, Capsule or Torus field gives you those shapes. Shader, Random, Formula, Sound and Python fields generate values from textures, noise, math, audio or code. Fields sit in a layer list on the effector's Falloff tab and combine with blending modes such as Normal, Add, Subtract, Multiply, Max and Min, much like layers in an image editor.
On top of the shape layers, modifier layers change the result. A Remap or Curve layer reshapes the falloff; Clamp limits it; Quantize steps it into bands; Delay smooths changes over time; Decay makes influence fade after the field passes; and Freeze captures the field's value and can accumulate it, which is how "growth" effects work, where clones switch on and stay on after a field sweeps past them.
Why fields beat keyframed strength
You could animate an effector's strength from 0 to 100 percent and get a reveal. But every clone would reveal at the same moment, and changing the timing would mean editing keys. With a Linear Field moving across the cloner, each clone's reveal time is set by its position, so the result is a sweep rather than a fade. The field's position is what you keyframe, and its falloff width sets how many clones are mid-transition at any moment. A narrow falloff reads as a crisp, mechanical wipe; a wide one reads as a gentle wash.
Keyframing the field instead of the strength has another benefit: the timing lives in one place. When the client asks for the reveal to finish half a second earlier, you move two keys on the field and every clone updates. The quality of those keys still matters, and the principles in our guide to keyframe interpolation and the graph editor apply directly here, because an ease on the field's movement becomes an ease on the whole sweep.
Shaping falloff well
- Use a Remap or Curve layer rather than stacking more fields when you want a sharper or softer edge.
- Invert a field instead of rebuilding it when you need the opposite region.
- Combine a Linear Field with a low-strength Random or Shader field on Add or Multiply to break up perfect straight edges without losing direction.
- Check the falloff visually: most field objects draw their shape in the viewport, and effectors can display field values on clones so you can see the gradient before rendering.
Understand Effector Order Before You Stack a Second One
Stacking effectors without understanding their order is one of the most common reasons MoGraph rigs behave unpredictably. On a cloner, effectors are listed in the Effectors tab and are evaluated in sequence from top to bottom. Each effector works on the result of the ones above it. Changing the order can change the result, sometimes dramatically.
Where order bites
Some combinations are close to order-independent. Two Plain effectors that each add a position offset will sum to the same place in either order. Many others are not. A Random effector followed by a Target effector gives you randomly placed clones that all face the target; reverse them and the random rotation is applied after aiming, so the clones no longer face the target. A Step effector that scales clones along the index followed by a Push Apart effector gives spacing that respects the new sizes; reverse them and Push Apart calculates on the old sizes, leaving overlaps.
Effectors that read clone state are especially sensitive. The Delay effector smooths changes over time, so it should generally sit after the effectors whose motion you want to soften. The Inheritance effector copies transforms from another cloner or object, and anything below it modifies the inherited result. The ReEffector re-applies a previous state and can make ordering even more important.
A safe way to stack
- Write down, in plain words, what you want each effector to do and in which order the viewer should perceive it, for example "scatter, then aim at camera, then settle with lag."
- Add effectors in that order and verify the result after each one.
- When something looks wrong, drag the last-added effector up or down one slot and compare. If the result changes, the order matters for that pair.
- Avoid using the same effector on several cloners unless you have checked that it produces what you want in each one. A shared effector is efficient, but it also means one tweak changes several shots.
Watch out: Effectors linked to a cloner but disabled in the Object Manager, or enabled but set to zero strength, still sit in the list and are easy to forget. Before handoff, remove anything you are not using. A dormant effector that someone switches on later is a classic source of "the shot changed and nobody knows why."
Order also interacts with deformers and with dynamics. A deformer on the child object is applied before cloning, so every clone inherits the deformation in its own local space. A deformer placed as a sibling of the cloner under a Null, or on the cloner itself, acts on the combined result. If you use MoGraph dynamics through a Rigid Body tag on the cloner, effectors typically set the initial state and forces, and the simulation takes over from there, so an effector you expect to drive motion throughout the shot may seem to stop working once the simulation begins.
Set Clone Counts From a Render Test, Not From the Viewport
Thousands of clones without render tests is the mistake that costs the most time, because it tends to surface late: the viewport was sluggish but workable, the preview renders were small, and then the first full-resolution frame takes far longer than the schedule allows. Keep clone counts manageable for render time, and find out what "manageable" means for this shot on your hardware early in the job.
How counts multiply
Grid Array counts are the product of the three axis values. A grid of 40 by 40 by 1 is 1,600 clones; change the depth to 10 and it is 16,000. Nested cloners multiply again: a cloner of 50 rows, each of which is itself a cloner of 50 elements, is 2,500 clones. Polygon counts multiply too. A child object with 2,000 polygons cloned 16,000 times is 32 million polygons before any subdivision, hair or displacement is considered. Those multiplications are simple arithmetic, and doing them before you commit to a count is the cheapest render test there is.
Instance modes and what they change
The Cloner's Instance Mode setting is the main tool for keeping heavy arrays renderable. The table below summarizes how the three modes are usually chosen.
| Instance Mode | How it stores clones | Best for | Trade-off |
|---|---|---|---|
| Instance | Each clone is a separate instance in the scene, which the renderer may still treat as full geometry | Low counts, clones that need individual handling, early design work | Memory and scene-preparation time grow quickly with count |
| Render Instance | Clones share one piece of geometry at render time | Hundreds to thousands of identical or few-variant clones | Less flexibility for per-clone geometry operations after cloning |
| Multi-Instance | Clones are handled as a single, lightweight group with reduced viewport display options | Very high counts where individual clone editing is not needed | Viewport shows simplified proxies; some per-clone features and downstream operations are limited |
Renderer support for each mode varies by engine and version, so check the documentation for the renderer you use rather than assuming a mode will be honored. The official Maxon documentation and product pages for Cinema 4D are the authoritative reference for what each mode does in your version.
A render test that tells you something
- Pick the heaviest frame in the shot, usually the moment with the most clones visible, the most motion blur or the most reflective overlap.
- Render it at final resolution with final sampling on the machine class that will do the real render.
- Note the render time and the scene-preparation time separately. If preparation dominates, the problem is geometry and instancing; if sampling dominates, it is materials, lights or blur.
- Multiply the per-frame time by the frame count. A 10-second shot at 30 frames per second is 300 frames; at 25 fps it is 250. Our note on frame rates for web animation covers how that choice affects both motion and render budget.
- Compare the total with the time available, leaving room for at least one full re-render after notes.
If the numbers do not fit, reduce what the viewer cannot see before reducing what they can. Clones behind the camera, hidden by other geometry, or smaller than a few pixels in the final frame can often be removed, simplified with a lower-polygon child, or culled with a field-driven Visibility setting on a Plain effector.
Name, Color-Code and Group Every Cloner, Effector and Field
A MoGraph setup that works but cannot be edited is only half finished. Hard-to-edit setups with unnamed objects are a mistake that rarely bites the original artist on the day. It bites the next person, or the same artist three weeks later when the client comes back. Name cloners and effectors clearly, and treat the Object Manager as documentation.
A naming convention that holds up
The exact convention matters less than using one consistently. A pattern that works on many teams is a type prefix, the subject and the job it does:
- CL_TileWall_Main for the cloner that builds the primary wall.
- EF_TileWall_Reveal_Plain for the Plain effector that handles the reveal.
- EF_TileWall_Jitter_Random for the Random effector adding variation.
- FL_TileWall_RevealSweep_Linear for the Linear Field that drives the sweep.
- NULL_TileWall_Rig for the parent that groups all of the above.
Keeping the effector type at the end of the name tells a reader what kind of object it is without opening it, and keeping the job in the middle tells them why it exists. Field names should describe what the field does in the shot, not just its shape, because a scene with five Linear Fields named "Linear Field," "Linear Field.1" and so on is unreadable.
Structure beyond names
- Group each rig under one Null so it can be hidden, soloed or moved as a unit.
- Use layers or display colors so that all effectors of one rig share a color in the Object Manager and the viewport.
- Put fields that are shared by several effectors in a clearly named group, and avoid silently sharing a field between rigs that should behave independently.
- Add a short annotation, using an Annotation tag or the object's name field, on any object whose purpose is not obvious, such as a Formula effector with a hand-typed expression.
- Delete test objects before handoff instead of leaving them disabled.
Clear structure also protects the long-term value of the file. When a project is archived and reopened a year later for a new edit, the difference between a readable hierarchy and a tangle of defaults is the difference between a quick update and a rebuild. Our guide to archiving animation projects covers how to package these scenes with their caches, textures and fonts so they reopen cleanly.
Give Procedural Motion an Art Direction
Procedural chaos without art direction is the mistake that makes MoGraph work look generic. A Random effector at full strength on a grid of cubes produces motion, but it does not produce meaning. Viewers read the result as noise because it is noise. The tools make it easy to generate movement; the craft is deciding what the movement is for.
Three questions to answer for every shot
- Where should the eye go, and when? Every shot needs a hero moment, such as the frame where the logo resolves or the product lands. The procedural motion should lead toward it, frame it, and then get out of the way.
- What is the rhythm? Decide whether the motion is a single gesture, a series of beats, or a continuous loop. Map the beats on a simple timing chart before you build. The method in our guide to animation timing charts works just as well for a sweep of clones as for a character.
- What is the resting state? Procedural rigs often never settle. A shot that ends with every clone still drifting feels unfinished. Plan a final state, even if it is a subtle idle, and make sure fields and effectors actually reach it.
Techniques that bring order to procedural motion
- Limit randomness to one or two parameters. Random rotation plus a slight random scale reads as organic; random position, scale, rotation and color together read as a screensaver.
- Use Indexed or Noise modes on the Random effector when you want variation that is coherent across neighbors, rather than pure per-clone randomness.
- Lock seeds once approved. A seed that a client has signed off on is part of the design. Write it down in the effector's name or an annotation.
- Use Step or Formula effectors for ordered variation, such as a cascade by index, when the design wants a clear sequence rather than scatter.
- Add lag with the Delay effector to make a sweep feel physical, but keep its strength moderate so the motion does not turn to mush.
- Tie color changes to the same field as motion, so a clone changes color as it moves, rather than on an unrelated schedule.
Art direction also means knowing when the procedural system is the wrong tool for part of a shot. If one hero clone needs to do something specific, such as land a beat early or catch the light a particular way, it is often cleaner to exclude it with a MoGraph Selection and animate it by hand, or to use the Fix Clone and Reset Coordinates options on a separate object, than to bend the whole rig around one element.
Templates are useful for editors who need repeatable motion, but they rarely carry this kind of art direction on their own. The trade-offs are covered in our piece on motion graphics templates for editors, which explains why a cloner-heavy 3D sequence usually ships as rendered footage rather than as an editable template.
Cache or Bake Complex Setups Before Final Renders
A live MoGraph rig is recalculated every time the scene evaluates a frame. For simple setups that is fine. For rigs with Delay effectors, Freeze or Decay field layers, dynamics, or anything else whose result depends on earlier frames, it can be a problem: render farms often distribute frames across many machines, and a machine that starts rendering at frame 180 does not know what happened between frames 0 and 179. The result can be flicker, popping or frames that do not match. Bake or cache complex setups before final renders.
Your caching options
- MoGraph Cache tag. Applied to the cloner, it records the position, rotation, scale, color and other clone data per frame, which removes the dependence on earlier frames and speeds up playback. The cache can be stored in the project or written to external files, which keeps the main scene file lighter.
- Dynamics caching. If the cloner uses rigid or soft body dynamics, bake the simulation in the dynamics settings or with the cache tag before final renders, so each frame is reproducible.
- Alembic export. For handoff to another application, a lighting team or a different renderer, exporting the cloner's result to Alembic freezes the geometry and animation into a portable format. The procedural controls are lost in the export, so keep the original rig archived.
- Current State to Object. For static arrangements, converting a cloner to editable geometry is the simplest bake of all, but it removes the procedural controls for good. Keep a copy of the live rig in the scene or in a separate file.
When to bake
Bake after the look is approved and before final renders, not before. Caching too early locks in a version the client has not seen, and every change after that means clearing and rebuilding the cache. A good rhythm is to keep the rig live through design and review, cache it once motion is signed off, render the final from the cache, and store both the cache and the live rig with the project.
Tip: After caching, scrub to a random frame in the middle of the shot and render it by itself, then render the same frame as part of a sequence. If the two images differ, something in the rig is still being evaluated live, often a field layer, a Sound effector or a child object's own animation that was not included in the cache.
Caching also matters when the same motion is reused in several places. A cloner reveal built for a hero film can be cut down for social formats, reused as an end card or adapted for other languages. A cached, well-named rig makes those versions quick to produce. Our guides to end cards and calls to action and to localization workflows cover what changes between those versions.
Procedural Freedom or Direct Control: The Key Trade-Off
Every MoGraph shot sits somewhere between two poles. At one end is a fully procedural rig where fields and effectors drive everything and changing one value reshapes the shot. At the other end is direct control, where each important element is keyframed individually and behaves exactly as animated. Most good work mixes the two, and the right mix depends on how many revisions you expect and how precise the result has to be.
Pros
- One change to a setting updates every clone at once, which makes large-scale revisions fast.
- Complex motion across hundreds or thousands of elements becomes possible without animating each by hand.
- Variations for different aspect ratios or durations can often be produced by adjusting a few parameters.
- Rhythm and falloff are consistent across the array because they come from the same fields.
Cons
- Precise, frame-exact control over one element is harder; the system resists one-off exceptions.
- Stacked effectors and fields can interact in ways that are hard to predict or explain.
- Render time and memory can climb quickly as counts grow.
- Rigs that depend on earlier frames need caching before they render reliably on a farm.
A useful rule is to keep procedural the things that should behave as a group and take direct control of the things the viewer is meant to notice individually. A background field of tiles should be procedural; the one tile that flips to reveal the product should often be animated by hand or isolated with a selection so its timing can be art directed without touching the rest.
The balance also depends on where the motion will play. Pre-rendered footage can carry very heavy rigs because the cost is paid once at render time. Motion that has to run live in a game engine or an interactive installation has very different limits, which our article on real-time motion graphics in game engines explains in detail.
Worked Example: An Illustrative Tile-Wall Logo Reveal
The following example is illustrative, not a client project. It shows how the checklist turns into decisions with real numbers for a common brief: a 10-second, 1920 by 1080 logo reveal at 30 frames per second, where a wall of tiles flips in a wave to reveal a logo, then settles.
Planning the rig
The wall is a flat lattice, so the cloner mode is Grid Array with a depth of 1. The frame is 16:9, and square tiles look best, so the grid is 32 columns by 18 rows, giving 576 clones. Each tile is a bevelled box with two material slots, one for the front face and one for the back, at roughly 300 polygons, so the wall totals about 173,000 polygons. That is light enough to use standard Instance mode while designing and switch to Render Instance for the final.
The effectors, in order, are a Plain effector that rotates tiles 180 degrees on one axis (the flip), a Random effector adding small rotation variation limited to a few degrees, and a Delay effector in Spring mode with moderate strength to add a slight overshoot as each tile lands. A Linear Field drives the Plain effector from left to right across the wall, with a Remap layer to give the sweep a firm leading edge. A Freeze layer is not needed, because the field ends fully across the wall and the tiles stay flipped.
Timing and render budget
| Item | Value | Reasoning |
|---|---|---|
| Total frames | 300 | 10 seconds at 30 fps |
| Hold on scattered tiles | Frames 0 to 45 | 1.5 seconds to establish the wall before motion |
| Field sweep | Frames 45 to 195 | 5 seconds so each column of tiles is readable as it flips |
| Settle and logo hold | Frames 195 to 300 | 3.5 seconds for Delay overshoot to resolve and the logo to read |
| Clones | 576 | 32 by 18 by 1 grid |
| Approximate polygons | 173,000 | 576 clones at about 300 polygons each |
| Test frame | Frame 120 | Mid-sweep, with the most tiles in motion and the most motion blur |
Suppose the render test at frame 120 takes 90 seconds on the target machine. Over 300 frames that is 27,000 seconds, or 7.5 hours for one full pass. If the schedule allows one working day for rendering, including one re-render after notes, that is too tight. The options, in the order to try them, are: check that Render Instance is actually used by the renderer; reduce motion-blur samples on the tiles, which are small on screen; lower the tile bevel subdivision, which is barely visible at this size; and only then consider reducing the grid. A 24 by 14 grid would drop to 336 clones, but it would also make each tile bigger and change the design, so it is a creative decision, not just a technical one.
The revision that tests the rig
Now suppose the note comes back: "Make the wave go from the center outward, and make it feel calmer." With a well-built rig, this is a small job. Replace the Linear Field with a Spherical Field centered on the logo and animate its radius instead of its position. Widen the Remap so more tiles are mid-flip at once, which reads as calmer. Reduce the Delay effector's spring strength so the overshoot is softer. Because the effectors are named, the field is labeled, and the timing lives on one field's keys, the change touches three objects, and the rest of the shot is untouched. Then re-cache, re-test frame 120, and render.
A rig with unnamed effectors, the flip keyframed per row and randomness applied before the flip would need to be partly rebuilt to take the same note. That difference, not the first render, is where procedural motion earns or loses its value.
When a Cloner Rig Needs a Specialist Team
Many teams can build a single cloner shot well with the checklist above. The picture changes when abstract 3D motion needs precise control across many shots. A campaign with a dozen deliverables that share one visual system, a brand film where every scene uses the same tile language, or a museum or exhibition piece that loops for months on large displays all put pressure on consistency, render planning and file management that goes beyond one artist's single scene.
Signs it is time to bring in help
- The same MoGraph look has to appear across many shots, formats or languages, and must match exactly each time.
- Render tests show that the schedule cannot absorb a full re-render after notes.
- The rig needs dynamics, heavy field stacks or cross-application handoff via Alembic, and nobody on the team has shipped that combination before.
- Feedback keeps landing on "it feels random" and the team is unsure how to give procedural motion clear art direction.
- The file has already been through several artists and nobody fully understands the hierarchy.
A specialist studio brings a tested naming and caching workflow, render planning across many shots and experience with how clients react to procedural motion in review. If you are weighing that option, our animation and motion graphics production service covers how that work is scoped. Good MoGraph shots also make strong portfolio pieces, and the advice in our guide to building a motion reel applies whether you are presenting your own work or reviewing a studio's.
Verdict Cloners and MoGraph effectors reward discipline more than ambition. Choose the cloner mode from the design's structure, build simply, shape everything with fields, respect effector order, set counts from render tests, name every object, give the motion a clear point of view and cache before you render. Do those things and a procedural rig becomes the fastest way to make, and revise, complex 3D motion. Skip them and the same tools produce slow, fragile scenes that look like everyone else's demo reel.
For most in-house teams, the right approach is to build smaller cloner shots in-house using this checklist and to bring in outside help for multi-shot systems where consistency and render budgets carry real risk. Either way, the checklist is the same, and it is worth printing out before you open the Object Manager.
Where this comes from
The figures and practices above come from the sources listed.
Working on something like this?
We take on Motion Graphics & Animation work for teams who want it done once, properly. Tell us what you are building and we will tell you honestly whether we are the right studio for it. Start a project.
Where to go next
Spotted something wrong? Report an error on this page. We correct on the page and say what changed.