Audiobook and Long-Form Narration: The Decisions That Matter
A checklist for audiobook and long-form narration: lock the spec, fix the room and mic chain, keep room tone, match pickups and master every chapter alike.
 Tomas Lindqvist

Audiobook and long-form narration means recording and finishing spoken word at length, often eight, twelve or twenty hours of finished audio, to the technical and consistency standards that distributors and publishers require. It sits at the far end of voice work from a thirty-second commercial. A commercial is judged on a single performance; a book is judged on whether the performance, the sound and the room hold together across dozens of sessions recorded over weeks or months.
That is the central idea of this guide: long-form narration is judged on consistency above all. A listener will forgive an imperfect read, a slightly rushed paragraph or a character voice that is not quite what they imagined. What they will not forgive is a narrator who sounds like a different person in chapter fourteen, a room that suddenly gets brighter, or a noise floor that hisses in one chapter and vanishes in the next. Distributors think the same way, and their quality checks are built to catch exactly those shifts.
This checklist guide is for authors producing their own audiobooks, publishers commissioning narrators, training and e-learning teams recording long courses, and the narrators and engineers doing the work. It starts with a master checklist, then gives each item its own section explaining why it matters and how to do it well.
The Audiobook and Long-Form Narration Master Checklist
Every item below is a decision that is cheap to make before recording and expensive to fix after it. Work through the list in order; the later items depend on the earlier ones.
- Confirm the exact distributor or publisher specification, in writing, before the first session.
- Choose one recording room and make it quiet, dead and repeatable.
- Fix the microphone, position, gain and interface settings, and document them with photos and measurements.
- Mark up the manuscript and build a pronunciation list before anyone steps up to the microphone.
- Plan session length and scheduling around the narrator's voice, not the calendar.
- Record room tone at the start and end of every session and label it.
- Choose a recording method (punch-and-roll or straight read) and an editing workflow that finds errors reliably.
- Record pickups and retakes under matched conditions, checked against the original audio.
- Process the whole production with one consistent chain and master every chapter to the same target.
- Run a chapter-to-chapter consistency check and a specification check before delivery.
- Know when a problem is beyond in-house repair and bring in help early.
The sections that follow take each item in turn. If you are short on time, the three that cause the most rejected or re-recorded productions are the room, the documented setup and the matched pickups.
Lock the Distributor Specification Before the First Session
Distributors publish technical requirements, and they are not suggestions. Typical requirements cover a specified loudness range, a peak ceiling and a maximum noise floor, along with file format, sample rate, bit rate, channel configuration, the amount of silence or room tone at the head and tail of each file, and how chapters are split. Most audiobook platforms expect separate files per chapter, plus opening and closing credits and sometimes a retail sample.
The reason to confirm this first is that several of these numbers shape how you record, not just how you master. A strict noise floor requirement tells you how quiet the room must be, because noise that is baked into the recording can only be reduced so far before the voice starts to sound processed. A loudness window tells you roughly how hot to record so that you are not adding large amounts of gain later, which raises the noise floor along with the voice. The head and tail silence requirement tells your editor how to trim every file.
If you are producing for Audible through ACX, read our practical guide to ACX audiobook requirements before you plan anything else, because its checks are among the most commonly referenced in the industry. For other retailers, aggregators, library platforms, podcast-style serialized fiction or internal learning platforms, get the current specification from the destination itself. Podcast feeds, for example, follow their own guidance; Apple Podcasts for Creators publishes audio requirements for shows distributed there, and they are not the same as audiobook retail requirements.
Tip: Meet the distributor specification rather than a general standard. Write the target numbers on a one-page production sheet that travels with the project, and note the date you checked them. Specifications change, and a production that takes three months can outlive the version you started with.
If a book will go to more than one destination, identify the strictest requirement for each parameter and produce a master that satisfies it, then create destination-specific delivery files from that master. It is much easier to derive a podcast-loudness version from a clean audiobook master than to rescue a book mastered too loud or too noisy.
Build a Recording Room You Can Return to for Months
The room is the part of the sound you can least fix after the fact. Equalization can nudge tone, and noise reduction can lower a steady hiss, but the reflections of a small untreated room are woven into the voice itself. More importantly for long-form work, every room sounds different. If chapters one to ten are recorded in a treated booth and chapters eleven to twenty in a spare bedroom, no amount of processing will make them sound like one book.
What "good enough" means for narration
A narration room needs three properties. It must be quiet, meaning low steady noise from ventilation, computers, refrigerators and traffic, and few intermittent noises such as plumbing, footsteps or deliveries. It must be dead, meaning short, even decay with no audible slap or boxiness close to the microphone. And it must be repeatable, meaning that the same room, set up the same way, will sound the same next Tuesday and next month.
Practical steps help with all three. Heavy absorption close to the narrator, on the wall they face and behind the microphone, does more than scattering thin foam around the whole room. Soft furnishings, a rug and closed curtains help a domestic space. Turning off heating or air conditioning during takes removes one of the most common broadband noise sources, but plan breaks so the room does not become unbearable. Computers belong outside the room or in a well-damped enclosure, and hard drives and fans should be as far from the microphone as possible.
Why a portable booth still needs checking
Portable vocal booths and reflection filters can work well, but they change the tone of the voice, often adding a slightly boxy low-mid color. That is acceptable if it is consistent. It becomes a problem when the booth is folded away between sessions and reassembled slightly differently, or when it is used for some chapters and not others. If you use one, treat its placement as part of the documented setup.
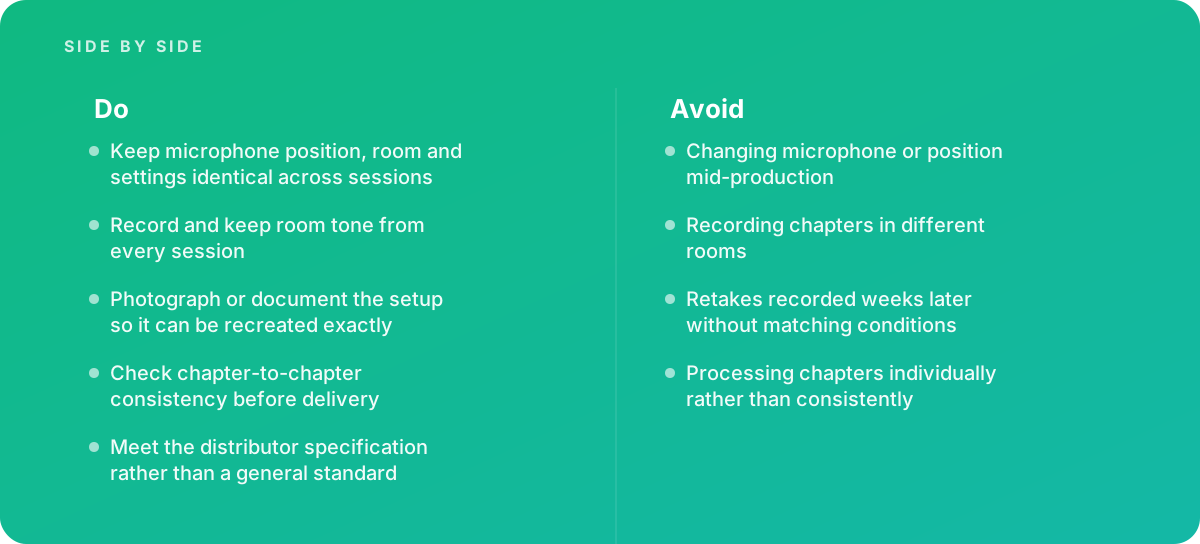
Recording chapters in different rooms is one of the most common mistakes in self-produced audiobooks, and it usually happens for sensible-seeming reasons: a move, a holiday, a noisy neighbor. If you must change rooms, stop and re-record a test chapter in the new space, then compare it directly against the earlier material before committing. Low-frequency hums from building wiring and equipment are a separate problem worth diagnosing early; our guide to removing hum and buzz covers how to track down the source rather than just filtering it.
Fix the Microphone Chain and Document It
Once the room is set, the next source of drift is the chain: microphone, position, preamp gain, interface, cables and software settings. Changing microphone or position mid-production is on every experienced engineer's list of mistakes to avoid, because each change shifts tone, proximity bass and the balance of voice to room. A microphone moved five centimeters closer sounds warmer and drier; moved off-axis, it sounds duller. Listeners hear these differences as a change in the narrator, not as a change in the equipment.
The fix is simple and routinely skipped: document the setup so it can be recreated exactly. Photograph the microphone from the front and side with the narrator in position. Measure the distance from the capsule to the mouth, and the height from the floor. Note the angle, the pop filter distance, the preamp gain setting, any pad or high-pass switch on the microphone or interface, the sample rate and bit depth in the recording software, and the monitoring level in headphones. Keep the chair in the same place and mark its position on the floor with tape.
- Microphone Same model and same unit for the whole book, with any switches recorded
- Distance Measured mouth-to-capsule distance, checked at the start of each session
- Gain Preamp setting written down or photographed, not set by ear each day
- Software Sample rate, bit depth and track template saved as a project file
- Room layout Chair, stand, booth and treatment positions marked or photographed
- Room tone A labeled sample from every session, stored with the raw audio
Record the raw audio without heavy processing on the way in. A clean, uncompressed, unprocessed recording at the sample rate and bit depth your workflow uses (commonly 24-bit, at 44.1 or 48 kHz, converted to the delivery format at the end) gives the editor the most room to work. Compression, noise reduction and equalization applied at the recording stage are baked in, and if they vary from session to session, they become another source of inconsistency. Our guide to voice-over recording goes deeper into microphone choice and gain staging for spoken word.
The Audio Engineering Society, whose standards and technical work on spoken word production underpin much of professional practice, is a useful starting point for anyone who wants the theory behind gain staging, level measurement and file formats rather than rules of thumb.
Mark Up the Manuscript and Settle Pronunciations Before Recording
Script preparation looks like a performance matter, but it is also a consistency matter. A character name pronounced two ways, an invented place name that drifts across chapters, or a foreign phrase read differently on day twenty than on day three are all errors that a listener catches and a distributor's reviewer may flag. Every one of them means a pickup, and every pickup is a chance for the sound to change.
Build a pronunciation list before the first session: every proper noun, technical term, acronym, foreign word and invented word in the text, with the agreed pronunciation written phonetically and, ideally, a short reference recording from the author or subject expert. Decide how numbers, dates, units and abbreviations will be read. For nonfiction, decide how to handle tables, figures, footnotes and URLs, which rarely translate directly to audio and often need a short spoken summary written in advance.
For fiction, the list extends to characters: voice, accent, pace, age and any distinctive speech pattern, noted the first time each character speaks so the narrator can check back hundreds of pages later. A narrator who records a short reference line for each major character at the start of the project has something to match against when that character reappears after a long gap.
Tip: Mark up the full manuscript in one pass before recording, not chapter by chapter during sessions. Marking in advance catches pronunciation questions early enough for the author to answer them, and it stops the narrator stopping mid-session to look things up. Our practical guide to marking up narration scripts sets out a markup system that works for long texts.
Script preparation is also the moment to confirm casting. If the book needs a particular accent, age range or ability to voice many characters, that should be settled before the room and chain are documented around one person's voice. Our guide to casting voice talent covers how to run auditions against a real passage from the text rather than a generic sample.
Plan Sessions Around the Narrator's Voice, Not the Calendar
A voice changes over a day, over a week and with health. It is typically lower and rougher first thing in the morning, clearer after warming up, and tired and thinner after hours of continuous reading. Colds, allergies and dry air change it further. Because the goal is a voice that sounds the same in every chapter, the schedule should be built to keep the narrator in the same condition every time they record.
In practice, that means similar session times each day, similar session lengths, and regular breaks. Many narrators find that a few hours of focused reading per day, split into blocks with rests and water, is sustainable over weeks; pushing for long marathon days tends to produce audible fatigue in the last hours and a rougher voice the next morning. The right figure depends on the individual and the material, so treat any number as a starting point and listen to the results. Dense technical text, many character voices or emotionally intense scenes are more tiring than plain narrative.
Remote and directed sessions
When a director or producer is involved, decide in advance how they will listen and give notes. A director who hears the session live can catch pronunciation slips and tonal drift immediately, which reduces pickups later. For productions where narrator and director are in different places, our guide to directing remote voice sessions covers connection, talkback and note-taking so that direction does not interrupt the recording chain or change the narrator's position.
Keep a session log: date, time, chapters and pages covered, any setup changes (there should be none), the narrator's condition, and any noises or problems noticed. When an editor finds a problem three weeks later, the log tells them whether it was a one-off or a pattern, and which room tone file to use.
Record Room Tone at the Start and End of Every Session
Room tone is the sound of the recording space with nobody speaking: the residual noise of the room, the equipment and the building. It is not silence, and that is why it matters. Editors use it to fill gaps, to smooth edits, to create the required head and tail on each chapter file, and to build noise profiles for gentle noise reduction. If the gaps between sentences are filled with digital silence, the listener hears the room switch on and off. If they are filled with room tone from a different session, the background character changes mid-chapter.
Record at least thirty seconds of room tone at the start and end of every session, with the narrator in position, breathing quietly and not moving, and everything else exactly as it will be during takes. Label each file with the date and session number and store it alongside that session's raw recordings. Room tone should be kept consistent across the whole production; the per-session files are how you verify that it is, and how you match it when it is not.
Room tone is also your early warning system. Put the day's room tone on the same timeline as the first session's room tone and listen. If the new one is noticeably louder, has a new hum, or has a different color, something has changed: a new appliance, a different ventilation setting, a cable moved near a power supply. Finding that at the start of a session costs a few minutes. Finding it during editing may cost a chapter.
The European Broadcasting Union's technical work on speech recording practice treats background noise and level consistency as core quality criteria for broadcast speech, and the same logic applies with even more force to a book that will be listened to for many hours in a row.
Choose a Recording Method and an Editing Workflow That Catches Errors
There are two broad ways to record long-form narration, and the choice affects how the editing is done and how consistent the result sounds.
In punch-and-roll recording, the narrator (or an engineer) stops at each mistake, rolls back a few seconds, listens to the lead-in and re-records from just before the error. The finished session is close to a clean read. In a straight read, the narrator reads through, marks mistakes by pausing and re-reading the line, and an editor later removes the bad takes. Both are widely used; the right choice depends on who is editing, how experienced the narrator is and how the budget is split between recording time and editing time.
Pros
- Punch-and-roll produces near-finished audio at the end of each session, so editing time is shorter.
- Rolling back into each punch helps the narrator match pitch, pace and energy immediately.
- Errors are fixed while the room, chain and voice are guaranteed to be identical.
- It suits narrators who self-engineer and have practiced the technique.
Cons
- Constant stopping can break the rhythm of a performance and make it sound stitched together.
- Poorly matched punches leave audible jumps in tone or breath that are hard to hide later.
- A straight read keeps performance flow but moves more work, and more judgment, to the editor.
- Straight reads rely on a careful proofing pass, or retake choices slip through to the listener.
Proofing is a separate job
Whichever method you use, somebody must listen to the finished audio while following the text, word by word, to catch dropped words, misreadings, mispronunciations, noises and bad edits. This proofing pass is distinct from editing. Editors listen to the sound; proofers listen to the words. Combining the two in one pass reliably lets errors through, because attention cannot hold both at once for hours.
Proofers should log each issue with the chapter, timecode, page and line, a short description and a category (misread, pronunciation, noise, edit, level). That log becomes the pickup list. Mouth clicks and lip smacks are a particular long-form issue because they accumulate across hours; our guide to mouth noise cleanup covers how much to remove without leaving the voice sounding clinical.
Match Pickups and Retakes to the Original Session Conditions
Pickups are the lines re-recorded after proofing to fix errors. They are where many otherwise consistent productions fall apart, because retakes recorded weeks later without matching conditions sound like a different recording dropped into the middle of a sentence. Retakes must be matched to the original session conditions: same room, same microphone, same position, same gain, same time of day where possible, and the same vocal energy and pace.
The documented setup from earlier in this checklist is what makes this possible. Before recording pickups, rebuild the setup from the photographs and measurements, then record a short test line and compare it directly against the original chapter on the same timeline. Listen for tone, proximity, room sound and noise floor. Adjust position before adjusting processing.
Performance matching matters as much as technical matching. Play the narrator several sentences before and after each pickup so they can match pitch, pace, intonation and emotional energy. Record each pickup a few times with slight variations so the editor has options. Read a little more than the error itself, starting and ending at a natural pause, so the edit points fall where a breath or sentence break hides them.
Batch pickups by chapter, and record them as early as proofing allows. The longer the gap between the original session and the pickup session, the more the voice, the room and the season will have drifted. Weeks of delay is when matching becomes difficult, and months is when it may become impossible without re-recording whole passages.
Process the Whole Book as One Production and Master to Spec
Processing chapters individually rather than consistently is a quiet but serious mistake. If each chapter gets its own noise reduction settings, its own equalizer curve and its own compressor adjustments, small differences accumulate into a book that shifts in tone every time a new file starts. Listeners often play chapters back to back, and some players remove the gaps between them, so these shifts are very noticeable.
The better approach is one processing chain for the whole production, set up on a representative chapter, checked on a few others, and then applied to everything. Our guide to voice processing chains covers the order and purpose of each stage in detail. For long-form narration, the chain is usually modest: a high-pass filter to remove rumble, gentle corrective equalization, light noise reduction only if needed, gentle compression or leveling to even out the performance, de-essing where sibilance is harsh, and a final limiter to control peaks. The lighter the chain, the more natural the voice sounds over many hours.
Mastering to the numbers
Mastering brings each chapter into the distributor's loudness window, below its peak ceiling, and with a noise floor under its limit, while keeping chapters consistent with one another. The order matters: set the loudness first, then the peak limiting, then measure the noise floor in the gaps, because raising the level raises the noise floor too. If the noise floor fails after loudness is set, the fix is usually in the recording, not in heavier noise reduction.
| Parameter | What it measures | What drives failure | How to stay inside it |
|---|---|---|---|
| Loudness range or average level | How loud the chapter is overall, as defined by the distributor's metric | Recording too quietly, uneven performance, over-compression | Record at a healthy level, level gently, measure every file with the metric the distributor uses |
| Peak ceiling | The highest instantaneous level allowed | Plosives, laughter, shouted dialogue, inter-sample peaks after encoding | Use a true-peak limiter set below the ceiling, and re-check after format conversion |
| Noise floor | The level of the background when nobody is speaking | Noisy room, high gain, noise raised by loudness normalization | Quiet room, light noise reduction, room tone rather than digital silence in gaps |
| Head and tail silence | Room tone at the start and end of each file | Inconsistent trimming, digital silence, clipped first words | Trim to a template and fill with that session's room tone |
| File structure | Format, sample rate, bit rate, channels, one file per chapter | Wrong export settings, mixed mono and stereo, merged chapters | Save an export preset and check every file's properties before upload |
A worked example (illustrative)
The following is an illustrative planning example, not a report on a real project. Suppose a nonfiction manuscript runs to about 90,000 words. Narrated at around 150 to 160 words per minute, a comfortable pace for explanatory material, that works out to roughly 9.5 to 10 finished hours, split into 24 chapters of about 25 minutes each, plus credits.
If the narrator sustains about three finished hours of reading per week in morning sessions, recording takes a little over three weeks. Proofing at real time plus logging typically takes longer than the running time, so allow roughly 12 to 20 hours for a careful proof of 10 finished hours. Suppose the proof log produces around 150 pickups, an average of six per chapter. Recorded in two batches within a week of the relevant sessions, with the setup rebuilt from photographs, those pickups might take two short sessions.
Mastering then applies one chain to all 24 chapters. Before delivery, the engineer measures every file and finds, say, that 22 chapters sit comfortably inside the loudness window, one sits near the bottom edge and one, recorded on a day with a noisy heating system, has a noise floor close to the limit. Rather than processing those two chapters differently, the engineer checks the session log, confirms the heating issue, applies the same noise reduction profile built from that session's room tone at a slightly higher amount, and re-measures. The chapter now passes, and a side-by-side listen against its neighbors confirms it still sounds like the same book. Every number in this example is a planning assumption; your narrator's pace, stamina and error rate will set the real figures.
Run a Chapter-to-Chapter Consistency Check Before Delivery
Automated measurements tell you whether each file meets the specification. They do not tell you whether the book sounds like one continuous production. That needs a listening check designed specifically to compare chapters against one another, and it is the last line of defense before a distributor's reviewer or a listener hears the result.
- Measure every file Run the loudness, peak and noise floor measurements on every final chapter file in the delivery format, not just the working masters, and record the results in a table.
- Line up the outliers Sort the table and note any chapters at the edges of the ranges, even if they pass. Outliers are where audible differences usually hide.
- Listen to the joins Play the last minute of each chapter followed by the first minute of the next, in order, on good headphones. Listen for changes in tone, room, noise and energy.
- Spot-check across distance Compare chapter one against a chapter from the middle and one from the end. Long gaps reveal slow drift that adjacent chapters hide.
- Check the pickups Jump to every logged pickup and listen to ten seconds either side. Poorly matched pickups are the most common consistency flaw in finished books.
- Listen on real devices Play samples on a phone speaker, earbuds and a car system if possible. Noise and harshness that are masked on studio monitors often appear on consumer devices.
- Verify files and metadata Confirm file names, chapter order, format, sample rate, bit rate, head and tail room tone, credits and retail sample against the specification sheet.
If this check turns up a problem, fix it at the source where possible. A chapter that sounds different because of a setup change is better re-recorded than heavily processed. A pickup that does not match is often better re-recorded with a longer run-in than disguised with equalization. Heavy corrective processing on a single chapter tends to create a new inconsistency even as it fixes the old one.
Keep the measurement table and the proof log with the project archive. If a distributor raises a query after submission, they tell you exactly what was checked and what changed, and they make it much faster to deliver a corrected file.
When Long-Form Narration Needs Outside Help
Many authors, publishers and in-house teams produce long-form audio successfully on their own. The checklist above is designed so that they can. There are three situations, however, where bringing in experienced help usually saves time and money rather than costing it.
The first is when a production has been rejected by a distributor. Rejection notes are often brief, and the underlying cause may be the room, the chain, the processing or the export, not the item the note mentions. Repeatedly adjusting processing and resubmitting can make the audio worse while the real cause goes untouched. An engineer who can diagnose the source and decide whether to repair or re-record is usually the fastest route back to a pass.
The second is when sessions must span weeks or months. Long schedules multiply every risk in this checklist: rooms change, equipment gets moved, voices change with the seasons, and memory of how the setup looked fades. A studio or producer with a fixed, documented recording environment and a disciplined session log removes much of that risk. Our voice and narration service is built around exactly this kind of repeatable long-form setup.
The third is when retakes have to match an earlier recording, especially one made by someone else or in a space you no longer have access to. Matching tone, room and performance across a gap is a specialist skill, and sometimes the honest answer is that a longer passage needs re-recording so the join falls at a chapter or section break. For editing, repair, mastering and delivery across all kinds of spoken word projects, see our audio editing and production services.
Verdict Audiobook and long-form narration succeeds or fails on consistency. Lock the distributor specification first, record in one documented room with one documented chain, capture room tone every session, match every pickup to its original conditions, process the whole book as one production, and check the chapters against each other before anyone else hears them. A good performance recorded this way will pass; a great performance recorded without it may not.
Treat the master checklist at the top of this guide as a living document for each production. Print it, attach the specification sheet and setup photographs to it, and tick items off as they are completed. The discipline it asks for is not glamorous, but it is what turns many hours of reading into a book that sounds like a single, confident voice from the first line to the last.
Where this comes from
- Audio Engineering Society — Spoken word production
- Apple Podcasts for Creators — Audio requirements
- European Broadcasting Union — Speech recording practice
The figures and practices above come from the sources listed.
Working on something like this?
We take on Audio Editing & Production work for teams who want it done once, properly. Tell us what you are building and we will tell you honestly whether we are the right studio for it. Start a project.
Where to go next
Spotted something wrong? Report an error on this page. We correct on the page and say what changed.