Retouching Workflow and Handover: The Decisions That Matter
Compare three retouching workflow and handover models, score them on revision cost and readability, and pick the right file standard for your situation.
 Imogen Clarke

A retouching workflow and handover is the set of decisions that determines how a retouching job is organized while it is being worked on, and what state the files are in when they leave the retoucher's hands. It covers how layers are named and grouped, where color work lives relative to pixel repairs, how versions are saved, how final files are produced, and what explanation travels with them. None of that shows in the finished image. All of it shows the moment a client asks for a change, a second retoucher picks up the file, or someone opens the archive eighteen months later looking for the unretouched background.
This guide matters to three groups. Marketing and brand teams who commission retouching need to know what to ask for so that revision rounds stay cheap and the assets they pay for remain usable. Studio managers and producers need a file standard that lets work move between people without being redone. Retouchers themselves need a way of working that protects them from their own shortcuts at eleven at night. Retouching is iterative by nature: feedback arrives in rounds, and a file that cannot be revised efficiently turns every round into fresh work.
Rather than prescribe one method, this article sets out the three realistic models for retouching workflow and handover, the criteria that separate them, a scored comparison, and a recommendation for each common situation. If you are at the stage of deciding who does the work at all, start with our guide to choosing a retouching partner, then come back here to decide how the work should be organized and delivered.
What a Good Retouching Workflow and Handover Must Deliver
Before comparing options, it helps to be precise about what the workflow is for. A good retouching workflow is not the one that produces the best first pass; skilled retouchers produce excellent first passes in messy files all the time. It is the one that keeps the cost of the second, third and fourth pass low, and keeps the file meaningful to whoever opens it next. Five properties define that, and they map directly onto the practices that working studios rely on.
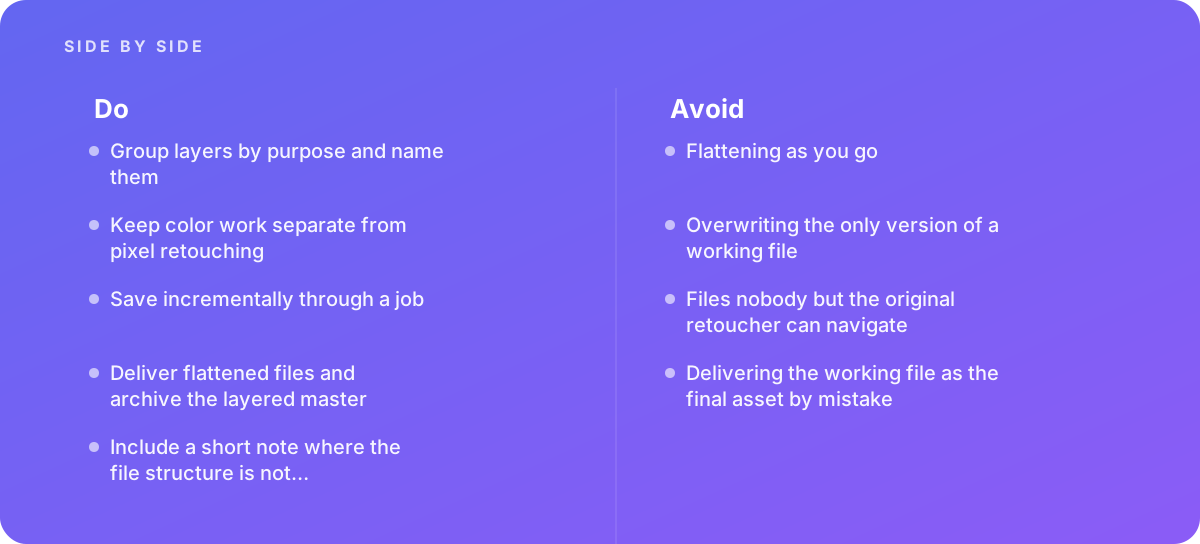
- Layer discipline. Layers are named, grouped and ordered by purpose, so that "Layer 47 copy 3" never appears in a file that leaves the building.
- Separation of concerns. Retouching, color and compositing sit on separate layer groups, so that a color note does not require touching a skin repair, and a background swap does not disturb either.
- Versioning. Work is saved incrementally through the job rather than overwritten, so any earlier state can be recovered without reconstructing it.
- Delivery from a master. Flattened output files are generated from the layered master, never edited directly, and never confused with it.
- Documentation. A short note explains anything in the file that is not obvious from the structure itself: a hidden alternate sky, a mask that must not be feathered further, a color group tuned for a specific print profile.
Each of these has a cost. Naming layers takes seconds per layer, which adds up across hundreds of images. Incremental saves consume disk space. A handover note takes a few minutes to write. The decision framework below is about when those costs are worth paying, and the honest answer is that they are worth paying far more often than people expect, but not always to the same depth.
The Three Workflow Models on the Table
In practice, retouching jobs are organized in one of three ways. They are not rigid categories, and plenty of studios drift between them depending on deadline pressure, but naming them makes the trade-offs discussable.
Model A: Flatten as you go, deliver flat
The retoucher works quickly, merging layers once a stage feels finished, often stamping visible layers and carrying on from the stamp. The working file may or may not survive; what the client receives is a flattened JPEG or TIFF. This is common in high-volume, low-touch work where each image gets a few minutes and revisions are rare, and it is also what happens by accident when a well-intentioned workflow collapses under a deadline.
Model B: Structured layered master, retoucher-owned
The retoucher keeps a layered master for each image, with groups for cleanup, skin or surface work, dodge and burn, color and output sharpening. Layers are named and ordered. The retoucher saves versions as they go. The client receives flattened exports, and the master stays with the retoucher or is archived on request. This is the default for most competent freelance and in-house retouchers, and it handles the majority of commercial work well.
Model C: Studio file standard with a full handover package
Every file follows a documented standard: a fixed group structure and naming convention, a versioning scheme, defined export presets, and a handover package that includes the layered master, the flattened deliverables, a changelog or note, and often the raw-processing settings. The file is built so that any retoucher who knows the standard can open it and continue without asking questions. This is what agencies, multi-retoucher studios and brands with long-lived asset libraries use, and what anyone outsourcing at scale should ask for.
The difference between B and C is not skill; it is who the file is built for. Model B files are built for their author. Model C files are built for a stranger.
The Criteria That Decide Between Them
Six criteria do most of the work in choosing a model. Weight them according to your situation; the scenarios later in this article show how the weighting changes the answer.
1. Cost of a revision round
This is the most important criterion for almost everyone. Ask: if the client says "warm the whole image slightly and bring back some of the freckles on the left cheek," how long does that take? In a structured file it is an opacity change on one layer and a curve tweak in the color group, measured in minutes. In a flattened file it may mean re-retouching the cheek from the original capture and re-grading the whole image, because the freckles were healed into the same pixels as the color shift.
2. Handover readability
Can someone other than the original retoucher navigate the file? This matters whenever work moves between people: a freelancer goes on holiday mid-job, a studio splits a large batch between three retouchers, or a brand changes agencies and wants its masters back. An unreadable file is, for practical purposes, a flat file with extra storage cost.
3. Setup and per-image overhead
Structure has a cost. Naming and grouping layers, maintaining version numbers and writing notes all take time. On a hero campaign image with eight hours of retouching, that overhead is trivial. On a batch of 400 event photos with ninety seconds each, it can dominate. The overhead can be shrunk dramatically with templates, actions and presets, which is one reason Model C is cheaper per image than it looks.
4. Delivery safety
How likely is it that the wrong file goes out? The classic failures are delivering the layered working file as the final asset, delivering a flattened file exported before the last round of changes, or delivering files with the wrong color profile embedded. A workflow in which exports are always generated from the master using fixed presets, into a separate output folder, makes these failures much rarer.
5. Storage and file weight
Layered masters are large. A high-resolution beauty image with a dozen pixel layers, several smart objects and a stack of adjustment layers can reach several gigabytes, and incremental versions multiply that. Adobe's documentation on the Adobe Help Center sets out the format limits: the standard PSD format tops out at 2 GB and 30,000 pixels per side, beyond which the Large Document Format (PSB) is required. Storage is cheap relative to retoucher time, but it is not free, and archiving policies need to account for it.
6. Longevity of the asset
Will anyone need to change this image in a year? Product images get reused across seasons with updated packaging; campaign imagery gets recropped for new formats; portraits get re-graded when a brand refreshes its palette. The longer an asset is expected to live, the more a well-organized master is worth.
In practice, Most teams underweight criteria 1 and 6 when deciding how much structure to pay for, because the cost of a messy file is deferred. It arrives later, as revision time that looks like "the client being difficult" rather than as a workflow problem.
Model A in Detail: Flattening as You Go
Flattening as you go is the fastest way to produce a first pass, and in some contexts that is the only thing that matters. It avoids the memory and disk overhead of large layered files, it keeps the Layers panel short, and it matches how many people learned to retouch. It is also the single most common source of expensive revisions, and it appears on every list of mistakes to avoid for a reason.
The core problem is that flattening fuses decisions together. Once a healing pass, a dodge and burn pass and a color grade are merged into one set of pixels, none of them can be adjusted independently. A request to soften the grade means grading on top of a grade, which degrades tonal quality in the shadows and highlights. A request to restore a detail means going back to the original capture and redoing everything above it. And because nothing records what was done, the redo is guesswork.
There is a narrower version of Model A that is defensible: working non-destructively inside a single session, then flattening only at export, with the raw file and processing settings preserved as the "master." For simple global corrections, such as exposure, white balance and a crop on a batch of event photos, the raw processor's settings file effectively is the layered master. Tools such as Capture One store adjustments as editable instructions attached to the original capture, so a batch processed there can be re-exported with changes at any time. The problem only arrives when pixel-level work is done in a flattened file outside that system.
Pros
- Fastest first pass, with the least per-image overhead
- Small files and low storage cost
- Adequate for global corrections kept in a raw processor
- Simple for very short, one-round jobs
Cons
- Revisions often mean redoing work from the capture
- No independent control over retouch, color and composite
- Impossible to hand over mid-job
- No record of what was done or why
- High risk of stacking grades and degrading tonal quality
If you commission work and receive only flattened files with no working master available, that is not necessarily Model A; the retoucher may be keeping masters privately. Ask. If they are not keeping masters, price revisions accordingly, because each round will be closer to new work than to a tweak.
Model B in Detail: The Structured Layered Master
Model B is where most professional retouching sits, and done properly it solves the revision-cost problem almost entirely. The file keeps the original capture as a locked background layer, and every stage of work sits above it in its own named group, in the order the work is done and read.
A layer structure that works
The exact names vary between retouchers, but the logic is consistent: foundation work at the bottom, finishing at the top, with color separated from pixel retouching so it can be changed without touching repairs.
| Group (bottom to top) | Contains | Why it is separate |
|---|---|---|
| Background (locked) | Original capture or raw-converted base | Always available to sample from and compare against |
| Cleanup | Dust, sensor spots, stray hairs, distractions, on empty pixel layers | Objective fixes that rarely change between rounds |
| Retouch | Skin or surface work, frequency separation layers, shape corrections | The most subjective pixel work; opacity is the main revision control |
| Dodge & Burn | Curves or 50% gray layers for local shaping, plus helper views | Shaping is revised often and must stay adjustable |
| Composite | Background swaps, added elements, smart objects | Structural changes that may need to be replaced wholesale |
| Color | Adjustment layers for global and local grading | Color notes are the most common revision request |
| Output | Sharpening, noise, format-specific tweaks, often hidden by default | Varies by destination; should never be baked into the master |
Two principles make this work. First, pixel repairs are done on empty layers sampling "current and below" wherever possible, so the original pixels are never overwritten. Second, color is done with adjustment layers rather than direct adjustments, so a grade can be changed, masked or switched off. Adobe's layer management documentation on the Adobe Help Center covers groups, color labels, layer comps and smart objects, all of which support this structure. The same principles translate directly to Affinity, where live filter and adjustment layers, groups and a clear layer hierarchy are part of how documents are meant to be structured.
For more on how the shaping layers themselves should be built so they stay adjustable, see our guide to dodge and burn retouching done properly. Keeping the color group separate also matters for consistency across a set, because matching skin tones from image to image is far easier when every grade sits in the same place.
Versioning within Model B
Incremental saving is the cheapest insurance in retouching. A practical convention is to append a two-digit version to the filename at meaningful milestones: after cleanup, after the first full pass, before and after each client round. Something like SKU4471_front_v03.psb. The rule that matters is simply that the only working file is never overwritten with a riskier state. Overwriting the only version of a working file is on every experienced retoucher's list of mistakes to avoid, usually because they learned it the hard way.
Pros
- Most revisions become opacity, mask or adjustment changes
- Color, retouch and composite can be changed independently
- Earlier states recoverable from incremental versions
- Modest overhead once the retoucher's habits are set
Cons
- Structure reflects one person's habits, so handover is uneven
- Naming and grouping discipline slips under deadline
- Large files and multiplied storage for versions
- Delivery safety depends on the individual's care
The weakness of Model B is visible in the cons list. It works beautifully as long as the same person carries the job from start to finish. When the file has to move, its readability depends on how closely that person's habits match the next person's.
Model C in Detail: A Studio File Standard and Handover Package
Model C takes everything that makes Model B work and writes it down so it no longer depends on one person. Its defining features are a shared standard and a defined handover package.
What the standard specifies
- Group names and order. A fixed list, ideally shipped as a template document or a script that creates the empty groups, so every file starts identical.
- Layer naming. Short descriptive names by purpose: "heal_skin_cheekL", "burn_jawline", "grade_warm_global". The format matters less than consistency.
- Color labels. For example, red for anything that must not be changed without asking, yellow for client-requested alternates, gray for helper layers that are hidden at export.
- Versioning scheme. How versions are numbered, when a new version is saved, and which version is the current master.
- Folder structure. Separate folders for capture, working masters, exports and archive, so a flattened file and a layered master never sit side by side in a way that invites confusion.
- Export presets. Named presets for each destination, with defined color profile, bit depth, dimensions and sharpening.
- Handover note. A short, standard-format text file per job or per image where needed.
Capture One's session structure is a useful model for the folder side of this: a session separates capture, selects, output and trash folders by default, which is exactly the separation a retouching standard wants between source, work in progress and deliverables. Many studios mirror that structure for the retouching stage even when raw processing happens elsewhere.
What a handover package contains
A complete package has four parts: the layered master at its final version, the flattened deliverables exported from that master, the note, and enough context to reproduce the starting point, which usually means the raw file plus processing settings or a reference to where they are archived. Delivering flattened files and archiving the layered master is standard good practice. The package just makes the archive self-explanatory.
Pros
- Any trained retoucher can pick up any file
- Revisions stay cheap even years later
- Wrong-file deliveries become rare
- Templates and presets cut per-image overhead
- Scales cleanly across teams and outsourced partners
Cons
- Upfront effort to write and maintain the standard
- Needs onboarding and occasional audits to stay real
- Heaviest storage footprint of the three models
- Can feel rigid for one-off creative work
Model C is closely related to a brand's visual rules. A file standard says how the work is organized; a style guide says what the work should look like. Brands that already maintain one will find our guide to retouching style guides for brands a natural companion, since the two documents are often written and enforced together.
Scored Comparison of the Three Models
The scorecard below rates each model from 1 (poor) to 5 (strong) against the six criteria. These are editorial judgments based on how each model behaves in typical commercial work, not measured figures. Note that "overhead" is scored so that a higher number means less overhead, so higher is always better.
| Criterion | A: Flatten as you go | B: Structured master | C: File standard + package |
|---|---|---|---|
| Cost of a revision round | 1 | 4 | 5 |
| Handover readability | 1 | 3 | 5 |
| Low setup and per-image overhead | 5 | 3 | 3 (4 with templates) |
| Delivery safety | 3 | 3 | 5 |
| Low storage weight | 5 | 3 | 2 |
| Longevity of the asset | 1 | 4 | 5 |
| Unweighted total (of 30) | 16 | 20 | 25 |
The unweighted total favors Model C, but unweighted totals rarely match anyone's real situation. A high-volume event photographer weights overhead and storage heavily and barely cares about longevity. A beauty brand with a three-year asset library weights revision cost and longevity above everything. The useful exercise is to assign your own weights, for example 3 for criteria that matter a great deal, 2 for moderate, 1 for minor, and multiply through.
Two patterns emerge whenever teams do this. First, Model A only wins when revisions are genuinely rare and the work is predominantly global adjustments that live in a raw processor anyway. Second, Model C's overhead score improves sharply once templates and export presets exist, which means its apparent cost is mostly a one-time setup cost.
A Worked Example: Pricing the Revision Round
To make the trade-off concrete, consider an illustrative job, not a real client project. The numbers are realistic ranges for this kind of work rather than measured benchmarks, and the point is the shape of the comparison, not the exact figures.
A skincare brand commissions 40 product-and-model images for a seasonal campaign. Each image involves cleanup, skin retouching, product label cleanup, a background extension and a campaign color grade. Assume the first pass takes roughly 45 minutes per image in any model, or about 30 hours in total. Assume two client revision rounds, with notes that touch around half of the images each round, and one late request, six months later, to re-grade the whole set cooler for a different season.
Model A
Round-one notes on 20 images include "less smoothing on the forehead" and "warmer overall." With flattened files, restoring texture means re-retouching from the capture, and re-grading means grading on top of the old grade or redoing it. Call it 20 to 30 minutes per affected image: roughly 7 to 10 hours per round, and 14 to 20 hours for two rounds. The seasonal re-grade six months later affects all 40 images, and since the grade is baked in, a clean result means redoing much of each image: perhaps 20 to 30 more hours. Total beyond the first pass: in the region of 34 to 50 hours.
Model B
Adding structure costs perhaps 3 to 5 extra minutes per image during the first pass, so 2 to 3 hours overall. Round-one notes become opacity changes on the skin group and a curve tweak in the color group: around 5 minutes per affected image, under 2 hours per round, so 3 to 4 hours for two rounds. The seasonal re-grade is a change to the color group, applied across the set, plus spot checks: perhaps 5 to 8 hours, assuming the original retoucher is available and remembers how the files are built. Total beyond the first pass: roughly 10 to 15 hours.
Model C
With a template and presets already in place, the first-pass overhead is similar to Model B, perhaps 2 to 3 hours in total, plus around an hour writing handover notes for the set. Revision rounds cost the same as Model B. The difference shows six months later: if the original retoucher is unavailable, a different retoucher can open the files, read the note, find the color group in the same place in every file and apply the re-grade in the same 5 to 8 hours. Under Model B, that stranger might spend several extra hours just learning each file. Total beyond the first pass: roughly 11 to 16 hours, with much lower risk.
| Model | Extra first-pass time | Two revision rounds | Seasonal re-grade | Total beyond first pass (illustrative) |
|---|---|---|---|---|
| A: Flatten as you go | None | 14–20 hrs | 20–30 hrs | 34–50 hrs |
| B: Structured master | 2–3 hrs | 3–4 hrs | 5–8 hrs (same retoucher) | 10–15 hrs |
| C: File standard + package | 3–4 hrs incl. notes | 3–4 hrs | 5–8 hrs (any retoucher) | 11–16 hrs |
The headline is not the exact numbers, which will vary with every job, but the asymmetry. Structure costs a small, predictable amount up front and saves a large, unpredictable amount later. This is also why accurate quoting depends on knowing the workflow; our guide to estimating retouching work explains how revision assumptions should feed into a quote.
How to Build a Handover-Ready File, Step by Step
Whichever of Models B or C you choose, the mechanics of building a handover-ready file are the same. The sequence below is designed so that the discipline is front-loaded into habits and templates rather than relying on willpower at the end of a long day.
- Start from a template. Open a template or run an action that creates the standard empty groups in order, so no file ever starts as a single background layer with nowhere to put things.
- Lock the base. Place the raw-converted capture as the background, lock it, and never paint on it. Keep the raw file and its settings where the handover note can point to them.
- Work on empty layers. Do healing and cloning on new layers set to sample current and below, and name each one by purpose as you create it, not afterward.
- Keep color in adjustment layers. Put all grading in the color group as adjustment layers, masked where local, so color notes never touch pixel repairs.
- Save a new version at each milestone. Increment the version number after cleanup, after the first full pass, and before and after each client round.
- Export from the master with a preset. Generate flattened deliverables from the final master into a separate output folder, using a named preset with the correct profile, bit depth and size.
- Write the note. Record anything non-obvious: hidden alternates, layers that must not be changed, the export preset used, and any open client decisions.
- Check before sending. Confirm the delivered files are flattened exports, match the latest version, and open correctly on a second machine.
Step 6 is where the most embarrassing failures happen. Delivering the working file as the final asset by mistake is a classic error: a client receives a 3 GB layered file where they expected a web-ready JPEG, or worse, a layered file containing unapproved alternates. A separate output folder and fixed presets make that error much harder to commit.
What goes in the handover note
A handover note should be short. Its job is to explain what the structure cannot. A useful template covers: the job and image identifiers; the current master version; which groups contain client-requested alternates and which alternate is approved; any layer marked do-not-edit and why; the export preset and color profile used; and any known open questions. Five to ten lines per job is usually enough. If you find yourself writing a page per image, the file structure itself is probably the problem.
The most common handover failures are quiet ones, and worth checking for explicitly:
- A merged "stamp" layer halfway up the stack that silently overrides the edits below it
- Output sharpening baked into the master, so the next export is sharpened twice
- Hidden layers nobody can explain, left in because no one dares delete them
- The flattened export and the layered master sharing a filename in the same folder
Recommendations by Situation
The right model depends on the kind of work, who does it and how long the assets will live. The scenarios below cover the most common situations and give a verdict for each.
High-volume event and batch work
For events, school photography and similar batches, most images receive global corrections, a crop and perhaps a quick blemish fix. Revisions are uncommon and usually image-specific. Here, a raw processor holds the real master: its non-destructive settings are the working file. Pixel retouching, where it happens, can be done on a small subset in a layered file. The skill in batch work lies in consistent global settings, not in file structure.
For e-commerce product work, which sits between batch and bespoke, the picture changes. Product images are reused, recolored for variants and updated when packaging changes, so longevity matters more than it first appears. Our guide to product photography retouching decisions explores those reuse patterns.
Verdict For true event batches, a disciplined raw-processor workflow is enough, with Model B files only for the few images that get pixel work. For e-commerce catalogs expected to live beyond a season, choose Model C: the reuse alone repays the setup.
Portrait, beauty and campaign retouching
This is where revision rounds are longest and most subjective. Skin texture, eye and teeth work, hair cleanup and the grade are all likely to be revisited, often by several stakeholders. Every piece of subjective work needs its own layer with an opacity that can be dialed back. Ethical and representational decisions also surface here, and being able to show exactly what was changed, and reverse it, is part of handling them responsibly, as discussed in our piece on portrait retouching ethics.
A single photographer-retoucher producing portraits for their own clients can work well in Model B. A studio producing campaign imagery for a brand, with art directors and multiple rounds, should work in Model C, because the chance that someone other than the original retoucher will need to open the file is high.
Verdict Solo portrait work: Model B, with rigorous versioning. Campaign and beauty work for brands, or any job where more than one retoucher might touch a file: Model C, with the handover note treated as part of the deliverable.
Outsourced and multi-retoucher work
When work moves between organizations, the file standard becomes part of the contract. Specify group structure, naming, versioning, export presets and the contents of the handover package in the brief, and check the first delivery against it. Our practical guide to outsourcing retouching covers how to write that brief, and planning around revision rounds is covered in our guide to planning retouching capacity.
Verdict Outsourced or multi-retoucher work calls for Model C, written into the brief and checked on the first delivery. Without it, every change of hands becomes a partial redo, and every archive becomes a set of files only one person understands.
Common Myths About File Structure and Handover
A few beliefs keep teams in the wrong model long after it has stopped serving them.
The first is that good retouchers do not need structured files, because they can remember what they did. In reality, memory does not survive a holiday, a staff change or an archive request eighteen months later. Structure exists precisely so that the file does the remembering, and files nobody but the original retoucher can navigate are one of the standard mistakes to avoid.
A second myth is that structure slows retouchers down. It slows the first ten files down. After that, naming and grouping become automatic, and templates remove most of the effort. The time saved on the first revision round almost always exceeds the time spent.
A third myth is that the delivered JPEG is the asset. For a one-off social post, perhaps. For anything a brand will reuse, the layered master is the asset and the JPEG is one rendering of it. Treat the master accordingly: archive it, name it, and know where it is.
A fourth is that flattening saves disk space that matters. Storage is almost always cheaper than retoucher time. A sensible archive policy, such as keeping the final master plus the last pre-client version and discarding intermediate versions after sign-off and a holding period, controls storage without giving up recoverability.
When to Bring in Help With Your Workflow
Many teams run a perfectly adequate Model B workflow for years before it starts to strain. The signals that it is time to change, or to bring in outside help, are consistent. Bring in help when work must be handed between retouchers, when revision rounds are consuming more time than the original work, or when a studio needs a file standard.
The second signal is the one most teams miss. If revision rounds are regularly taking longer than first passes, that is almost never a client problem; it is a file problem. Look at a handful of recent masters. If groups are unnamed, color is mixed into pixel layers, or there is a stamp layer halfway up each stack, the workflow is generating its own revision cost.
Setting a file standard is also a natural moment to align on visual standards. If you retouch headshots at scale, our guide to setting a standard for headshot retouching shows how the look and the file structure can be specified together. When you want a partner to run the whole process, our photo retouching service works to a documented file standard and delivers flattened finals alongside archived, annotated masters.
A quick self-audit for any recent job:
- Every master has named groups in a consistent order
- Color work lives in adjustment layers, separate from pixel repairs
- Versions are saved incrementally; nothing important is overwritten
- Deliverables are exported from the master with a named preset into a separate folder
- A short note travels with any file whose structure is not self-explanatory
- Layered masters are archived, with a known location and retention policy
If you can tick every item on that list for your last ten jobs, your retouching workflow and handover is in good shape, whichever model you use. If you cannot, the gaps show you where the next revision round will cost more than it should.
Where this comes from
- Adobe Help Center — Layer management
- Affinity by Serif — Document structure
- Capture One — Workflow documentation
The figures and practices above come from the sources listed.
Working on something like this?
We take on Image Editing & Retouching work for teams who want it done once, properly. Tell us what you are building and we will tell you honestly whether we are the right studio for it. Start a project.
Where to go next
Spotted something wrong? Report an error on this page. We correct on the page and say what changed.