How to Get Batch Processing and Automation Right
Follow an illustrative 3,200-image catalog job from spec to delivery and learn how to test, run, verify and document batch image processing safely.
 Imogen Clarke
Batch processing and automation means applying the same set of operations to many images by action, droplet, script or command-line tool, instead of opening each file and repeating the steps by hand. Resizing, format conversion, renaming, output sharpening and color profile conversion are the usual candidates. They are mechanical and repetitive, and they have to come out the same on the ten-thousandth file as on the first.
This matters to anyone whose images come in volume: ecommerce teams with growing catalogs, marketplace sellers who have to meet an exact specification, agencies that deliver the same shoot in six sizes, and in-house studios that re-export an archive every time the website changes. At catalog scale, doing it by hand is not merely slow. It cannot be done, because nobody can open twelve thousand files and apply identical settings to every one. Consistency is half the value of automation and speed is the other half. It also works in reverse: a batch that is wrong is wrong on every file it touches.
Rather than list principles in the abstract, this guide follows one project from brief to delivery and explains each decision as it comes up. The project is an illustrative example, not a real client engagement. Its figures are realistic but made up so we can show the reasoning. The decisions, tools and traps are the ones a real catalog pipeline runs into.
The Illustrative Brief: 3,200 Product Masters, Four Outputs Each
Our fictional client is a home goods retailer. It has 3,200 retouched product images: one hero shot and up to three alternates for roughly 900 products. The masters are layered 16-bit TIFFs in Adobe RGB (1998), delivered by retouchers over two years. Cleanup, shadows and color correction are done. What's missing is every output the business uses day to day.
The brief asks for four derivatives of every master:
- Marketplace main: a 2000 × 2000 pixel square JPEG on a pure white background, sRGB, named to the marketplace's SKU convention.
- Website zoom: 2400 pixels on the long edge, sRGB, high-quality JPEG, for the product page zoom viewer.
- Website listing: 800 pixels on the long edge, sRGB, WebP, for category grids.
- Social square: 1080 × 1080 pixels, sRGB, JPEG, for the paid social catalog feed.
That's 12,800 output files. The client also expects about 40 new products a month, so this is a pipeline that will keep running, not a single job. That one fact shapes most of the decisions below. A one-off job can tolerate some manual intervention. A recurring pipeline has to be documented, repeatable and runnable by someone other than the person who built it.
The brief also contains an awkward detail that is typical of real catalogs: about 300 of the masters came from an earlier retoucher who flattened the files and saved them in sRGB instead of Adobe RGB, and roughly 150 of them are portrait-orientation images of tall products like floor lamps. A pipeline tested only on the "normal" files would fail on those in ways nobody notices until a customer sees them.
Decision: Before choosing any tool, write the output specification as a table with exact values for every derivative: pixel dimensions, fit method, color space, file format, quality setting, sharpening, metadata policy and filename pattern. Every later decision is checked against that table, and every argument about "what the client meant" gets settled by it.
Writing the Output Specification Before Touching a Tool
Most failed batch jobs fail at the specification stage, not the scripting stage. "Web size, sRGB" is not a specification. "2400 px long edge, no upscaling, bicubic sharper downsampling, convert to sRGB IEC61966-2.1 with relative colorimetric intent and black point compensation, embed profile, JPEG quality 85 equivalent, strip GPS and camera serial but keep copyright" is a specification. The difference is that the second one can be verified.
Here is the table the illustrative project settled on:
| Derivative | Dimensions and fit | Color | Format | Filename pattern |
|---|---|---|---|---|
| Marketplace main | 2000 × 2000, product fitted to 85% of the frame, padded with pure white | sRGB, profile embedded | JPEG, high quality | SKU.MAIN.jpg or SKU.PT01.jpg for alternates |
| Website zoom | 2400 long edge, no upscaling | sRGB, profile embedded | JPEG, high quality | sku-view-2400.jpg |
| Website listing | 800 long edge | sRGB, profile embedded | WebP, lossy | sku-view-800.webp |
| Social square | 1080 × 1080, product fitted to 80% of the frame, white padding | sRGB, profile embedded | JPEG | sku_view_1080.jpg |
Three things in that table are worth pointing out.
Fit method is a decision, not a default
"Resize to 2000 × 2000" can mean three different things: stretch (never acceptable for products), crop to fill (it cuts off the tops of floor lamps) or fit and pad (the product sits inside the square with background filling the rest). For product imagery, fit and pad is almost always right, but the padding percentage has to be written down. If it isn't, one run fills 95% of the frame and the next fills 70%, and the category grid looks uneven. Marketplace rules on frame fill and background are covered in detail in our guide to image editing for marketplaces. Here the point is only that the rule belongs in the specification, so the batch can apply it the same way every time.
Filenames are part of the output
Filenames are how downstream systems find images. A marketplace ingestion tool, a product information management system or a CDN rule might all match on filename. The illustrative project used three different patterns because three different systems consumed the files, and each pattern was defined exactly: case, separators, view codes and extension. Predictable output names are one of the main reasons to automate at all, since a person renaming 12,800 files by hand will make mistakes that a script won't.
Metadata policy is explicit
The retouched masters carried camera serial numbers, some GPS coordinates from location shoots, and the client's copyright notice. The specification said to strip GPS and camera serials from all public derivatives and keep copyright and creator fields. Making that decision up front avoids an awkward conversation later about product photos that revealed a photographer's home studio address. The mechanics of rewriting fields at scale are covered in bulk metadata editing.
Choosing Between Actions, Droplets, Scripts and Command-Line Tools
The four families of batch tools overlap, but each has a sweet spot. The illustrative project used two of them, and the reasons are worth spelling out.
Photoshop actions and the Batch command
An action records a sequence of Photoshop operations, and File > Automate > Batch replays it over a folder. The strength is that anything you can do in Photoshop can be recorded, including layer operations, content-aware steps and smart object handling. The weaknesses are that actions record absolute values (so conditional logic is limited) and that one modal dialog or missing layer name can stop a run. Adobe's help documentation on actions and batch processing covers options such as overriding an action's Open and Save As commands and logging errors to a file instead of stopping. Both options matter at scale.
Droplets
A droplet is an action saved as a small application: drag files onto it and they get processed. Droplets are good for handing a fixed operation to people who shouldn't be editing actions, such as a studio coordinator who needs web proofs. They are less good as the core of a pipeline, because the settings are baked into the droplet and it's easy for several slightly different copies to spread across a team.
Scripts
Photoshop scripting (ExtendScript or UXP, depending on version) adds logic that actions can't express: "if the image is portrait, pad differently", "read the SKU from a spreadsheet and name the file after it", "skip files that already have an up-to-date output". Scripts take more effort to write and maintain but are much more robust for recurring work. Our Photoshop automation work is mostly this layer: actions for the image operations, with a script around them for decisions and naming.
Command-line utilities
Tools like ImageMagick, libvips and ExifTool run without a graphical interface. That means they can run on a server, on a schedule, or be triggered when files land in a folder. They are very fast at pure pixel operations (resize, pad, convert, encode) and very good at metadata. They can't do anything that needs Photoshop's layer engine. For image sequences, especially frames that will become or came from video, FFmpeg's image sequence handling is the standard tool and deals with numbered frame patterns natively.
Raw-first workflows usually batch inside the raw processor. Lightroom export presets and Capture One process recipes both render many variants from one set of adjustments, and Capture One's batch export documentation describes how several recipes can run at once from one selection. When the source is raw capture rather than retouched masters, the decisions in raw processing come first, and output batching follows from them.
- Days 1–2 Specification table agreed with the client; three filename conventions confirmed with the teams that consume them.
- Days 3–4 Source audit: color profiles, bit depths, orientations and layer structures counted across all 3,200 masters.
- Days 5–6 Photoshop stage built: flatten, 16-to-8-bit conversion, profile conversion to sRGB, and export of a clean intermediate master.
- Day 7 Command-line stage built: fit-and-pad, resizing, sharpening, encoding and naming for all four derivatives.
- Days 8–9 Test run on a 60-image representative sample; two defects found and fixed; sample re-run.
- Days 10–11 Full run to a new output location, logged; automated checks over all 12,800 files.
- Day 12 Human spot-check of a stratified sample; client review; delivery.
- Day 13 Runbook finalized and handed over; monthly-intake procedure tested by a second operator.
Auditing the Source Files Before Writing a Single Step
The step that is skipped most often is also the one that prevents the most damage: find out what you actually have. The illustrative project ran a read-only inventory over the 3,200 masters with a metadata tool and wrote one row per file to a spreadsheet: embedded profile, bit depth, pixel dimensions, orientation, layer count and file size.
The audit found four groups the brief hadn't mentioned:
- Profile mix: about 2,900 files in Adobe RGB, about 300 in sRGB, and 11 with no embedded profile at all.
- Orientation: about 150 portrait images, mostly tall products, where fit-and-pad would leave wide white bars on either side.
- Layer structure: most files had a consistent layer stack, but around 80 had a hidden "OLD BG" layer left over from a revision. A careless flatten would discard it (correct), but a "merge visible" step recorded on a different file might not.
- Small sources: 23 masters were under 2,000 pixels on the long edge, so they couldn't produce the 2400 px zoom derivative without upscaling.
Each group needed a decision. The 11 untagged files were checked by eye against tagged neighbors from the same shoot. All 11 turned out to be sRGB, so they were assigned sRGB explicitly before batching instead of letting the pipeline guess. The specification's "no upscaling" rule was upheld for the 23 small files: their zoom derivatives were produced at native size, and the client was sent a list so those products could be reshot. The portrait images got their own padding rule, described below.
None of this is glamorous work. But every group found in the audit is a group that would otherwise have been found in production, after 12,800 files had already been generated.
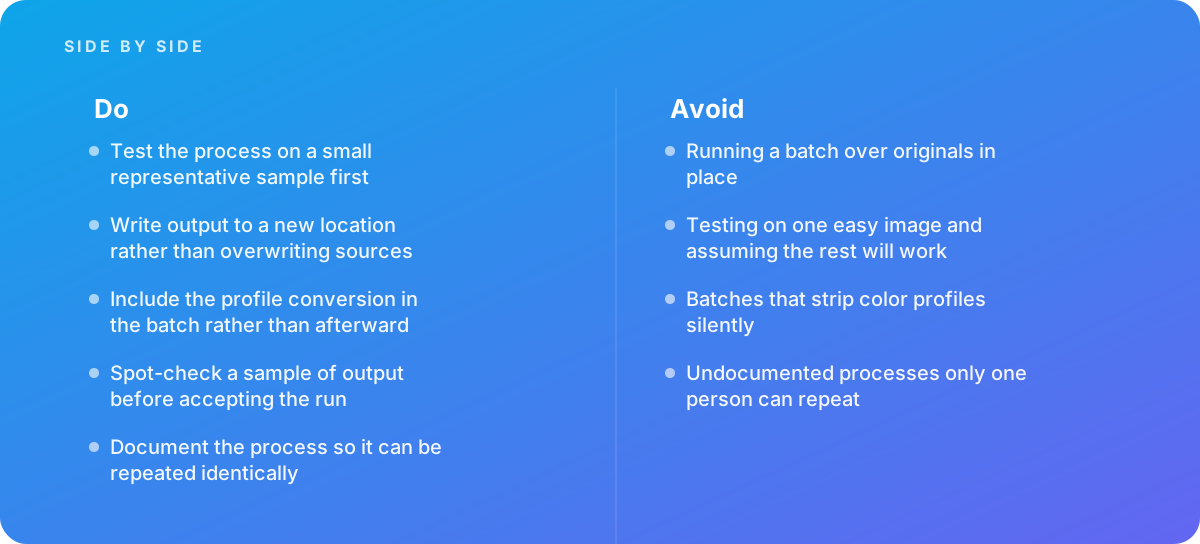
Trap avoided: Testing on one easy image. The first image anyone opens is usually a clean, landscape, correctly tagged hero shot, and a pipeline tuned on it will look perfect. The files that break batches are the untagged ones, the portrait ones, the undersized ones and the ones with leftover layers. Your test sample has to include every group the audit found, deliberately.
Building the Pipeline in Two Stages
The illustrative pipeline was split into two stages with a clean handoff file between them. That structure is the most important architectural decision in the project.
Stage one: Photoshop produces a normalized intermediate
Stage one runs in Photoshop because the masters are layered files, and only Photoshop reads them reliably. Its job is narrow: open the master, flatten, convert from 16-bit to 8-bit, convert to sRGB, and save a flattened TIFF to a new "intermediate" folder with the original base filename. Nothing is resized, sharpened or renamed at this stage.
The sRGB conversion used Edit > Convert to Profile with relative colorimetric intent and black point compensation on. That's a conventional choice for product imagery: it preserves in-gamut colors exactly and clips out-of-gamut ones, whereas perceptual intent shifts everything slightly to make room. For a catalog where the same fabric appears in many shots, keeping in-gamut colors unchanged matters more than a smooth roll-off on a few saturated edges. Why saturated product colors behave the way they do when leaving a wide-gamut space is covered in wide gamut color for the web.
The 16-to-8-bit conversion was deliberately placed after the profile conversion. Converting between color spaces in 16-bit and only then dropping to 8-bit keeps rounding errors small and avoids banding in smooth gradients like shadows on seamless backgrounds.
Stage two: command-line tools produce every derivative
Stage two reads the normalized intermediates and generates all four derivatives. Because every intermediate is now a flat, 8-bit, sRGB, correctly tagged TIFF, this stage doesn't need Photoshop at all. It runs much faster from the command line, can be re-run in minutes when a specification detail changes, and can run unattended.
The split pays off whenever something changes. When the client later asked for the social square at 85% fill instead of 80%, only stage two had to be re-run. When a retoucher delivered revised masters for 40 products, stage one ran on those 40 files and stage two regenerated their 160 derivatives. Nothing else was touched.
Color Profile Handling Inside the Batch, Not After It
Color is where batch pipelines fail most quietly. The dangerous failure isn't an error message. It's a file that looks fine on the operator's calibrated monitor and wrong everywhere else.
Why the conversion belongs inside the batch
If profile conversion is a separate step "we'll do afterward", it will eventually be skipped for one delivery, or run twice, or run on a subset. Putting it inside stage one means no intermediate can exist without having been converted. The pipeline's structure enforces the rule, so nobody has to remember it.
Conversion versus assignment
Converting to a profile changes pixel values so the colors look the same in the new space. Assigning a profile changes only the label, so the same numbers are interpreted differently and the colors shift. The batch has to convert Adobe RGB masters to sRGB. It must not assign sRGB to them. The two commands sit close together in Photoshop's menus, and a recorded action that uses the wrong one produces files that are uniformly slightly dull, a problem easy to miss in a spot-check of one image and obvious in a grid of fifty.
Silent profile stripping
Several common export paths can strip the embedded profile without warning. Legacy "Save for Web" settings, some command-line options meant to reduce file size, and some web optimization plugins remove ICC profiles to save a few kilobytes. An untagged sRGB file usually displays close to correct in browsers, which assume sRGB when there's no tag. But "usually close" isn't a specification, and an untagged Adobe RGB file displays badly wrong. The illustrative pipeline embedded the sRGB profile in every derivative and included a check (described below) that failed any file without one.
If the same product appears across many images and must match from shot to shot, profile handling is necessary but not sufficient. The upstream correction work in matching color across images has to be done before a batch can preserve it.
Decision: Portrait images got their own padding rule. Instead of fitting the product to 85% of the frame's width, which would shrink a floor lamp to a thin sliver, stage two fitted portrait images to 85% of the frame's height and centered them horizontally. The rule was keyed on the aspect ratio measured in the audit, not on a filename or folder, so new portrait products arriving in monthly intake get the right treatment automatically.
Resizing, Sharpening and Encoding: The Pixel Decisions
Resampling
Downsampling from a roughly 5000-pixel master to 800 pixels discards most of the pixel data, so the resampling filter matters. The illustrative pipeline used a Lanczos filter for all downsampling. It's a common default in command-line tools and keeps fine texture well. The "no upscaling" rule was enforced in code: any requested size larger than the source was capped at the source size and logged, never silently enlarged.
Output sharpening, per size
Downsampling softens an image, and the right amount of output sharpening depends on the output size. A single sharpening setting applied before resizing is a common and costly shortcut: it's too strong for the 2400 px zoom and has no effect by the time the image reaches 800 px. The illustrative pipeline applied a light unsharp mask after each resize, with a smaller radius for smaller outputs. The settings were chosen by viewing sample outputs at 100% on the actual website templates, not by copying numbers from another project. Sharpening values don't transfer between catalogs, because they depend on the texture of the products and the softness of the masters.
Encoding and quality
JPEG quality numbers aren't comparable across tools. "Quality 85" in one encoder isn't byte-for-byte or visually the same as "85" in another. The illustrative project picked quality settings by encoding a sample at several levels, comparing them at 100% on the most demanding images (fine fabric weaves and smooth gradients), and choosing the lowest level with no visible artifacts. The same method set the WebP quality for listing images. Image compression and quality settings goes into this trade-off in depth. What matters for batching is that the chosen values go into the specification and the runbook, so the next run uses exactly the same ones.
The social square followed the dimensions in the client's ad platform specification. Anyone building a similar derivative for organic social should check each platform's current recommended sizes rather than reusing an old preset, because platforms revise their recommendations.
The 60-Image Test Run and What It Caught
The test sample wasn't random. It was built from the audit so that every known group was represented:
- 20 standard landscape Adobe RGB masters across different product categories and background tones.
- 10 masters that were already sRGB, to confirm they weren't converted a second time.
- All 11 previously untagged files, now explicitly assigned.
- 10 portrait masters, including the tallest and narrowest products in the catalog.
- 5 undersized masters, to confirm the no-upscaling rule.
- 4 files with the leftover hidden layer.
The first test run produced 240 files and exposed two defects.
Defect one: a double conversion
The stage one action converted every file to sRGB, which should do nothing to a file that is already sRGB. But the processing machine's color settings had the RGB policy set to "Convert to Working RGB" with Adobe RGB as the working space, and mismatch warnings were turned off so the batch would not stop. Every already-sRGB master was therefore silently converted to Adobe RGB on open and then back to sRGB by the action. That unnecessary round trip shifted some saturated reds slightly. The fix was to set the machine's color settings to preserve embedded profiles and to write that setting into the runbook as a checked prerequisite, not an assumption.
Defect two: an off-white pad
The masters' white backgrounds were retouched to 255, 255, 255 in Adobe RGB. After conversion to sRGB they were still pure white, but the padding color in stage two had been typed as a named color the tool interpreted as slightly off-white. On a white page the padding was invisible. On a marketplace that shows images against a light gray tile, it appeared as a faint rectangle around each product. The fix was to specify the pad as an exact RGB value and to add an automated check that sampled the corner pixels of every marketplace derivative.
Both defects would have reached all 12,800 files. Both were caught on 240.
The lessons from the test run became the pre-flight list the pipeline now uses on every run:
- Test sample includes every group found in the source audit, not just clean hero shots.
- Output goes to a new, empty folder; the source folder is read-only to the batch.
- Profile conversion is inside the batch, and every output embeds its profile.
- Color settings on the processing machine are documented and checked before each run.
- Exact numeric values, not named colors or presets, for padding, quality and sharpening.
- Automated checks run over every output file before any human review.
- A stratified human spot-check signs off before delivery.
- The runbook is followed by a second person at least once.
Running the Full Batch Without Touching the Originals
The full run wrote to a new, dated output location. The source masters stayed in a folder the processing account could read but not write. This isn't excessive caution: it's the only protection against the most expensive batch mistake there is.
Some command-line tools edit files in place by default, and some batch dialogs make "save and close" the easy option. A batch that overwrites 3,200 layered masters with flattened 8-bit sRGB copies has destroyed two years of retouching, and if the backup is also a synced folder, the damage may already have replicated. Making sources read-only turns that mistake into an error message.
The run was logged. For every source file, the log recorded start and end time, each output written, and any warning: capped upscaling, a missing profile, a changed aspect ratio. Photoshop's batch dialog can write errors to a log file instead of stopping at the first failure, and the command-line stage wrote its own log. After the run, the log was the first thing checked. A clean log isn't proof of correct output, but a log with warnings nobody expected is a reason to stop.
Trap avoided: Running a batch over originals in place. The illustrative pipeline never had write access to the masters, and each run went to a new dated folder, so a bad run could be deleted and repeated without losing anything. If your tool offers an "overwrite" or in-place mode, treat it as off-limits for anything you can't regenerate.
Verifying 12,800 Files: Automated Checks and a Stratified Spot-Check
Verification had two layers, because each catches what the other misses.
Automated checks on every file
A short script read every output and confirmed, per file:
- The pixel dimensions match the specification for that derivative (exactly 2000 × 2000 for marketplace, long edge exactly 2400 or native for zoom, and so on).
- An sRGB profile is embedded.
- The corner pixels of marketplace and social squares are exactly 255, 255, 255.
- The filename matches its derivative's pattern, and the SKU portion exists in the client's product list.
- GPS and camera serial fields are absent, and the copyright field is present.
- Every source produced exactly four outputs, and no output lacks a source.
That last check sounds trivial, but it catches a whole class of problems: files that crashed partway through, duplicate SKUs that overwrote each other's outputs, and sources added to the folder after the run started. In the illustrative run it flagged six products whose SKUs appeared twice in the source folder under slightly different filenames. The client confirmed which version was current, and the duplicates were removed.
A human spot-check, stratified
Automated checks confirm that files match the specification. They can't confirm that the specification produced good images. The human spot-check covered about 2% of the output, chosen deliberately: some files from each product category, each derivative, and each audit group (portrait, undersized, formerly untagged), plus the files flagged in the log. The reviewer looked at them at 100% and in context: marketplace images on a gray tile, listing images in a mock category grid, zoom images in the zoom viewer. Two portrait items needed individual attention because the product's base sat too close to the bottom edge, and they were fixed at the master level and re-run through both stages.
The principle is simple. A wrong batch is wrong everywhere, so the check has to be spread across the whole batch, not concentrated on the first page of thumbnails.
Documenting the Pipeline So Someone Else Can Run It
The client had a new-product intake of about 40 products a month, so the last deliverable wasn't a folder of images. It was a runbook. A pipeline that only its author can run turns into a liability as soon as that person is on holiday, and an undocumented process drifts: someone "just tweaks" the quality setting, and six months later nobody knows why new listing images look different from old ones.
The illustrative runbook covered:
- Prerequisites: software versions, the exact color settings file to load, the action set and script versions, and folder permissions.
- The specification table, as above, with the reason for each non-obvious value.
- The procedure: where new masters go, how to run stage one and stage two, where outputs land, and how to name the dated output folder.
- Verification: how to run the automated checks, how to read the log, and how to draw the spot-check sample.
- Known exceptions: the portrait rule, the undersized list, and what to do with an untagged file.
- Change control: any change to a setting is recorded with a date and a reason, and the whole affected derivative set is regenerated, not just new products, so the catalog stays consistent.
The runbook was tested properly: a second operator who hadn't built the pipeline processed that month's 40 new products using only the document. Every point where they had to ask a question became an edit to the runbook.
When to Automate, When to Hand-Edit and When to Bring In Help
Not everything should be batched. The illustrative project batched output generation, which is purely mechanical, and left retouching to people. That split is deliberate. Operations whose correct result depends on judgment about the specific image, such as skin retouching, shadow shaping, or deciding whether a color is right, aren't good batch candidates even when AI tools make them look automatable. Our assessment of Photoshop Neural Filters covers where that line currently sits. A batch can safely apply a consistent look, such as a LUT, only when the source images are already consistent. When they aren't, a batch just makes the differences uniform.
Event and volume photography sit in between. Hundreds of frames from one lighting setup can share corrections, then get individual attention on the frames that matter. Event photo batch editing describes that hybrid in detail.
| Task | Batch it? | Why |
|---|---|---|
| Resizing, padding, format conversion | Yes | Fully specified by numbers; identical treatment is the goal |
| Profile conversion to an output space | Yes, inside the batch | Must never be skipped or repeated |
| Renaming to a system convention | Yes | Humans make transcription errors at volume; scripts don't |
| Metadata stripping and stamping | Yes | Policy-driven and verifiable |
| Shared corrections from one lighting setup | Partly | Batch the base correction, then review individual frames |
| Cleanup, cutouts, skin and product retouching | No | The right result depends on judgment about each image |
As for outside help, three situations justify it. The first is reprocessing an existing catalog, where the source audit and exception handling are most of the work and mistakes affect thousands of live listings. The second is output that has to meet a marketplace specification exactly, where a rejected feed costs sales days. The third is a repeatable pipeline for ongoing work, where the value is in the documentation and verification as much as the scripts. Our batch photo editing service is built around those three cases.
Verdict Good batch processing and automation is mostly work done before and after the batch runs: an exact specification, an audit of what the sources really are, a test sample that includes the difficult files, output written away from the originals, verification across the whole run, and a runbook someone else can follow. The script itself is the smallest part.
Where this comes from
- Adobe Help Center — Actions and batch processing
- Capture One — Batch export documentation
- FFmpeg — Image sequence processing
The figures and practices above come from the sources listed.
Working on something like this?
We take on Image Editing & Retouching work for teams who want it done once, properly. Tell us what you are building and we will tell you honestly whether we are the right studio for it. Start a project.
Where to go next
Spotted something wrong? Report an error on this page. We correct on the page and say what changed.