Apparel Cleanup Retouching, Done Properly
A phase-by-phase playbook for apparel cleanup retouching: removing lint, threads and creases while keeping fabric texture, true color and fit accurate.
 Imogen Clarke

Apparel cleanup retouching is the work of removing lint, loose threads, dust, temporary marks and distracting creases from clothing images while keeping the fabric, color and fit exactly as they are on the real garment. It sits between capture and publication in almost every fashion and e-commerce pipeline, and it is the stage that most often decides whether a product page looks professional or looks rushed. A black knit sweater photographed under strobes will show every fiber of lint on the lens-facing side; a linen shirt pulled from a shipping bag will carry fold lines no steamer fully removed; a pair of chinos will pick up dust from the set floor. None of that belongs to the product, so it should go.
The harder part is knowing where cleanup stops. The same tools that remove a stray thread can also flatten a rib knit into a plastic-looking surface, pull in a waistline, erase a pocket or shift a burgundy toward red. Those edits stop being cleanup and start misrepresenting the product. Shoppers who receive something that does not match the photo send it back, and in the United States the Federal Trade Commission treats misleading product representations as deceptive. That is why this guide treats the line between cleaning and changing as a working rule, not a matter of taste.
This playbook is written for e-commerce managers, in-house studio leads, marketers commissioning catalog work and retouchers who want a repeatable method. It is organized as a sequence of phases, each with a goal, the actions to take, the outputs it should produce and the checks that confirm it was done properly. Follow them in order and the result is apparel imagery that is clean, consistent across a whole range and honest about what the customer will receive.
The Apparel Cleanup Retouching Playbook at a Glance
Before going phase by phase, it helps to see the whole sequence. The order matters. Color and tone come before spot cleanup because a global Curves move can reveal or hide lint and dust. Spot cleanup comes before crease work because loose threads and fibers sitting on a fold confuse the crease pass. Shape and construction checks come last among the edits because that is where earlier passes most often cause accidental damage. Quality control and handover close the loop so the next batch starts from a better standard than this one.
- Write the cleanup standard Decide, in writing, what gets removed, what gets reduced and what is never touched, including a documented policy on fit changes.
- Intake and triage the batch Check files, color references and physical samples, then sort images into cleanup tiers so effort matches need.
- Lock color and tone against the sample Correct white balance and exposure globally, then match garment color to the physical item or its approved reference.
- Remove lint, dust, threads and temporary marks Work at 100 percent zoom on a separate layer with tools chosen to preserve weave and knit structure.
- Reduce distracting creases, keep natural folds Soften packing lines and wrinkles that do not belong to how the garment drapes, while leaving the folds that explain its shape.
- Protect fit, shape and construction Confirm seams, pockets, stitching, hems and silhouette match the garment, and log any permitted shape corrections.
- Run variant and range consistency checks Compare colorways, angles and sizes side by side so the range reads as one set.
- Quality control, export and handover Inspect at output size and at 100 percent, export to the channel spec and hand over layered masters with notes.
Each phase below expands one or two of these steps. If you are building a team process rather than editing a single shoot, read this alongside our guide to retouching workflow and handover decisions, which covers file naming, versioning and approval loops in more depth.
Phase 1: Write the Cleanup Standard Before Opening a File
Goal: a short written document that tells every retoucher, in-house or external, exactly what counts as cleanup for this brand and what does not. Without it, two retouchers working on the same range will make different calls, and the range will look inconsistent even if each image is individually good.
Actions
Start by listing the defects that are always removed. For almost every brand this covers lint and fibers, loose threads and thread ends, dust and hair, pins, clips, tags and price stickers that should not show, temporary chalk or tape marks, and small shipping scuffs that would disappear with a lint roller or steamer. The test for this list is simple: would the defect be gone if the garment had been perfectly prepared on set? If yes, removing it is honest.
Next, list what gets reduced but not removed. Creases are the main entry. Define the difference between a packing crease (a sharp, straight line from folding in a bag or box) and a drape fold (the soft, curved shape fabric takes because of gravity, cut and body). Packing creases are reduced or removed; drape folds stay, perhaps softened slightly if they are distracting. Pilling and slight surface fuzz can go in this category too, with a note that the fabric's natural nap must remain visible.
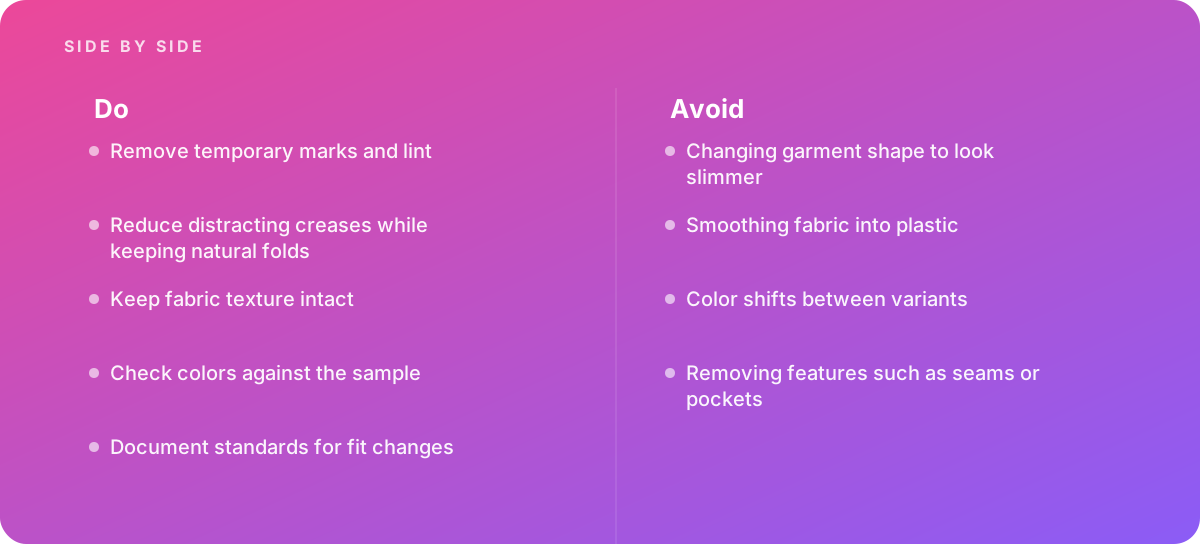
Then list what is never changed without explicit approval: garment silhouette and proportions, seam positions, pocket shapes and placement, stitching, hardware such as buttons, zippers and rivets, print and pattern placement, fabric texture and sheen, and color. This is where the brief's most important rule lives. Changing garment shape to look slimmer, or removing features like seams or pockets, misrepresents the product.
Finally, write a fit-change policy. Some corrections are legitimate: a mannequin that twisted a hem, a collar that flipped during shooting, a side seam that swung forward because the garment was clipped badly at the back. Decide which of those your team may correct, how far, and how the change is logged. A common approach is to permit corrections that restore the garment to how it hangs when properly dressed, and to forbid anything that makes it look narrower, longer or more fitted than it is.
Outputs
The output is a one- or two-page cleanup standard with example images: one before and after pair for each defect type, one example of an acceptable crease reduction and one of an over-smoothed failure. If your brand already maintains a broader retouching guide, this becomes a chapter within it; our article on building retouching style guides for brands explains how to structure one so it survives staff turnover and vendor changes.
- Always-remove list covers lint, threads, dust, hair, pins, clips, stickers and temporary marks
- Crease policy distinguishes packing creases from natural drape folds, with visual examples
- Never-change list names silhouette, seams, pockets, stitching, hardware, print placement, texture and color
- Fit-change policy states what may be corrected, the limit, and how each change is logged
- Standard includes at least one over-retouched example labeled as a failure
- Document is versioned and dated so later batches can be traced to the rules in force
Checks
Give the draft standard to two retouchers and ask each to clean the same three test images. Compare the results. Where they differ, the standard is ambiguous; tighten the wording or add an example. This test usually takes less than a day and saves far more than that in revision rounds later.
Phase 2: Intake, Triage and Color References
Goal: know what you have, what condition it is in and how much work each image needs before committing time to any of it.
Actions
Check the files first. Raw captures or high-bit TIFFs give far more room for color and tone correction than compressed JPEGs, and you want to know now, not halfway through, if a batch arrived as 8-bit JPEGs. Confirm the pixel dimensions meet the largest output you will need, including zoom views on product pages. Confirm a color target, such as a gray card or color chart, was shot under the same light at the start of each setup; if it was not, note that color matching will rely on the physical sample alone.
Next, secure the color reference. The brief is blunt on this point: garment colors should match the physical item. The best reference is the garment itself or a production swatch viewed under a controlled, daylight-balanced viewing light next to a calibrated monitor. Where the physical sample is not available, an approved color value from the brand's product data or a signed-off hero image is the fallback. Record which reference was used for each style.
Then triage. Scroll through the batch at a moderate zoom and sort images into tiers. Three tiers are usually enough:
| Tier | Typical condition | Work involved | Relative effort |
|---|---|---|---|
| Light | Well-prepared garment, a few specks of lint, minor dust, no significant creases | Color check, spot removal, quick edge inspection | Lowest; often a few minutes per image |
| Standard | Visible lint on dark fabric, several loose threads, a packing crease or two | Full spot pass, targeted crease reduction, construction check | Moderate; roughly two to three times the light tier |
| Heavy | Poorly steamed, heavy pilling, strong creases across the body, visible pins or clips, stains | Extended crease work, rebuilding texture in patches, possible reshoot recommendation | Highest; can be several times the standard tier |
The effort ratios above are working estimates that vary with fabric, resolution and output size, not fixed figures. Dark, fuzzy knits and technical fabrics with a sheen take longer at every tier. Heavy-tier images deserve a second look before anyone starts: sometimes the honest and cheaper answer is to re-steam and reshoot. For a structured approach to converting tiers into hours and budget, see our guide to estimating retouching work.
Shortcut: Triage on a contact sheet view first, then zoom only on the images you are unsure about.
- Dark garments almost always drop one tier worse than they look at thumbnail size, because lint shows up at 100 percent.
- Flag every image with visible pins, clips or tags in the same pass so they are never missed later.
- Tag heavy-tier images with a reshoot question rather than a retouch estimate, and let the client decide.
Outputs and checks
The outputs are a triage list with a tier for every image, a note of the color reference per style, and a list of file problems. Check that every style has a color reference recorded and that no heavy-tier image entered production without someone deciding retouch versus reshoot.
Phase 3: Lock Color and Tone Against the Physical Sample
Goal: garment color that matches the product, applied consistently, before any detail work begins.
Why color comes first
Color and tone corrections change how cleanup defects look. Lifting shadows on a navy jacket can reveal dust that was invisible before. Increasing contrast on a white shirt can make a faint crease read as a sharp line. If you clean first and correct color second, you will find yourself cleaning twice. Correcting globally first also means cleanup layers sit on top of a stable base.
Actions
Set white balance from the gray card or neutral target in the raw converter, then set exposure so the garment's highlights hold detail and its shadows still show weave. For white and very pale garments, keep the brightest fabric areas slightly below pure white so texture remains; clipped white fabric looks like a cutout rather than cotton. For black garments, keep the deepest folds slightly above pure black for the same reason.
Then match the garment to its reference. Place color samplers on two or three representative, evenly lit areas of fabric, avoiding highlights and deep folds, and read the values in the Info panel. Adjust with a Curves or Hue/Saturation adjustment layer masked to the garment so the background and any model skin are unaffected. Adobe's documentation for Photoshop covers adjustment layers, color samplers and masking in detail in the Adobe Help Center, and it is worth having retouchers work from the same reference for these basics so methods stay consistent.
Many studios use Lab values and a color difference metric such as Delta E to decide when a match is close enough. There is no single universal tolerance for apparel photography; teams set their own threshold based on how critical color is for the product and how visible the difference is on screen. The important part is that the threshold is written down and applied the same way to every style.
Variants and colorways
Color shifts between variants are one of the brief's named mistakes, and they are easy to create. When a shirt comes in navy, charcoal and black, each colorway must be matched to its own sample, not nudged toward a pleasing average. Equally, the same colorway shot on different days must land on the same values. Build one adjustment preset per colorway once it is approved, and apply it across every angle of that colorway.
A common belief is that a more saturated garment sells better, so boosting color slightly is harmless. In practice, Boosting saturation makes the image disagree with the product in the box. The shopper compares the two, and a garment that looks duller than its photo reads as a quality problem. The brief is clear that garment colors should match the physical item, and the FTC treats misleading product representations as deceptive. Make the photo accurate and let styling, lighting and composition do the selling.
Outputs and checks
Outputs are color-corrected base files with masked adjustment layers kept live, plus a note of the sampled values per colorway. Check each colorway side by side with its physical sample under the viewing light, and check all colorways of one style side by side on screen to confirm they differ only where the products differ.
Phase 4: Remove Lint, Dust, Threads and Temporary Marks
Goal: every defect on the always-remove list gone, with the fabric beneath it looking untouched.
Set up the file
Work on a new, empty layer above the base with the healing and cloning tools set to sample the current and below layers. This keeps every correction reversible and lets a reviewer toggle the layer to see exactly what changed. Name it clearly, for example "cleanup-spots", so anyone opening the master later understands its purpose.
Work at 100 percent zoom in a systematic pattern. The most reliable method is a grid: move across the garment in horizontal strips, left to right, then down one strip, so no area is skipped and no area is worked twice. Some retouchers add a temporary high-contrast Curves layer, sometimes called a check layer, that exaggerates tonal differences so faint lint and dust stand out; delete it before export.
Choose the tool for the fabric
The right tool depends on the defect and the texture underneath.
- Spot Healing Brush or Remove tool: fast and effective for isolated lint, dust and hair on plain, fine-textured fabric. Watch for smudged texture on coarse weaves, where the automatic sampling can blend structure into mush.
- Healing Brush with a chosen source: better for repeating textures such as twill, denim or rib knit, because you pick a source point on the same rib or wale and preserve the pattern direction.
- Clone Stamp at high hardness: the choice for defects that sit on or next to a seam, stitch line or edge, where healing tools pull in unwanted tone from the neighboring area.
- Patch tool or Content-Aware Fill: useful for larger marks such as a sticker residue or chalk line, followed by a check at 100 percent for repeating artifacts.
Loose threads need particular care. A thread end hanging from a hem should go; the hem stitching it came from should stay perfectly intact. Clone along the line of the stitch rather than across it, and check the stitch count and spacing afterward. Pins and clips holding a garment on a mannequin or form are removed, but the fabric they were pulling must be reconstructed to hang naturally; if removing a clip leaves a tension line radiating from where it was, that tension line counts as part of the defect.
Printed and patterned fabric
On prints, stripes and checks, repair along the pattern. A healed spot that breaks a stripe is far more visible than the original lint. Sample from an identical point in the pattern repeat, aligned with the stripe or check direction, and confirm the repeat still lines up after the repair.
- All spot work sits on a separate, named layer above the color-corrected base
- Grid pass completed at 100 percent across the full garment, including collar, cuffs and hems
- Every pin, clip, tag and sticker flagged at triage has been removed
- Thread ends removed without altering stitch lines or stitch spacing
- Stripes, checks and print repeats unbroken at every repair
- Temporary check layer deleted before the file moves on
Outputs and checks
The output is the base file with a clean spot layer. Check by toggling the layer on and off at 100 percent: each correction should remove a defect and nothing else. If you see texture changing in an area where there was no defect, something went wrong with a sampling point.
Phase 5: Reduce Distracting Creases While Keeping Natural Folds
Goal: creases that come from packing, handling or poor steaming are reduced or removed, while the folds that show how the garment drapes and fits remain, and the fabric texture stays visible throughout.
Read the crease before touching it
Ask three questions about every crease. Is it straight and sharp, with a hard edge on one side? That usually means packing. Does it follow the pull of gravity or the shape of the body or form? That usually means drape. Does it explain something about the garment, such as the ease in a sleeve or the break at the hem of a trouser? Then it belongs to the product. Packing creases get reduced; drape folds stay; explanatory folds stay untouched.
Choose a method
For light packing lines, dodging and burning on a 50 percent gray layer set to Soft Light or Overlay is the most controllable approach: lighten the dark side of the crease and darken the bright side at low brush opacity until the ridge flattens. Because it adjusts tone without resampling pixels, the weave underneath is untouched. Our guide to dodge and burn retouching covers the setup and brush settings in detail.
For heavier creases, frequency separation splits the image into a low-frequency layer holding tone and color and a high-frequency layer holding texture. You can smooth the crease's tonal shape on the low-frequency layer while the fabric's texture remains on the high-frequency layer. It is powerful and easy to overuse; blurring the low-frequency layer too broadly produces the flat, plastic look the brief warns against.
For deep, sharp creases on plain fabric, a clone or healing pass on the texture layer may be needed where the crease has physically distorted the weave. Keep these repairs small and sample from nearby fabric with the same grain direction.
The trade-offs between the two main methods are worth weighing before you start. In their favor:
- Dodge and burn keeps texture untouched because it only changes tone
- Frequency separation handles broad, heavy creases faster than dodge and burn alone
- Both methods remain fully reversible when kept on separate layers
Against them:
- Dodge and burn is slow on large areas and needs a steady hand
- Frequency separation, overused, removes the tonal variation that makes fabric look real
- Any crease method can erase drape folds that show fit if the retoucher does not stop in time
Keep the fabric honest
Different fabrics hold creases differently, and customers know it. Linen wrinkles; that is part of what linen is. Removing every wrinkle from a linen shirt shows a fabric that does not exist. Silk and satin have a sheen that shows every ripple; smoothing all of them removes the highlight structure that tells the eye this is silk. Knits stretch and relax, and their folds are soft. A useful rule is to reduce creases until they stop drawing the eye first, then stop. The garment should still look like it was worn or dressed, not rendered.
Outputs and checks
Outputs are a separate crease layer or layer group. Check at output size first, since that is how shoppers see the image, then at 100 percent to confirm the weave, knit or nap is still visible in every smoothed area. If a smoothed area looks like a flat color fill at 100 percent, it has gone too far.
Phase 6: Protect Fit, Shape and Construction Details
Goal: confirm the cleaned image still shows the garment's true silhouette, proportions and construction, and that any permitted correction is logged.
Why this phase is separate
Earlier phases can quietly change construction. A spot pass removes a thread and takes a few stitches with it. A crease pass softens the fold beside a pocket until the pocket edge disappears. A background cleanup on a ghost mannequin shot trims the side of a sweater a few pixels too far. Individually these are small, but a shopper zooming in on a product page sees them, and a garment that arrives with a pocket the photo did not show, or one missing the one it did, is exactly the kind of mismatch that drives returns.
Actions
Compare the retouched image with the unretouched original, side by side or by toggling all retouching layers, and walk through the garment's construction: collar or neckline, shoulder seams, sleeve seams, cuffs, side seams, pockets, plackets, closures, hems, labels that are meant to show, and any trims or embellishments. Each should be present, in the same place and the same shape as the original.
Then check the silhouette. Overlay the outline of the original at reduced opacity, or use guides at the widest and narrowest points, and confirm the garment's width at chest, waist and hem has not changed. Any difference should be either zero or a documented correction under the fit-change policy written in Phase 1. Changing garment shape to look slimmer is the first mistake the brief names, and it is the one most likely to cause customer disappointment.
Permitted corrections, such as straightening a hem twisted by a mannequin or restoring a collar flipped during handling, should be made with a clearly named layer and noted in the delivery log. When the correction involves reconstructing an interior neck or the back of a garment for invisible mannequin imagery, the techniques in our practical guide to ghost mannequin and apparel imagery apply, and the same honesty rules hold: rebuild what the garment has, never add what it lacks.
Shortcut: Save a silhouette check as an action. Duplicate the original, set it to Difference blend mode above the retouched layers, and any change in outline or construction shows as a bright edge against black. Anything bright that is not a removed defect or a logged correction needs a second look.
Edges and cutouts
Many apparel images are also cut out onto white or a brand color. Cleanup and cutting are separate jobs, but they interact at the garment edge: fuzzy knits, frayed denim hems and faux fur have edges that a hard path would falsely sharpen. Where a clean, hard edge is right, such as structured outerwear, a clipping path service for apparel produces it; where the edge is soft or furry, masking preserves the fibers that make the fabric recognizable.
Outputs and checks
Outputs are a construction-verified master and a delivery log entry for any fit correction. Check that the log exists even when it is empty; an explicit "no fit changes" note is part of the audit trail.
Phase 7: Consistency Across Variants, Angles and the Whole Range
Goal: a range that reads as one coherent set, where colorways differ only in color, angles of the same product agree with each other, and the cleanup level is even from the first style to the last.
Actions
Lay out every image of one style together: front, back, detail and any on-model shots, in every colorway. Look for three things. First, color: does the navy front match the navy back and the navy detail? Second, cleanup level: is one angle noticeably cleaner or smoother than the others? Third, construction: does the pocket shown in the front shot line up with its position in the side view?
Then zoom out to the range. Put a representative image of each style in one grid, as it will appear on a category page, and look for outliers: a white that is warmer than the others, a black that has more contrast, a knit that looks smoother than every other knit. Category pages show these inconsistencies more than any single product page does.
When the range includes on-model images, skin and garment should be treated to the same standard of restraint. Skin retouching has its own rules for color accuracy and texture, which deserve their own guide; the parallel is that both skin and fabric should keep texture and true color.
- Every angle of each colorway shares the same garment color values within the written tolerance
- Colorways of the same style differ only in color, not in contrast, crease level or cleanup level
- Construction details agree across front, back, side and detail views
- Range grid at category-page size shows no outliers in white point, black point or smoothness
- On-model and flat or mannequin shots of the same product are consistent in color
Outputs and checks
Outputs are a signed-off range grid and a short list of outliers corrected. The check is a second person reviewing the grid without having retouched any of it; fresh eyes see outliers faster.
Phase 8: Quality Control, Export and Handover
Goal: files that meet the channel's technical specification, masters that let anyone revisit the edit, and documentation that makes the next batch faster.
Quality control
Run a final inspection in two passes. At output size, look at the image as a shopper will: does anything draw the eye that should not? At 100 percent, spot-check areas where the most work was done: smoothed creases, large repairs, reconstructed edges. Confirm texture is visible in each.
Export
Export to the specification each channel requires, which typically covers pixel dimensions, file format, color profile, background color, margins and file size. Marketplaces and your own storefront may need different outputs from the same master, so build export presets rather than resizing by hand. Convert to the web's standard color space, usually sRGB, as part of export, and check a sample on a standard display to confirm color held through conversion.
Handover
Deliver the layered masters with a consistent layer structure (base, color, spots, creases, any logged corrections), the exported files named to the agreed convention, and the delivery log recording the color reference used, the tier assigned and any fit corrections. If something comes back from a customer complaint or a returns review, this log is what lets you see what was done and why.
Cleanup removes what does not belong to the product. The moment an edit changes what the customer will receive, it has stopped being cleanup.
A Realistic Schedule and Worked Example
To make the phases concrete, here is an illustrative project. It is not a client case; the numbers are assumptions chosen to show how the arithmetic works, and your own figures will depend on fabric, resolution, output count and team.
The illustrative brief
A clothing brand is launching a season of 120 styles, each shot in four angles (front, back, side, detail), for a total of 480 images. Triage in Phase 2 sorts them as follows: 50 percent light, 35 percent standard and 15 percent heavy. The team assumes, from its own past batches, about 5 minutes per light image, 12 minutes per standard image and 25 minutes per heavy image, including color and construction checks but not range QC.
| Tier | Share | Images | Assumed minutes each | Total hours |
|---|---|---|---|---|
| Light | 50% | 240 | 5 | 20.0 |
| Standard | 35% | 168 | 12 | 33.6 |
| Heavy | 15% | 72 | 25 | 30.0 |
| Total | 100% | 480 | 83.6 |
Add range consistency review and corrections (Phase 7), which the team budgets at about 10 percent of production time, or roughly 8.4 hours, and a revision allowance for client feedback of another 10 percent. The total comes to roughly 100 retouching hours. With two retouchers each producing around six focused retouching hours per day, that is about eight to nine working days of production, plus setup and handover.
Notice what the heavy tier does to the numbers. At 15 percent of images, it takes 36 percent of production hours. If better steaming on set could move half of those 72 images into the standard tier, the saving would be 36 images times 13 minutes, about 7.8 hours. That is the case for sharing the triage results with the photography team, not just the retouchers. For turning figures like these into staffing plans, see our guide to planning retouching capacity.
- Day 1 Cleanup standard confirmed or updated; two-person calibration test on three sample images; ambiguities resolved.
- Day 2 Intake and triage of all 480 images; color references recorded; heavy-tier images reviewed for reshoot decisions.
- Days 3 to 4 Color and tone locked for all colorways; presets built and applied; first 20 styles fully retouched as a pilot and sent for client approval.
- Days 5 to 10 Main production of the remaining styles, with daily spot checks of completed images against the standard.
- Day 11 Range consistency review on category-page grids; outliers corrected.
- Day 12 Client feedback round and revisions.
- Day 13 Final QC, export to each channel, handover of masters and delivery log.
The pilot on days 3 to 4 is the most valuable step in the schedule. Sending 20 finished styles for approval before main production means that any disagreement about crease level, color or smoothness costs 20 styles of rework, not 120.
Common Failure Points and How to Catch Them
The brief names four mistakes to avoid. Each has a recognizable signature and a quick check that catches it.
| Mistake | How it shows up | How to catch it | Phase that prevents it |
|---|---|---|---|
| Changing garment shape to look slimmer | Waist or sides pulled in; hems longer; sleeves narrower than the product | Difference-mode overlay against the original; measure widths at chest, waist and hem | Phase 6 |
| Smoothing fabric into plastic | No visible weave or knit at 100 percent; flat tone across large areas; missing sheen structure on satin | 100 percent inspection of every smoothed area; compare with an untouched patch of the same fabric | Phase 5 |
| Color shifts between variants | Colorways that look different in contrast, not just hue; one angle warmer than the rest | Sampled values per colorway and angle; range grid review | Phases 3 and 7 |
| Removing features such as seams or pockets | Missing stitch lines, softened pocket edges, lost buttons or trims | Construction walk-through against the unretouched original | Phases 4 and 6 |
Two further failure points deserve mention. The first is inconsistent effort across a long batch: retouchers are more careful on the first styles than the last. Daily spot checks during production, as in the schedule above, catch this. The second is losing the original. Always keep the unretouched capture alongside the master; without it, the construction and silhouette checks in Phase 6 are impossible.
The accuracy rules do not relax because an image is for advertising rather than a product page. The FTC's framework on deception, available through the Federal Trade Commission, looks at whether a representation is likely to mislead a reasonable consumer about something material. For apparel, fit, color and construction are material. If an edit would change what a shopper believes they are buying, it needs a documented, legitimate reason or it should not be made.
When to Scale Apparel Cleanup Retouching Beyond Your Team
The brief's guidance is straightforward: bring in help when apparel catalogs need consistent cleanup. The signal is rarely a single difficult image. It is volume and consistency together: a seasonal launch of hundreds of styles, a marketplace expansion that needs every existing image re-exported to a new spec, or a range where in-house retouchers are also responsible for campaign work and cannot hold one standard across both.
What to hand over
An external team can only be as consistent as the brief it receives. Hand over the cleanup standard from Phase 1, the color references from Phase 2, a set of approved before and after examples, the export presets and the delivery log format. Ask for a paid pilot on a representative mix of tiers before committing a full season. Our guides to choosing a retouching partner and outsourcing retouching cover how to evaluate a partner's quality control, turnaround and security.
Questions to ask a partner
- How do you decide between retouching and recommending a reshoot for heavily creased garments?
- How do you verify garment color, and against what reference?
- What is your process for checking construction and silhouette against the original?
- How do you keep cleanup level consistent across retouchers on a large batch?
- Will you deliver layered masters and a log of any fit corrections?
A partner who answers these specifically, with examples, is a partner who already works this way. If you want to see how a studio handles this work end to end, our image editing and retouching services page outlines the scope, and the same standards apply to related product photography retouching for accessories and footwear shot alongside the apparel range.
In short, apparel cleanup retouching done properly removes what does not belong to the garment and keeps everything that does. Work in phases: standard first, color before cleanup, spots before creases, construction checks before export, and range review before handover. Keep texture visible, keep color matched to the sample, and log every fit correction. That sequence produces product images that look professional and match what arrives in the box.
Where this comes from
- Adobe Help Center — Photoshop User Guide
- Federal Trade Commission — FTC Policy Statement on Deception
The figures and practices above come from the sources listed.
Working on something like this?
We take on Image Editing & Retouching work for teams who want it done once, properly. Tell us what you are building and we will tell you honestly whether we are the right studio for it. Start a project.
Where to go next
Spotted something wrong? Report an error on this page. We correct on the page and say what changed.