A Practical Guide to Product Photography Setup
Learn how to build a product photography setup you can repeat exactly: camera position, lighting, a clean white background, color targets and tethered review.
 Imogen Clarke

A product photography setup is the physical arrangement of lights, modifiers, background, support surface and camera used to photograph products the same way, every time. It includes the obvious equipment, but also the measurements that connect it: how far each light sits from the product, at what height and angle, at what power, where the camera is locked off, and which settings it uses. A good setup is less a collection of gear than a recipe that can be written down and followed.
It matters most to anyone responsible for a catalog rather than a single hero image: ecommerce managers, brand teams, marketplace sellers, in-house studio staff and the agencies that support them. Shoppers compare products side by side on a category page, and they notice when one pair of shoes is warmer, darker or shot from a slightly different height than the next. Consistency across a catalog is worth more than brilliance on any single shot, and consistency comes from a setup that can be reproduced exactly, next week, next season, or in a different studio.
This field guide moves from fundamentals to advanced practice. It starts with the space and the camera, works through lighting, background and color control, then covers tethered capture, documentation, and scaling a setup across ranges, people and locations. Each section is written so you can act on it, whether you are building a first tabletop studio or tightening up a process that already runs every day.
- Goal A setup that can be recorded, rebuilt and repeated exactly
- Soft light Larger, closer light sources give softer shadows
- Clean white Light the background separately from the product
- Review Tether to a computer and judge images at full size
- Color Shoot a color reference target with every set
- Lock Fix camera settings and position for the whole range
Planning the Space Before You Buy Anything
Most setup problems start with the room, not the equipment. A space that is too small forces lights too close to the background, spill from one light contaminates another, and nothing can stay in place between sessions. Before spending money, plan the space around the largest product you will regularly shoot and the working distances that product needs.
Size and layout
For small goods such as jewelry, cosmetics and accessories, a sturdy table and a few square yards of floor space around it can be enough. For footwear, small appliances and bags, you need room for the camera to sit well back from the product with a longer lens, plus space behind the product for the background to be lit on its own. For furniture or apparel on a mannequin, you need significant depth, often the length of a small room, because the product must sit several feet in front of the background to keep background light from wrapping onto it.
A useful planning rule: sketch the product, the background and the camera in a line, then add lights on either side and behind. If a light cannot be placed where the plan needs it without hitting a wall, the room is too small for that product category, and you should either choose a different space or accept a simpler lighting plan for those items.
Controlling stray light
Window light and overhead fixtures change during the day and mix different color temperatures into your images. Block windows with blackout material, switch off room lighting during capture, and paint or cover nearby walls in a neutral, non-reflective finish. A white wall a few feet from a glossy product will show up as a reflection; a colored wall will cast its color. If you do want to work with daylight, treat it as its own discipline, as covered in our guide to natural light product photography, and accept that exact repeatability becomes much harder.
Power, cabling and permanence
If the setup can stay built, leave it built. Tape floor positions for stands, table legs and the camera tripod. Route cables along the floor edges where they will not be kicked. A setup that is torn down and rebuilt daily will drift, no matter how carefully it is documented.
Camera, Lens and Support: The Fixed Point of the Setup
The camera position is the reference everything else is measured from. If it moves, every product shot afterward has a slightly different perspective, crop and scale, and those differences are exactly what a customer notices when scrolling a category page.
Choosing a lens
Short focal lengths used close to a product exaggerate perspective: the nearest parts look larger and edges appear to lean. For most packshots, a short telephoto on a full-frame camera, roughly in the 70 to 105mm range, or an equivalent on a crop sensor, gives natural proportions while leaving working room for lights. Macro lenses in this range are popular because they also focus close for detail shots without changing lens. For very small items, a dedicated macro setup is its own discipline; our piece on macro product photography covers magnification, focus stacking and depth of field in detail.
Locking the camera
Use a heavy tripod or, better, a camera stand on a fixed column. Record the height of the lens center above the floor or table, the horizontal distance to the product's front edge, and the camera tilt. A geared head makes small, repeatable adjustments far easier than a ball head. Once set for a range, the camera should not move until the range is finished.
Locking exposure settings
Shoot in manual mode. Set ISO at the camera's base value, choose an aperture that gives enough depth of field for the product at your working distance, and set a shutter speed at or below your flash sync speed if you use strobes. Fix white balance to a specific value rather than auto, and turn off any in-camera processing that varies from frame to frame. Autofocus can be used to set focus on the first item, but for a range of similar-sized products manual focus at a fixed distance is often more consistent.
Tip: Photograph the camera settings screen and the tripod head at the start of each range, and store those images with the session. It takes seconds and removes any doubt later about what the settings were.
Lighting Fundamentals for a Product Photography Setup
Lighting decides how a product's shape, surface and material read in the picture. The core principles are few, but every setup decision follows from them.
Size and distance control softness
Larger, closer light sources give softer shadows. What matters is the size of the light relative to the product, not its absolute size. A large softbox placed close to a small product wraps light around it and produces gentle, graduated shadows. The same softbox pulled far back behaves like a smaller source and produces harder, more defined shadows. This is why diffusion panels and scrims are placed close to the product rather than close to the light.
Distance also controls brightness and falloff
Light intensity falls off with the square of distance. Double the distance from light to product and you get roughly a quarter of the light, which is two stops. Practically, this means small changes in light position at close range produce large exposure changes, and it is one reason light positions must be measured, not estimated. It also means a light close to the product falls off quickly across its depth, so the back of a long product may be noticeably darker than the front; moving the light back and increasing power evens this out at the cost of some softness.
A basic three-part plan
- Key light. The main light that defines form, usually a large softbox or diffused panel to one side and slightly above the product.
- Fill. A second, weaker light or a white reflector on the opposite side, reducing shadow density without eliminating shadows entirely.
- Background lights. One or two lights aimed only at the background, controlled independently, to produce a clean, even white or tone.
Additional accent or rim lights can separate dark products from dark backgrounds or define edges on glass. Add them only when a specific problem needs solving, because each added light is another variable to document and reproduce.
Continuous light or flash
Both work. Strobes deliver short, powerful bursts that freeze movement and keep the studio cool; continuous LED panels let you see exactly what the light is doing and suit video. Whichever you choose, the priority for a catalog is consistency: flash output and color should be stable from shot to shot, and continuous sources should have accurate, consistent color rendering. Mixing light types in one setup invites color mismatch between key and fill.
Diffusion, Reflectors and Controlling Surfaces
Modifiers turn raw light into the quality of light the product needs. Choosing and positioning them carefully matters as much as the lights themselves.
Softboxes, scrims and panels
Softboxes are the standard way to enlarge a light source. Scrims, which are frames of diffusion fabric placed between the light and the product, create a very large, soft source close to the subject and can be positioned independently of the light. For reflective products a large scrim is often the most useful single tool, because it produces a clean, even highlight across the surface instead of a bright hotspot.
Reflectors and flags
White cards bounce light back into shadows. Black cards, often called flags or negative fill, absorb light and deepen shadows or add dark edges to glass and polished metal. Silver reflectors add a harder, brighter fill. Clamp them to stands rather than having someone hold them; handheld reflectors are never in the same place twice.
Material-specific considerations
| Product surface | Main challenge | Typical setup approach |
|---|---|---|
| Matte (textiles, paper, wood) | Showing texture without flattening it | Key light from a lower side angle to rake across the surface; moderate fill |
| Glossy plastic and lacquer | Hotspots and room reflections | Large scrims close to the product; black flags to shape edges |
| Polished metal | Reflects everything around it | Enclose the product with diffusion; use black and white cards to draw edges |
| Clear glass and liquids | Defining edges and transparency | Backlight through diffusion; dark or light edge lines from flags |
| Dark products on white | Losing shape into shadow | Stronger fill, rim lights for separation; keep background exposure separate |
| White products on white | Product merging with background | Keep background only just to white; use gentle shadow to define edges |
Reflective and transparent products take the most setup time, and specialized categories have their own habits. Our guides to cosmetics and beauty product photography and beverage photography go further into these materials.
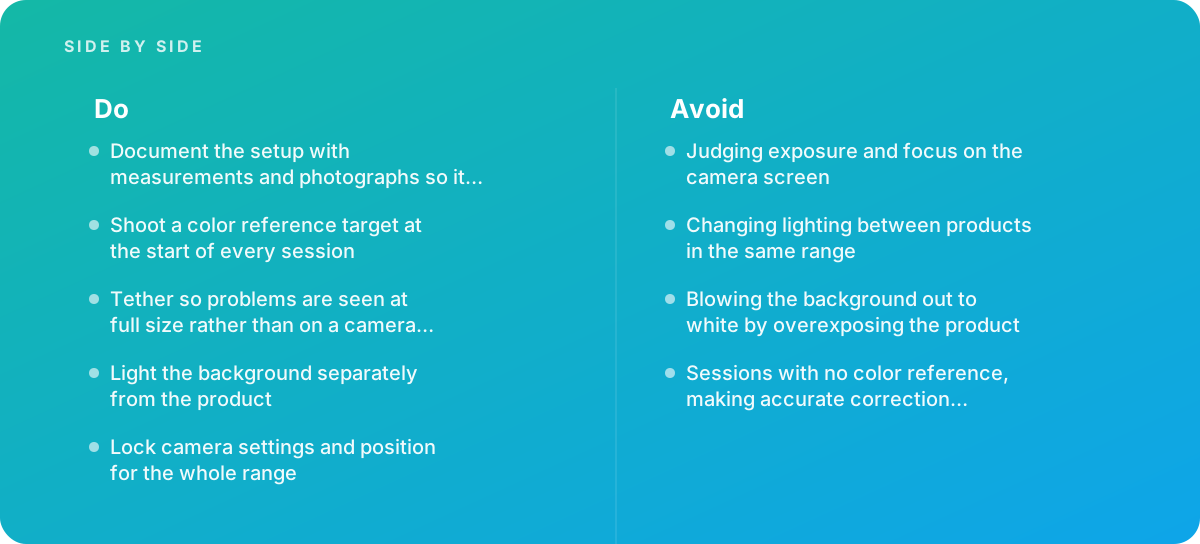
Warning: Do not re-light between products in the same range to make each one look its best individually. Changing lighting between products in the same range is one of the fastest ways to break catalog consistency. If an item genuinely cannot be shot with the range setup, treat it as an exception, document the variant setup separately, and apply it to every similar item.
Backgrounds and Achieving a Clean White
A consistent background is what makes a grid of product images look like one catalog. Many marketplaces and retailers require or strongly prefer pure white, so it is worth understanding how to achieve it properly.
Light the background separately
The background should be lit by its own lights, with their own power settings, so it can be brought to white independently of the product exposure. A common approach is two lights aimed at the background from either side, or one light behind a translucent sweep. Increase background exposure until it just reaches white in the image, and no further. Pushing it well beyond white creates glare that bounces back onto the product and softens its edges.
Why overexposing the product is the wrong fix
The tempting shortcut, when a background looks gray, is to raise the overall exposure until it goes white. Blowing the background out to white by overexposing the product costs detail in highlights, washes out color, and flattens form. It also varies with each product's tone, so a dark product and a light one end up with different exposures and the catalog loses consistency. Separate control of product and background exposure avoids all of this.
Distance between product and background
The farther the product is from the background, the less background light spills onto it, and the easier it is to keep the product's edges crisp. A sweep, where the background curves smoothly from vertical into the tabletop, removes the horizon line and is standard for tabletop work. Where a shadow or reflection under the product is wanted, a white acrylic sheet on the table gives a controlled reflection; otherwise a matte surface keeps the base clean.
Tip: Check the background with the camera's or capture software's highlight warning and a numeric readout at several points across the frame, not just in the center. Corners often fall off first, and an uneven background shows up clearly when images sit side by side on a white web page.
Color Control: Targets, Profiles and White Balance
Color accuracy is where catalog photography meets the returns desk. If a shopper receives a sweater that is a different shade from the picture, the image has failed, however attractive it looked.
Shoot a color reference at the start of every session
Photograph a color reference target in the product position, under the session lighting, before the first product. Many studios also reshoot it at intervals during a long day or whenever anything in the setup changes. The target gives you a known reference for setting white balance, checking exposure and, with suitable software, building a custom camera profile for that lighting. Sessions with no color reference make accurate correction guesswork. The International Color Consortium publishes the ICC profile specification and background on color management, which underpins how profiles move color accurately between camera, editing software and display.
From target to corrected files
- Capture the target at the start of the session with locked settings.
- Set white balance from a neutral patch on the target in your raw processing or capture software.
- Optionally, build a custom profile from the target for this camera and lighting combination.
- Apply the same white balance and profile to every image in the session.
- Check a few products against the physical items under controlled viewing light.
Calibrated displays and viewing conditions
Correction is only as reliable as the screen it is judged on. Calibrate editing displays regularly with a hardware device and keep the room lighting around the display consistent. Where physical products are compared against the screen, use standardized viewing light rather than whatever lighting the office happens to have. Relevant viewing condition standards are published through ISO, which maintains a range of standards for photography and graphic technology.
Warning: Auto white balance will shift from product to product depending on the colors in the frame. A red product and a blue product shot under identical light will come out with different color casts. Fix white balance to a measured value from the target, and never let the camera decide per shot.
Tethered Capture and Reviewing at Size
Tethering means connecting the camera to a computer so every frame appears on a large, calibrated screen seconds after it is taken. For catalog work, it is not a luxury.
Why the camera screen is not enough
Judging exposure and focus on the camera screen is one of the most common setup mistakes. A small screen shows a heavily downsampled, processed preview; a slightly soft focus point, a speck of dust on a lens surface or a faint background gradient can be invisible on it and obvious at full size. Tethering means problems are seen at full size rather than on a camera screen, while the product is still on set and the fix takes a minute rather than a reshoot.
What a tethered workflow gives you
- Immediate review at 100 percent magnification for focus and dust.
- Numeric readouts of background and product values at any point in the frame.
- Overlay guides so each product sits in the same position and occupies the same proportion of the frame.
- Automatic application of the session's white balance, profile and naming conventions as images arrive.
- Instant comparison of the current shot against a reference image from earlier in the range.
Professional capture applications support this workflow directly. The Capture One documentation covers tethered shooting, live view, overlays and applying adjustments on import, which is a good model of what to expect from any tethering tool you evaluate.
Naming and file handling
Set file naming at capture so each image carries the product SKU, view and a sequence number. Renaming afterward invites errors. Keep raw files, the session's color reference frame and the setup documentation together in one session folder.
Diagnosing Common Setup Problems Before They Reach the Catalog
Even a well-documented setup produces faults. The advantage of a fixed, measured set is that faults become easy to trace, because only a few things can have changed. When an image looks wrong on the tethered screen, work through the likely causes in a set order rather than adjusting lights at random.
Inconsistent brightness between products
If one product looks brighter or darker than its neighbors, first confirm that camera settings have not changed, then check light output. Flash units can vary slightly between pops, especially at very low power settings or when recycling is not complete. Allow full recycle time between frames, and avoid working at the extreme bottom of a light's power range where consistency is often weakest. If a product's own tone makes it look different, that is correct: the aim is identical exposure, not identical appearance.
Shadows that change shape
A shadow that is longer, harder or pointing in a different direction than on the reference image almost always means a light, modifier or reflector has moved. Compare the current frame with the reference at the same magnification and look at the catchlights on any glossy surface; they reveal the shape and position of the light sources more clearly than the shadow does. Check the tape marks on the floor and the heights recorded on the setup sheet.
Edges softened or haloed
A glowing fringe around the product on a white background usually means the background is too bright and light is bouncing or flaring back toward the lens. Reduce background power until it just reaches white, add flags to stop background lights hitting the lens, and increase the distance between product and background if the room allows. A lens hood or a black card above the lens can also cut flare.
Color drifting during a long session
If later images look warmer or cooler than early ones, check whether room lighting has been switched on, whether daylight is leaking in, or whether a continuous light has been changed. Reshoot the color target and compare it with the one from the start of the session. If the two differ, the setup has changed and the cause needs finding before shooting continues; correcting the difference in post-production hides the problem instead of solving it.
Scale and position creeping
Products that gradually get larger, smaller or drift toward one side of the frame suggest the camera has been nudged or products are no longer placed on their marks. Capture software overlays make this obvious. Re-check the camera height and distance against the setup sheet, and re-tape product positions if marks have worn. Consistent positioning also underpins good framing decisions, which our guide to composition for product photography explores further.
Documenting the Setup So It Can Be Rebuilt
Repeatability is the whole point. The setup must be recordable and rebuildable, by you on a different day or by someone else in a different studio.
What to record
- A plan-view diagram showing product, background, camera and every light and modifier, with distances measured in consistent units.
- Heights of each light center and the camera lens center, and the angle of each light relative to the product.
- Light make, model, modifier and power setting, plus any gels or grids.
- Camera body, lens, focal length, aperture, shutter speed, ISO, white balance and focus distance.
- Background material, distance from product, and background light power.
- Photographs of the whole set from at least two angles, plus close-ups of any critical positioning.
- The reference image of a representative product and the color target frame.
Store this with the session files and in a shared location that anyone rebuilding the setup can find. A one-page setup sheet per range, updated whenever the range is reshot, is the minimum. Product preparation standards belong alongside it: steaming, cleaning, stuffing and fitting procedures affect consistency as much as lighting does, as our guide to product preparation for shoots explains.
Worked Example: A Repeatable Footwear Setup
Consider a hypothetical footwear brand shooting a range of 60 sneaker styles, each in a side profile, a three-quarter front view, a back view and a sole view, on pure white. The brand adds new colorways every season and wants them to sit seamlessly beside last season's images.
The setup
The product sits on a white matte sweep, roughly 5 feet in front of a white background wall. Two background lights with reflectors are positioned either side of the product, behind it, aimed at the wall and flagged so they do not hit the shoe. The key light, a large rectangular softbox, sits to camera left at about 45 degrees, a little above the shoe and around 3 feet from it. A white V-flat on camera right provides fill. A strip light low behind the shoe adds a subtle rim to separate dark soles from the sweep. The camera, on a fixed stand, uses a 100mm macro lens on a full-frame body, positioned about 6 feet from the shoe at the height of the midsole, with a slight downward tilt for the three-quarter view.
The settings and checks
ISO is set at base. The aperture is chosen for enough depth of field to hold the toe and heel in focus at this distance, confirmed by checking both ends at 100 percent on the tethered screen. White balance is set from the color target at the start. The background exposure is raised until it reads just at white across all four corners, then locked. Each shoe is placed on tape marks for each view, and an overlay in the capture software confirms scale and position.
Why it holds up
Next season, a different photographer rebuilds the set from the setup sheet and photos, shoots the color target, and compares the first new shoe against a reference image from the previous season on screen. Small discrepancies in light position show up immediately as differences in highlight shape or shadow density and are corrected before the range starts. Nothing about this requires special equipment; it requires measurements and discipline. Delivered sizes and crops then follow the storefront's requirements, as described in our guide to product image sizes for online stores.
Scaling a Setup Across Ranges, People and Locations
A single photographer shooting a single range can keep much of the setup in their head. Once several people, several ranges or several studios are involved, the setup has to become a formal standard.
Standard sets by product category
Define one documented setup for each product category that shares size and material characteristics: small reflective goods, apparel on a form, footwear, boxed products, and so on. Each standard includes the setup sheet, reference images, crop and positioning rules and the approved retouching steps. When a new product arrives, it is assigned to a category and shot on that standard.
Reproducing a setup in another location
Reproducing a setup elsewhere is harder than it sounds. Different rooms bounce light differently, different light units vary in output and color even at the same nominal power, and different camera bodies render color differently. To close the gap, use the same models of light and modifier where possible, shoot the color target and a physical reference product in both locations, and compare the results side by side at full size before starting production. Adjust power and position at the new location until the reference product matches. Shoots outside a studio bring further variables, covered in our guide to on-location product shoots.
Training and handover
The setup sheet should be complete enough that a competent photographer who has never seen the set can rebuild it. Test that by asking one to try. Every question they ask is a gap in the documentation.
When to bring in help
Bring in help when a catalog must be shot consistently over time, when color accuracy is affecting returns, or when a setup must be reproduced in another location. These are the situations where the cost of inconsistency compounds, and where an experienced studio's standards and documentation habits save the most. Our product photography service is built around documented, repeatable sets for exactly these cases.
- Key light
- The main light in a setup, which defines the product's shape and the direction of its shadows.
- Fill
- Light or reflected light added to the shadow side to control contrast without removing shadows entirely.
- Scrim
- A frame of diffusion material placed between a light and the product to create a larger, softer source.
- Flag
- A black card or panel used to block light or add dark reflections and edges to shiny products.
- Sweep
- A background that curves smoothly from vertical to horizontal, removing the visible horizon line behind the product.
- Tethering
- Connecting the camera to a computer so images appear on a large screen immediately for review at full size.
- Color reference target
- A chart of known color patches photographed under the session lighting, used to set white balance and build profiles.
- Camera profile
- A description of how a particular camera renders color under particular light, used to translate its raw data into accurate color.
Verdict A strong product photography setup is defined less by the equipment than by the fact that it can be written down and rebuilt exactly. Lock the camera, light the background separately, control softness with source size and distance, shoot a color target every session, tether so you judge at full size, and record everything. Do that and every new product slots into the catalog as if it were shot the same afternoon as the rest.
Where this comes from
- Capture One — Tethered capture documentation
- International Color Consortium — Color targets and profiling
- ISO — Photographic standards
The figures and practices above come from the sources listed.
Working on something like this?
We take on Photography & Product Visuals work for teams who want it done once, properly. Tell us what you are building and we will tell you honestly whether we are the right studio for it. Start a project.
Where to go next
Spotted something wrong? Report an error on this page. We correct on the page and say what changed.